
1. تعارف
This manual provides essential information for the safe and efficient operation of your Technaxx Wireless CarPlay & Android Car Monitor TX-361. Please read this manual thoroughly before using the device and retain it for future reference. The TX-361 is designed to integrate modern smartphone connectivity, including Apple CarPlay and Android Auto, into your vehicle without requiring a complex car radio replacement. It also features an integrated DAB digital radio for enhanced audio experience.
2. حفاظتی معلومات
- ڈیوائس کو ہمیشہ ذمہ داری سے اور مقامی ٹریفک قوانین کے مطابق چلائیں۔ ڈسٹرب ڈرائیونگ حادثات کا باعث بن سکتی ہے۔
- Do not attempt to disassemble or modify the device. This may void the warranty and pose safety risks.
- ڈیوائس کو انتہائی درجہ حرارت، براہ راست سورج کی روشنی اور نمی سے دور رکھیں۔
- اس بات کو یقینی بنائیں کہ آلہ محفوظ طریقے سے نصب ہے اور آپ کی راہ میں رکاوٹ نہیں ڈالتا ہے۔ view یا گاڑی کے کنٹرول میں مداخلت کریں۔
- صرف فراہم کردہ پاور کیبل اور لوازمات استعمال کریں۔
- If the device malfunctions, disconnect it from the power source and contact customer support.
3. پیکیج کے مشمولات
تصدیق کریں کہ نیچے دی گئی تمام اشیاء آپ کے پیکیج میں شامل ہیں:
- DAB 7-inch CarPlay with Touch Screen TX-361
- Power Supply (USB-A to USB-C, 1.5m cable)
- AUX Cable (1m)
- ڈی اے بی اینٹینا
- Holder (Mounting Bracket)
- صارف دستی
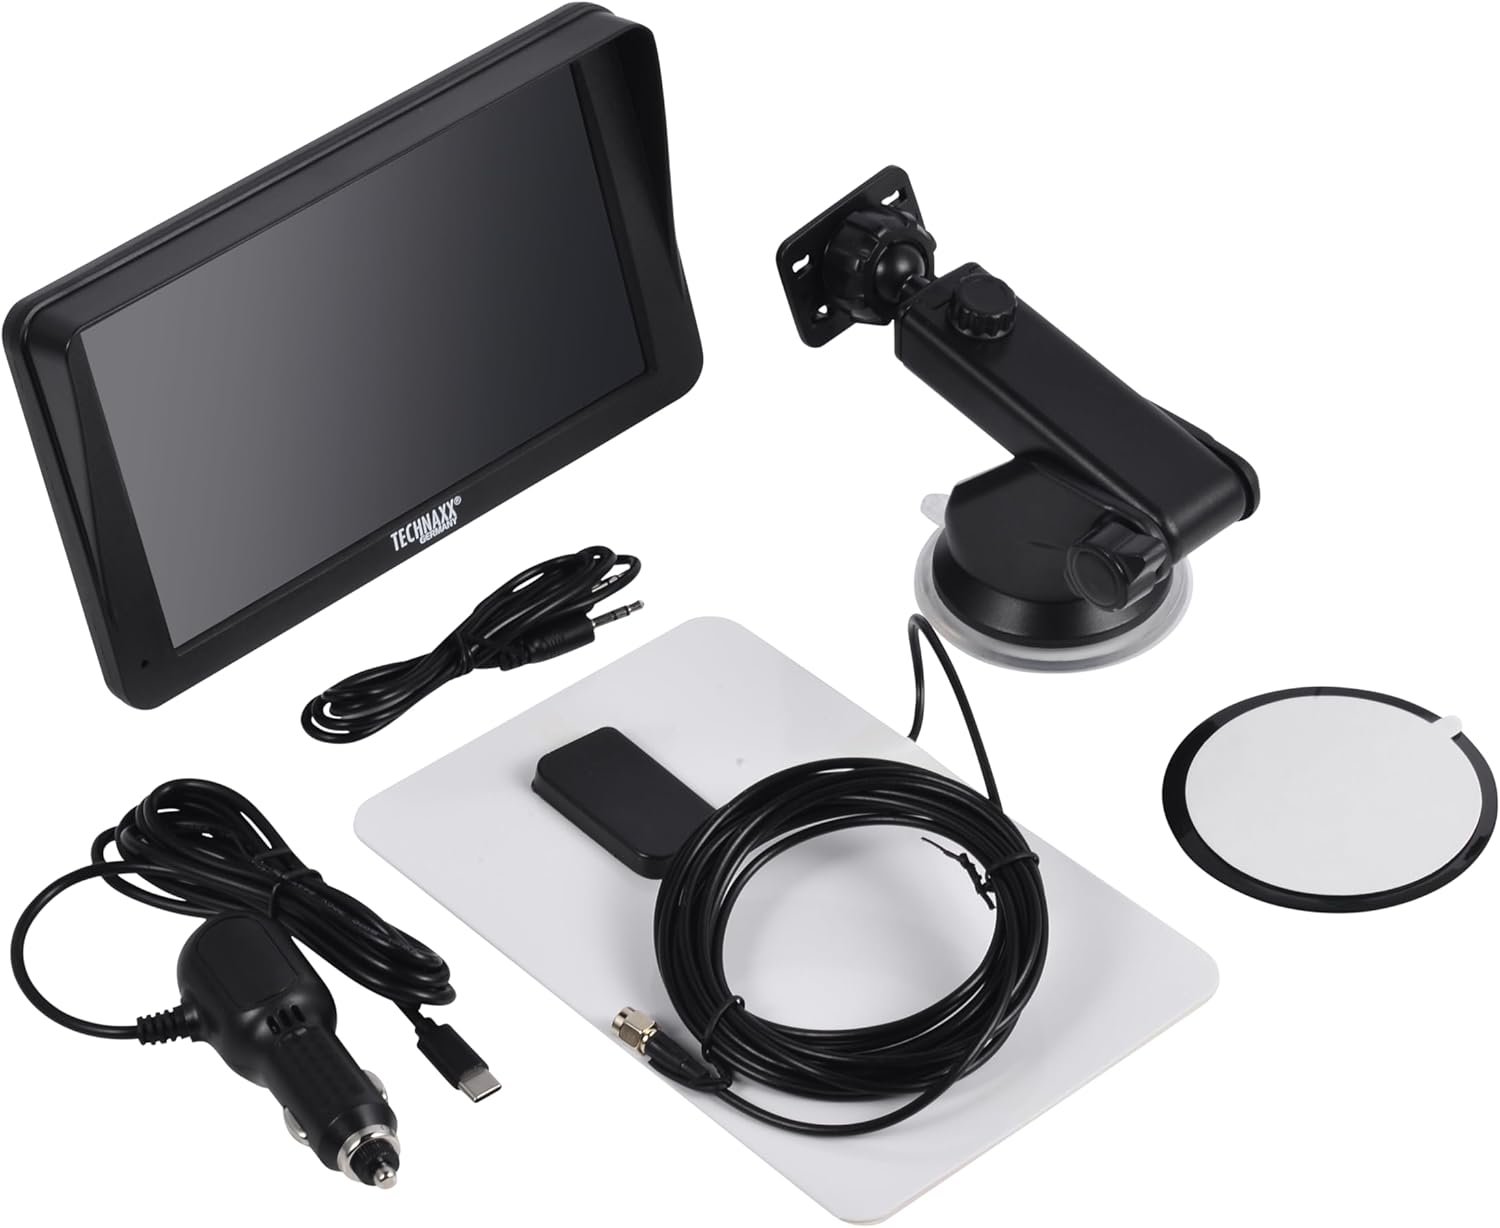
Image: All components included in the Technaxx TX-361 package, neatly laid out.
4. پروڈکٹ ختمview
Familiarize yourself with the main components of your TX-361 monitor.
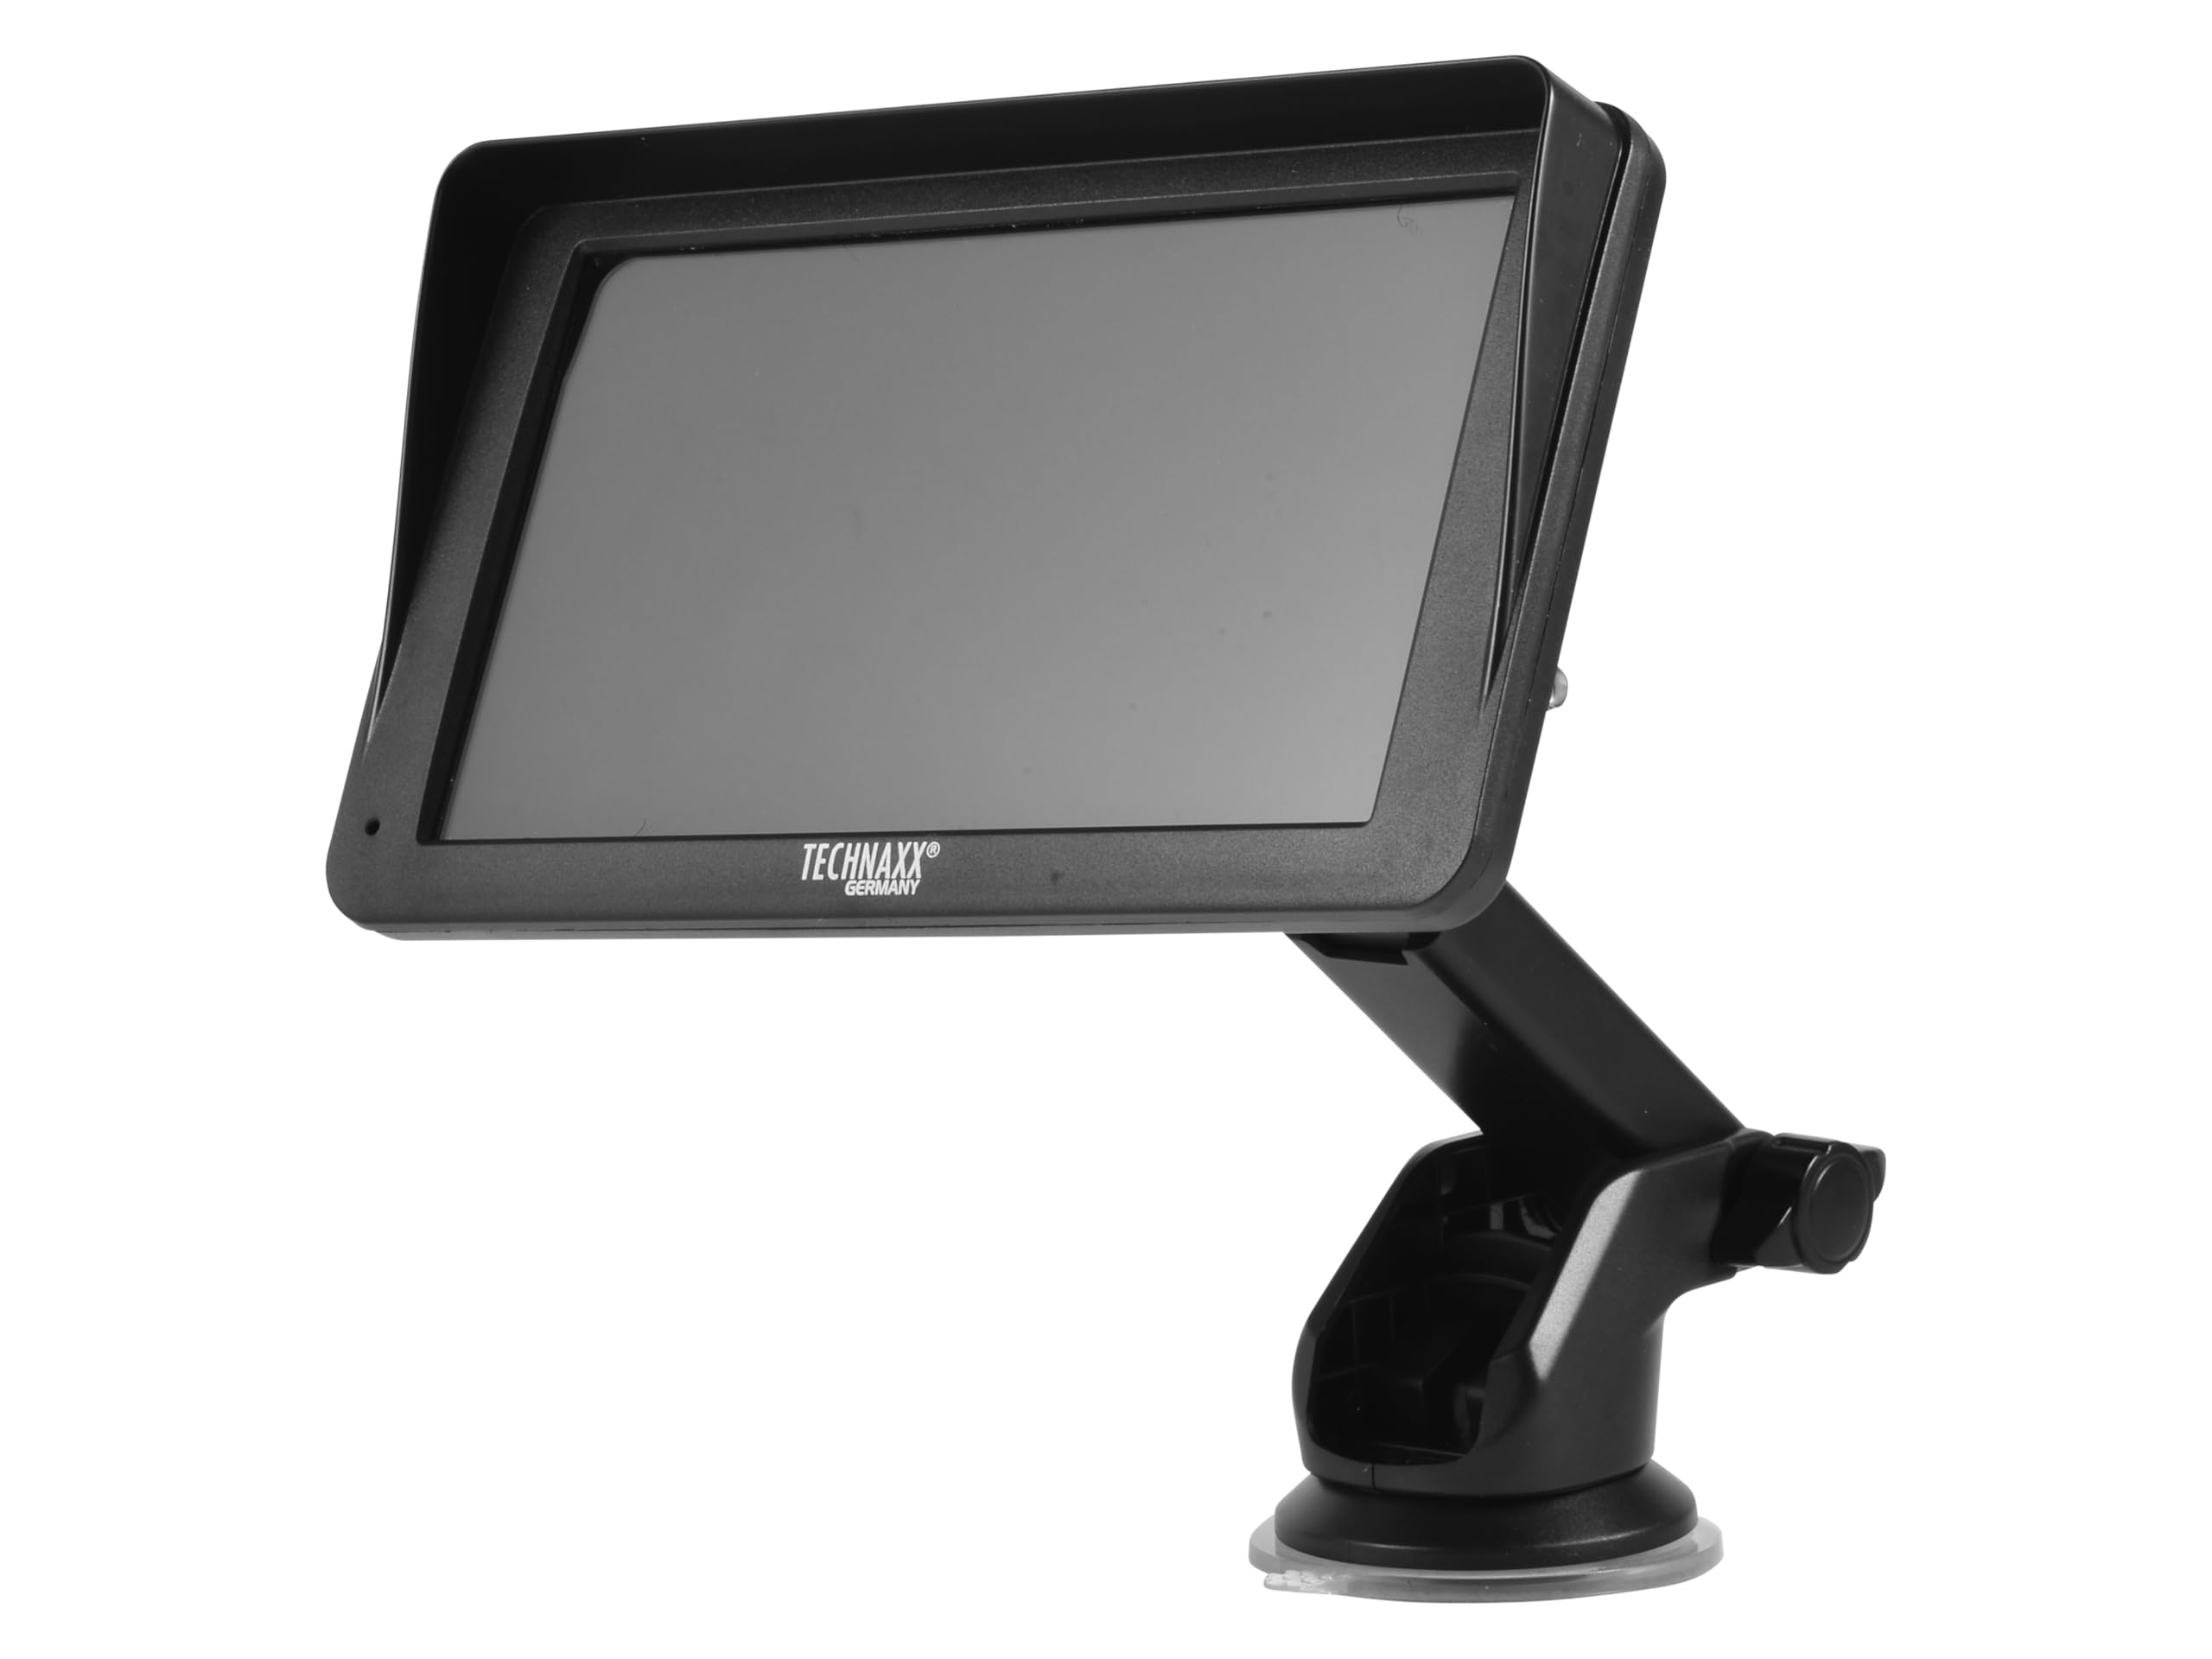
تصویر: سامنے view of the TX-361 monitor with its 7-inch display and 'TECHN AXX GERMANY' branding, attached to the adjustable mounting stand.

تصویر: پیچھے view of the TX-361 monitor, highlighting the ventilation grilles and the attachment point for the mounting bracket.

تصویر: تفصیلی view of the right side of the TX-361 monitor, showing the power button, reset button, USB-C power input, AUX output, and USB-A port.
4.1. ڈیوائس کے اجزاء
- 7 انچ کیپسیٹیو ٹچ اسکرین: Main display for all functions.
- پاور بٹن: اوپر دائیں جانب واقع ہے۔
- ری سیٹ بٹن: Small pinhole button for system reset.
- USB-C پورٹ: پاور ان پٹ کے لیے۔
- AUX آؤٹ پٹ: 3.5mm jack for wired audio transmission.
- USB-A پورٹ: For media playback or charging external devices.
- DAB Antenna Input: Connector for the external DAB antenna.
- مربوط اسپیکر: براہ راست آڈیو پلے بیک کے لیے۔
5. سیٹ اپ
5.1. ڈیوائس کو لگانا
The TX-361 can be mounted on your vehicle's windscreen or dashboard using the provided holder.
- Attach the monitor to the mounting bracket.
- For Windscreen Mounting: Clean the desired area on the windscreen. Press the suction cup firmly against the glass and engage the lever to secure it.
- For Dashboard Mounting: Clean the desired area on the dashboard. If necessary, use the adhesive disc provided for a more secure attachment point for the suction cup. Press the suction cup firmly and engage the lever.
- زیادہ سے زیادہ کے لیے مانیٹر کے زاویہ کو ایڈجسٹ کریں۔ viewing without obstructing your driving view.

Image: The TX-361 monitor securely mounted on a car dashboard, showing its position relative to the driver's view.

Image: The TX-361 monitor mounted on a car windscreen, demonstrating an alternative placement option.
5.2. پاور کنکشن
- Connect the USB-C end of the power cable to the USB-C port on the monitor.
- Plug the USB-A end of the power cable into the provided 12V/24V cigarette lighter adapter.
- Insert the cigarette lighter adapter into your vehicle's 12V/24V power socket. The device will power on automatically or can be turned on using the power button.
5.3. DAB Antenna Connection
For optimal DAB radio reception, connect the included DAB antenna:
- Connect the DAB antenna cable to the dedicated DAB antenna input on the monitor.
- Mount the DAB antenna on your windscreen or another suitable location, ensuring it has clear line of sight for best signal reception.
6. آپریٹنگ ہدایات
6.1. پر / آف پاور
- پاور آن: The device typically powers on automatically when connected to the vehicle's power. If not, press and hold the power button on the top right side.
- بجلی بند: Press and hold the power button until the device shuts down. A short press will turn the screen off/on.
6.2. Initial Setup and Smartphone Connection
The TX-361 supports wireless Apple CarPlay and Android Auto via Wi-Fi and Bluetooth 5.0.
- یقینی بنائیں کہ آپ کے اسمارٹ فون کا Wi-Fi اور بلوٹوتھ فعال ہیں۔
- On the TX-361 monitor, navigate to the CarPlay or Android Auto section.
- The monitor will display a Bluetooth name. On your smartphone, search for and connect to this Bluetooth device.
- Once connected via Bluetooth, the device will prompt you to enable Wi-Fi for CarPlay/Android Auto functionality. Confirm the connection on your phone.
- After successful pairing, Apple CarPlay or Android Auto will launch automatically on the monitor.
6.3. ٹچ اسکرین آپریشن
The 7-inch capacitive touchscreen allows for intuitive control:
- تھپتھپائیں: آئٹمز منتخب کریں یا کارروائیوں کی تصدیق کریں۔
- سوائپ: Navigate through menus or lists.
- چوٹکی سے زوم: (Where supported, e.g., in navigation apps) Adjust map zoom levels.
6.4. DAB Digital Radio
To use the integrated DAB digital radio:
- Ensure the DAB antenna is properly connected.
- From the main menu, select the 'DAB Radio' option.
- The device will automatically scan for available DAB stations.
- فہرست سے اپنا مطلوبہ اسٹیشن منتخب کریں۔
6.5. ایف ایم ریڈیو
For traditional FM radio reception:
- From the main menu, select the 'FM Radio' option.
- اسٹیشنوں کو اسکین کرنے یا فریکوئنسی کو دستی طور پر ٹیون کرنے کے لیے آن اسکرین کنٹرولز کا استعمال کریں۔
6.6. آڈیو آؤٹ پٹ کے اختیارات
The TX-361 offers several ways to transmit audio to your vehicle's sound system:
- مربوط اسپیکر: Audio will play directly from the monitor's built-in speaker.
- AUX کیبل: Connect the provided 3.5mm AUX cable from the monitor's AUX output to your car's AUX input. Select 'AUX' as the input source on your car radio.
- ایف ایم ٹرانسمیشن: Select an unused FM frequency on the TX-361 and tune your car radio to the same frequency. Audio will be transmitted wirelessly to your car's speakers.
7 دیکھ بھال
- صفائی: Use a soft, dry cloth to clean the screen and exterior of the device. Do not use abrasive cleaners or solvents.
- ذخیرہ: اگر آلہ کو ایک طویل مدت کے لیے ذخیرہ کر رہے ہیں، تو اسے پاور سے منقطع کریں اور اسے ٹھنڈی، خشک جگہ پر محفوظ کریں۔
- سافٹ ویئر اپ ڈیٹس: وقتا فوقتا کارخانہ دار کی جانچ کریں۔ website for any available firmware updates to ensure optimal performance.
8 خرابیوں کا سراغ لگانا
| مسئلہ | ممکنہ حل |
|---|---|
| ڈیوائس آن نہیں ہوتی ہے۔ |
|
| Cannot connect to CarPlay/Android Auto. |
|
| Poor DAB/FM radio reception. |
|
| کوئی آڈیو آؤٹ پٹ نہیں ہے۔ |
|
9. وضاحتیں
| فیچر | تفصیلات |
|---|---|
| ماڈل نمبر | 5361 |
| ڈسپلے | 7 انچ کیپسیٹیو ٹچ اسکرین |
| کنیکٹوٹی ٹیکنالوجی | Wi-Fi (Dual-band 2.4 / 5 GHz), Bluetooth 5.0 |
| خصوصی خصوصیات | Wireless CarPlay & Android Auto, DAB Digital Radio, FM Radio, Touchscreen Display |
| DAB تعدد کی حد | Band III: 174-240 MHz |
| آڈیو آؤٹ پٹ | AUX, FM Transmission, Integrated Speaker |
| بجلی کی فراہمی | 12V/24V via Cigarette Lighter |
| پروڈکٹ کے طول و عرض (D x W x H) | 18.8D x 10.8W x 3.5H سینٹی میٹر |
| شے کا وزن | 0.58 پاؤنڈز (تقریباً 263 گرام) |
10. وارنٹی اور سپورٹ
Technaxx products are covered by a manufacturer's warranty. For detailed warranty information, please refer to the warranty card included with your product or visit the official Technaxx website. For technical support, troubleshooting assistance, or service inquiries, please contact Technaxx customer support through their official channels.
You can often find additional resources, FAQs, and contact information on the Technaxx official webسائٹ.