1. تعارف
The SPL 2Control is a compact and user-friendly stereo monitor controller designed to provide comprehensive control over your digital audio workstation's (DAW) monitoring functions. It ensures high-quality audio reproduction through both studio monitors and headphones, allowing you to hear every detail of your mix. Key features include a precise speaker volume potentiometer, active circuitry for sound integrity, and a unique Crossfeed control for accurate headphone monitoring that simulates a stereo speaker image.
2. حفاظتی ہدایات
- ڈیوائس کو چلانے سے پہلے ان ہدایات کو اچھی طرح پڑھیں۔
- مستقبل کے حوالے کے لیے اس دستی کو رکھیں۔
- آگ یا بجلی کے جھٹکے سے بچنے کے لیے یونٹ کو بارش یا نمی کے سامنے نہ رکھیں۔
- مناسب وینٹیلیشن کو یقینی بنائیں؛ وینٹیلیشن کے کسی بھی سوراخ کو مسدود نہ کریں۔
- مینوفیکچرر کی طرف سے مخصوص اٹیچمنٹ/لوازمات ہی استعمال کریں۔
- بجلی کے طوفان کے دوران یا طویل عرصے تک غیر استعمال ہونے پر بجلی کی تار منقطع کریں۔
- تمام سروسنگ کو اہل سروس اہلکاروں سے رجوع کریں۔
- یونٹ کو گرمی کے ذرائع جیسے ریڈی ایٹرز، ہیٹ رجسٹر، چولہے، یا دیگر آلات کے قریب رکھنے سے گریز کریں (بشمول amplifiers) جو گرمی پیدا کرتی ہے۔
3. پیکیج کے مشمولات
Upon unpacking, please verify that the following items are included:
- 1 x SPL 2Control Module
- 1 ایکس پاور کی ہڈی
- یہ صارف دستی
4. پروڈکٹ ختمview
4.1 فرنٹ پینل کے کنٹرول اور اشارے
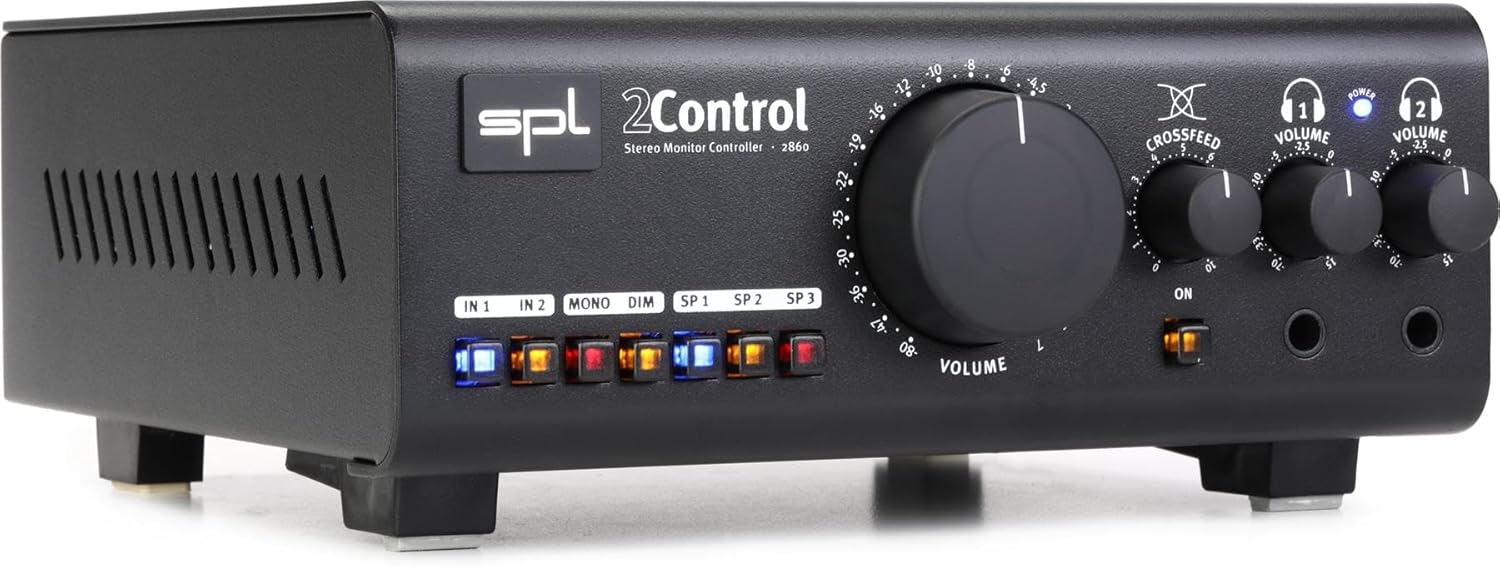
تصویر 1: Front Panel of the SPL 2Control Stereo Monitor Controller.
This image displays the front panel of the SPL 2Control. From left to right, it features input selection buttons (IN 1, IN 2), function buttons (MONO, DIM), speaker output selection buttons (SP 1, SP 2, SP 3), a large central master VOLUME knob, a CROSSFEED knob, and two individual headphone VOLUME knobs with corresponding headphone output jacks. A power indicator LED is visible above the headphone controls.
- IN 1 / IN 2 Buttons: Selects the active stereo input source.
- MONO Button: Sums the stereo signal to mono for compatibility checking.
- DIM بٹن: Reduces the output volume by a fixed amount (e.g., -20dB) for temporary level reduction.
- SP 1 / SP 2 / SP 3 Buttons: Selects the active stereo speaker output pair.
- وولم نوب: Master volume control for selected speaker outputs.
- CROSSFEED Knob: Adjusts the stereo panorama for headphone monitoring to simulate a speaker listening environment.
- HEADPHONE VOLUME 1 / 2 Knobs: Independent volume controls for the two headphone outputs.
- HEADPHONE 1 / 2 Jacks: 1/4-inch stereo headphone outputs.
- پاور ایل ای ڈی: اشارہ کرتا ہے کہ یونٹ آن ہے۔
4.2 Rear Panel Connections (Inferred)
The rear panel typically houses the audio input and output connections, as well as the power input. Based on common audio equipment and product specifications, you can expect:
- ینالاگ آدانوں: Balanced XLR or TRS inputs for connecting your audio interface or mixer.
- اسپیکر آؤٹ پٹ: Multiple sets of balanced XLR or TRS outputs for connecting up to three pairs of studio monitors.
- پاور ان پٹ: Connector for the included power cord.
5. سیٹ اپ
- جگہ کا تعین: Position the SPL 2Control on a stable, flat surface, ensuring adequate ventilation around the unit.
- پاور کنکشن: Connect the provided power cord to the power input on the rear panel of the 2Control and then to a suitable AC power outlet.
- ان پٹ کنکشنز: Connect the stereo outputs of your audio interface, mixer, or other audio source to the IN 1 and/or IN 2 inputs on the rear panel using balanced XLR or TRS cables.
- اسپیکر کنکشن: Connect your studio monitors to the SP 1, SP 2, and/or SP 3 outputs on the rear panel using balanced XLR or TRS cables. Ensure correct left and right channel connections.
- Headphone Connections: Plug your headphones into the HEADPHONE 1 and/or HEADPHONE 2 jacks on the front panel.
- ابتدائی پاور آن: Ensure all volume controls are set to their minimum positions before powering on the unit. Then, connect the power cord to the wall outlet. The POWER LED on the front panel will illuminate.
6. آپریٹنگ ہدایات
- ایک ان پٹ کا انتخاب: یا تو دبائیں 1 میں or 2 میں button to select your desired audio source. The active button will illuminate.
- Selecting Speaker Outputs: دبائیں ایس پی 1, ایس پی 2، یا ایس پی 3 button to route the audio to the corresponding pair of studio monitors. Only one speaker output can be active at a time.
- ماسٹر والیوم کو ایڈجسٹ کرنا: Slowly turn the large حجم knob clockwise to increase the listening level for the selected speaker outputs. Turn counter-clockwise to decrease.
- مونو سمنگ: دبائیں مونو button to sum the stereo signal to mono. This is useful for checking phase compatibility and mix balance. Press again to return to stereo.
- مدھم فنکشن: دبائیں DIM button to temporarily reduce the output volume. This is useful for quick conversations or when you need to lower the volume without losing your main volume setting. Press again to restore the original volume.
- ہیڈ فون کی نگرانی:
- Plug your headphones into the desired headphone jack (HEADPHONE 1 or 2).
- Adjust the individual HEADPHONE VOLUME 1 or 2 knob to set the listening level for your headphones.
- استعمال کریں۔ کراس فیڈ knob to adjust the stereo image for headphone listening. Turning it clockwise increases the crossfeed, simulating a more natural speaker-like stereo field by blending the left and right channels slightly.
7 دیکھ بھال
- صفائی: یونٹ کے بیرونی حصے کو صاف کرنے کے لیے نرم، خشک کپڑا استعمال کریں۔ مائع کلینر یا سالوینٹس استعمال نہ کریں۔
- وینٹیلیشن: Ensure that the ventilation slots are kept clear of dust and debris to prevent overheating.
- ذخیرہ: اگر یونٹ کو لمبے عرصے تک ذخیرہ کر رہے ہیں، تو اسے بجلی سے منقطع کریں اور اسے ٹھنڈی، خشک جگہ پر محفوظ کریں۔
8 خرابیوں کا سراغ لگانا
| مسئلہ | ممکنہ وجہ | حل |
|---|---|---|
| اسپیکر سے کوئی آواز نہیں ہے۔ |
|
|
| ہیڈ فون سے کوئی آواز نہیں۔ |
|
|
| مسخ شدہ آڈیو۔ |
|
|
9. وضاحتیں
| فیچر | تفصیل |
|---|---|
| ماڈل کا نام | 2 Control (also known as 2860) |
| برانڈ | ایس پی ایل |
| اسپیکر کی قسم | مانیٹر |
| تجویز کردہ استعمال | Control, Volume for Monitors |
| ہم آہنگ آلات | Monitors, Speakers |
| سراؤنڈ ساؤنڈ چینل کنفیگریشن | 2.0 |
| رنگ | سیاہ |
| شامل اجزاء | 1 x SPL Control Module |
| پروڈکٹ کے طول و عرض (D x W x H) | 8.66" x 8.46" x 3.15" |
| شے کا وزن | 7.06 پاؤنڈ (تقریباً 3.2 کلوگرام) |
| طاقت کا منبع | کورڈڈ الیکٹرک |
| کنیکٹوٹی ٹیکنالوجی | TRS, XLR |
| آڈیو آؤٹ پٹ وضع | سٹیریو |
| چڑھنے کی قسم | ٹیبلٹاپ ماؤنٹ |
| کارخانہ دار | Sound Performance Lab |
10. وارنٹی اور سپورٹ
The SPL 2Control Monitor Controller comes with a limited warranty. For specific warranty terms, duration, and conditions, please refer to the documentation provided with your purchase or visit the official SPL website. For technical support, service, or inquiries, please contact the manufacturer, Sound Performance Lab, or your authorized dealer.
مینوفیکچرر: Sound Performance Lab