
1. تعارف
This manual provides detailed instructions for the installation, operation, and maintenance of your Foxconn TSAA725 ATX Tower Case. Please read this manual thoroughly before beginning installation to ensure proper setup and safe use of the product. Keep this manual for future reference.
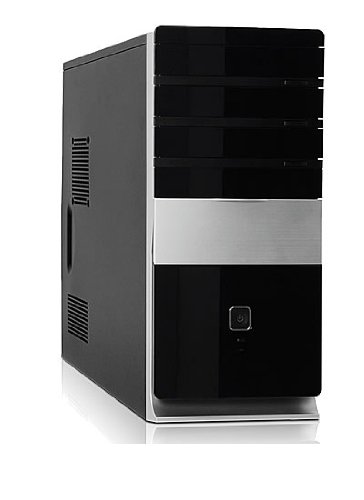
تصویر: سامنے view of the Foxconn TSAA725 ATX Tower Case, showcasing its design and front panel ports.
2. حفاظتی معلومات
پروڈکٹ کو پہنچنے والے نقصان یا اپنے آپ کو چوٹ سے بچانے کے لیے درج ذیل حفاظتی تدابیر پر عمل کریں:
- Always disconnect the power supply from the wall outlet before opening the computer case or performing any installation/maintenance.
- Handle internal components with care to avoid electrostatic discharge (ESD) damage. Use an anti-static wrist strap if available.
- زیادہ گرم ہونے سے بچنے کے لیے کیس کے ارد گرد مناسب وینٹیلیشن کو یقینی بنائیں۔
- Do not expose the case to moisture or extreme temperatures.
- چھوٹے حصوں کو بچوں سے دور رکھیں۔
3. پیکیج کے مشمولات
تصدیق کریں کہ تمام اشیاء پیکیج میں موجود ہیں:
- Foxconn TSAA725 ATX Tower Case
- 350W Power Supply (pre-installed)
- لوازماتی کٹ (پیچ، اسٹینڈ آف، کیبل ٹائیز)
- یہ ہدایت نامہ
4. کلیدی خصوصیات
The Foxconn TSAA725 ATX Tower Case offers the following features:
- مواد: 0.5mm SGCC Alloy Steel construction for durability.
- مدر بورڈ سپورٹ: Compatible with ATX and Micro ATX motherboards.
- ڈرائیو بیس:
- 3x 5.25" External Bays
- 2x 3.5" External Bays
- 4x 3.5" Internal Bays
- کولنگ سسٹم:
- 1x 80/92/120mm rear fan support (fan not included)
- Optional 1x 80/92/120mm front fan support (fan not included)
- 80mm Air Duct for CPU cooling.
- فرنٹ I/O پینل:
- 2x USB 2.0 پورٹس
- 1x Headphone jack
- 1x مائیکروفون جیک
- بجلی کی فراہمی: Integrated 350W Power Supply.
5. سیٹ اپ اور اجزاء کی تنصیب
Follow these steps to install your computer components into the Foxconn TSAA725 case:
- کیس تیار کریں:
Place the case on a flat, stable surface. Remove the side panel(s) by unscrewing the thumbscrews at the rear of the case and sliding the panel backward.
- مدر بورڈ انسٹال کریں:
Install the necessary standoffs onto the motherboard tray according to your motherboard's form factor (ATX or Micro ATX). Carefully place the motherboard onto the standoffs, aligning the screw holes. Secure the motherboard with screws provided in the accessory kit.
- Install Drives (HDD/SSD):
For 3.5" internal drives, slide the drive into an available 3.5" internal bay and secure it with screws from the side. For 5.25" external drives (e.g., optical drives), remove the front panel bay cover, slide the drive in from the front, and secure it with screws.
- توسیعی کارڈز انسٹال کریں:
Remove the appropriate expansion slot covers at the rear of the case. Insert your graphics card or other expansion cards into the PCIe/PCI slots on the motherboard and secure them with screws.
- کیبلز کو جوڑیں:
Connect the power supply cables to the motherboard (24-pin ATX, 4/8-pin CPU), graphics card (if applicable), and drives (SATA power). Connect the front panel cables (USB, audio, power switch, reset switch, LED indicators) to the corresponding headers on the motherboard. Refer to your motherboard manual for header locations.
- کیبل مینجمنٹ:
Route cables neatly to improve airflow and aesthetics. Use cable ties from the accessory kit if needed.
- کیس بند کریں:
Once all components are installed and cables are connected, reattach the side panel(s) and secure them with the thumbscrews.
6. آپریٹنگ ہدایات
After successful assembly, connect your peripherals (monitor, keyboard, mouse) and power cable to the case. Press the power button on the front panel to start your computer.
فرنٹ پینل I/O پورٹس:
- USB 2.0 پورٹس: USB آلات جیسے کی بورڈز، چوہوں اور بیرونی اسٹوریج کو جوڑنے کے لیے۔
- ہیڈ فون جیک: ہیڈ فون یا اسپیکر کو جوڑنے کے لیے۔
- مائکروفون جیک: مائکروفون کو جوڑنے کے لیے۔
- پاور بٹن: To turn the computer on or off.
- ری سیٹ بٹن: To restart the computer.
7 دیکھ بھال
Regular maintenance helps ensure optimal performance and longevity of your computer case:
- دھول کی صفائی: Periodically clean dust from inside the case, especially from fans and heatsinks, using compressed air. Ensure the computer is powered off and unplugged before cleaning.
- بیرونی صفائی: کیس کے بیرونی حصے کو نرم سے صاف کریں، ڈیamp کپڑا کھرچنے والے کلینر یا سالوینٹس سے پرہیز کریں۔
- کیبل مینجمنٹ: وقتاً فوقتاً کیبل روٹنگ کو چیک کریں تاکہ یہ یقینی بنایا جا سکے کہ کوئی کیبل ہوا کے بہاؤ یا پنکھے کے آپریشن میں رکاوٹ نہیں بن رہی ہے۔
8 خرابیوں کا سراغ لگانا
اگر آپ کو مسائل کا سامنا ہے، تو درج ذیل عام حلوں کا حوالہ دیں:
- کمپیوٹر آن نہیں ہوتا:
- Ensure the power cable is securely connected to both the case's power supply and the wall outlet.
- Check if the power supply switch (if present) is in the 'ON' position.
- تصدیق کریں کہ فرنٹ پینل پاور بٹن کیبل صحیح طریقے سے مدر بورڈ سے منسلک ہے۔
- مانیٹر پر کوئی ڈسپلے نہیں:
- Ensure the monitor is powered on and connected to the correct video output on your graphics card or motherboard.
- گرافکس کارڈ اور رام ماڈیولز کو دوبارہ سیٹ کریں۔
- USB پورٹس کام نہیں کر رہے ہیں:
- Verify that the front panel USB cables are correctly connected to the motherboard's USB headers.
- آلہ کو کسی مختلف USB پورٹ سے جوڑنے کی کوشش کریں۔
9. وضاحتیں
| فیچر | تفصیل |
|---|---|
| برانڈ | FOXCONN |
| ماڈل | TSAA725-ISO450 |
| مواد | 0.5mm SGCC Alloy Steel |
| مدر بورڈ مطابقت | اے ٹی ایکس، مائیکرو اے ٹی ایکس |
| Drive Bays (External) | 3x 5.25", 2x 3.5" |
| Drive Bays (Internal) | 4x 3.5" |
| کولنگ سسٹم سپورٹ | 1x 80/92/120mm rear fan, 1x 80/92/120mm front fan (optional), 80mm Air Duct |
| فرنٹ I / O بندرگاہیں | 2x USB 2.0, 1x Headphone, 1x Microphone |
| بجلی کی فراہمی | 350W (Integrated) |
| پروڈکٹ کے طول و عرض (LxWxH) | 50.17 x 24.13 x 54.61 سینٹی میٹر |
| شے کا وزن | 6.96 کلوگرام |
10. وارنٹی اور سپورٹ
For warranty information and technical support, please refer to the official Foxconn webسائٹ یا اپنے مقامی خوردہ فروش سے رابطہ کریں۔ وارنٹی کے دعووں کے لیے اپنی خریداری کا ثبوت رکھیں۔
آن لائن وسائل: For additional support and updated drivers, visit the official Foxconn support page.
نوٹ: وارنٹی کی شرائط علاقے کے لحاظ سے مختلف ہو سکتی ہیں۔