1. تعارف
This manual provides detailed instructions for the installation, operation, and maintenance of your SpeaKa Professional DL-1117 In-Wall/Ceiling Speaker. Please read this manual thoroughly before installation and use to ensure proper function and safety. Keep this manual for future reference.
2. پروڈکٹ ختمview
The SpeaKa Professional DL-1117 is a high-quality in-wall/ceiling speaker designed for various audio applications in both residential and industrial environments. Its robust metallic construction ensures durability and reliable performance.

تصویر 2.1: سامنے والا view of the SpeaKa Professional DL-1117 In-Wall/Ceiling Speaker. This image shows the speaker's front grille and mounting frame.
اہم خصوصیات:
- Ideal for wall and ceiling mounting.
- Suitable for industrial and residential spaces.
- Solid metallic construction for enhanced durability.
3. وضاحتیں
| تفصیلات | قدر |
|---|---|
| برانڈ | سپیکا پروفیشنل |
| ماڈل کا نام | DL-1117 |
| آئٹم ماڈل نمبر | SP-1207908 |
| اسپیکر کی قسم | In-Wall/Ceiling Speaker |
| اسپیکر کا سائز | 8 Inches (77mm INWALL SPEAKER as per label) |
| رکاوٹ | 8 اوہم |
| Power (Nominal) | 15 واٹ |
| زیادہ سے زیادہ اسپیکر آؤٹ پٹ پاور | 25 واٹ |
| تعدد رسپانس | 90Hz - 17,000Hz (as per label) |
| چڑھنے کی قسم | سیلنگ ماؤنٹ (وال ماؤنٹ کے لیے بھی موزوں) |
| پروڈکٹ کے طول و عرض (L x W x H) | 11 x 11 x 7 سینٹی میٹر |
| شے کا وزن | 520 گرام |
| رنگ | سیاہ |
| یونٹس کی تعداد | 1 یونٹ |
| تجویز کردہ استعمال | For computer (audio output), general audio systems |
| ہم آہنگ آلات | Desktop computer, Laptop (via ampلیفائر/ وصول کنندہ) |

تصویر 3.1: Dimensional drawing of the SpeaKa Professional DL-1117 speaker. This diagram illustrates the speaker's diameter (Ø100mm), depth (49mm), and cutout dimensions (Ø74mm, Ø81mm).
تصویر 3.2: پیچھے view of the SpeaKa Professional DL-1117 speaker, showing the product label with model number DL-1117BK8, frequency response, power rating, and impedance.
4. حفاظتی ہدایات
مصنوعات کو چوٹ یا نقصان سے بچنے کے لیے براہ کرم درج ذیل حفاظتی تدابیر پر عمل کریں:
- برقی حفاظت: Ensure all power to the audio system is disconnected before making any connections or performing installation. Incorrect wiring can cause damage to the speaker or ampزندگی
- تنصیب: Installation should be performed by a qualified professional if you are unsure about electrical wiring or structural integrity. Ensure the mounting surface (wall or ceiling) can safely support the weight of the speaker.
- ماحولیات: سپیکر کو ضرورت سے زیادہ نمی، انتہائی درجہ حرارت، یا براہ راست سورج کی روشنی کے سامنے نہ رکھیں۔
- صفائی: صفائی کے لیے نرم، خشک کپڑا استعمال کریں۔ مائع کلینر یا ایروسول استعمال نہ کریں۔
- بے ترکیبی: اسپیکر کو الگ کرنے یا اس میں ترمیم کرنے کی کوشش نہ کریں۔ اس سے وارنٹی ختم ہو جائے گی اور نقصان یا چوٹ ہو سکتی ہے۔
5. سیٹ اپ اور انسٹالیشن
Follow these steps for proper installation of your in-wall/ceiling speaker:
5.1 ٹولز درکار ہیں۔
- ڈرل
- Hole saw (matching cutout diameter, approx. Ø74-81mm)
- سکریو ڈرایور
- تار عریاں ہوجانے والے
- Speaker wire (appropriate gauge for your amplifier and cable length)
5.2 بڑھتے ہوئے مقام
Choose a suitable location in your wall or ceiling. Ensure there are no electrical wires, plumbing, or structural elements behind the chosen area. Use a stud finder if necessary.
5.3 افتتاحی کاٹنا
- Carefully mark the desired cutout diameter on the wall or ceiling. Refer to the dimensions in Figure 3.1.
- Using a hole saw, carefully cut the opening.
5.4 وائرنگ
- اپنے سے اسپیکر وائر چلائیں۔ amplifier/receiver to the cutout opening.
- سپیکر کی تار کے سروں سے تقریباً 1/2 انچ (12 ملی میٹر) موصلیت کو ہٹا دیں۔
- Connect the speaker wires to the terminals on the back of the DL-1117 speaker. Ensure correct polarity (+ to + and - to -) from the amplifier to the speaker. The terminals are typically screw-type or spring-loaded.
5.5 Installing the Speaker
- Carefully insert the speaker into the cutout opening.
- Secure the speaker using the integrated mounting clips or screws, if applicable. For this model, the design suggests it is inserted and then secured from the front.

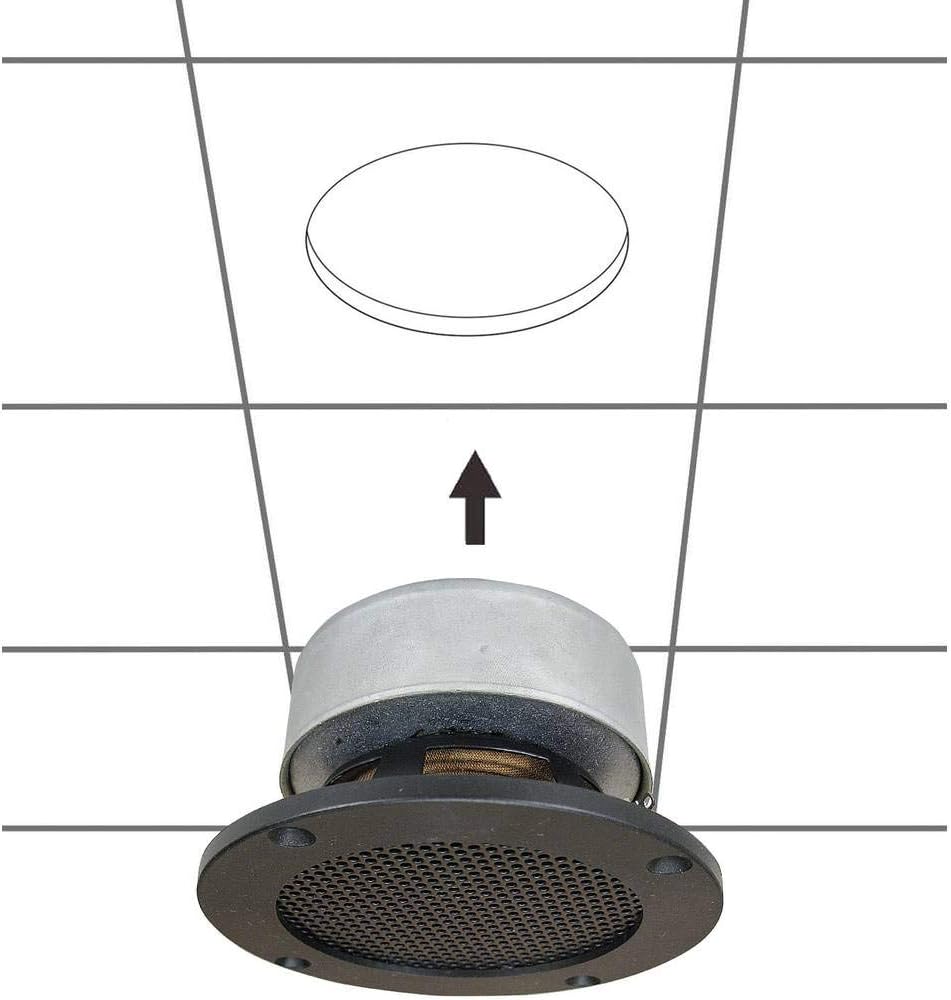
تصویر 5.1: Diagram illustrating the installation process of the SpeaKa Professional DL-1117 speaker into a ceiling opening. The speaker is inserted from below into the pre-cut hole.
6. آپریٹنگ ہدایات
Once the speaker is correctly installed and wired to your ampلیفائر یا وصول کنندہ:
- یقینی بنائیں کہ تمام کنکشن محفوظ ہیں۔
- اپنے کو چالو کریں۔ ampوصول کنندہ / وصول کنندہ۔
- Start playing audio through your connected source.
- اپنے پر والیوم کو ایڈجسٹ کریں۔ amplifier/receiver to a comfortable listening level. Avoid excessively high volumes that could distort the sound or damage the speaker.
7 دیکھ بھال
The SpeaKa Professional DL-1117 speaker requires minimal maintenance:
- صفائی: Periodically wipe the speaker grille and frame with a soft, dry cloth to remove dust. Do not use abrasive cleaners or solvents.
- معائنہ: Occasionally check the speaker for any visible damage or loose connections.
8 خرابیوں کا سراغ لگانا
اگر آپ کو اپنے اسپیکر کے ساتھ مسائل کا سامنا کرنا پڑتا ہے، تو درج ذیل عام مسائل اور حل دیکھیں:
| مسئلہ | ممکنہ وجہ | حل |
|---|---|---|
| اسپیکر سے کوئی آواز نہیں آتی | ڈھیلی یا غلط وائرنگ Amplifier/receiver off or muted ماخذ آلہ آڈیو نہیں چلا رہا ہے۔ | مناسب قطبیت اور سختی کے لیے تمام اسپیکر وائر کنکشن چیک کریں۔ یقینی بنائیں amplifier/receiver is on and not muted, and volume is up. Verify audio is playing from the source device. |
| مسخ شدہ آواز | حجم بہت زیادہ ہے۔ ناقص کوالٹی آڈیو سورس اسپیکر کی تار کو نقصان پہنچا | اپنے پر والیوم کو کم کریں۔ ampوصول کنندہ / وصول کنندہ۔ Try a different audio source to rule out source issues. Inspect speaker wires for fraying or damage and replace if necessary. |
| وقفے وقفے سے آواز | ڈھیلے روابط ناقص ampلائفائر چینل | تمام اسپیکر وائر کنکشن چیک کریں اور محفوظ کریں۔ Test the speaker with a different amplifier channel or a known working ampزندگی |
If the problem persists after trying these solutions, please contact SpeaKa Professional customer support.
9. وارنٹی اور سپورٹ
For warranty information and customer support, please refer to the documentation provided with your purchase or visit the official SpeaKa Professional webسائٹ وارنٹی کے دعووں کے لیے اپنی خریداری کا ثبوت رکھیں۔
مینوفیکچرر: سپیکا پروفیشنل
ASIN: B00CS2V1AQ