
1. تعارف
Thank you for choosing the OSD Audio PRE-1 High Definition Preamplifier. This unit is designed to enhance your audio experience by providing versatile source selection and precise audio control. The PRE-1 acts as a central hub for various audio components, including turntables, CD/DVD players, and tape decks, delivering a clean and powerful signal to your main ampزندگی
This manual provides detailed instructions for the proper setup, operation, and maintenance of your PRE-1 preamplifier. Please read this manual thoroughly before operating the unit to ensure optimal performance and longevity.
2. اہم حفاظتی معلومات
- طاقت کا منبع: یونٹ کو صرف مارکنگ لیبل پر اشارہ کردہ پاور سورس کی قسم سے جوڑیں۔
- وینٹیلیشن: Ensure adequate ventilation. Do not block any ventilation openings. Install in accordance with the manufacturer’s instructions.
- پانی اور نمی: اس اپریٹس کو پانی کے قریب استعمال نہ کریں یا اسے ٹپکنے یا چھڑکنے سے بے نقاب کریں۔
- حرارت: گرمی کے کسی بھی ذرائع جیسے ریڈی ایٹرز، ہیٹ رجسٹر، چولہے، یا دیگر آلات (بشمول amplifiers) جو گرمی پیدا کرتی ہے۔
- صفائی: صرف خشک کپڑے سے صاف کریں۔
- سروسنگ: اس پروڈکٹ کو خود پیش کرنے کی کوشش نہ کریں۔ تمام سروسز کو اہل سروس اہلکاروں کے حوالے کریں۔
- گراؤنڈنگ: یہ یونٹ مناسب طریقے سے گراؤنڈ ہونا ضروری ہے۔
3. پیکیج کے مشمولات
براہ کرم چیک کریں کہ درج ذیل اشیاء آپ کے پیکیج میں شامل ہیں:
- OSD Audio PRE-1 High Definition Preampزندگی
- پاور کیبل
- صارف دستی (یہ دستاویز)
4. پروڈکٹ ختمview
4.1. فرنٹ پینل
The front panel provides access to all primary controls and a microphone input for convenient use.

This image displays the front panel of the OSD Audio PRE-1 Preamplifier, including its physical dimensions for installation planning.

ایک مفصل view of the left side of the PRE-1's front panel, highlighting the Microphone Level, Bass, Midrange, and Treble adjustment knobs.

ایک مفصل view of the right side of the PRE-1's front panel, showing the Loudness, Balance, and Volume controls, along with input selection and function buttons.
- پاور بٹن: یونٹ کو آن یا آف کرتا ہے۔
- مائک ان پٹ: 1/4-inch jack for connecting a microphone.
- مائک سطح: Adjusts the volume of the microphone input.
- باس کنٹرول: کم فریکوئنسی آؤٹ پٹ کو ایڈجسٹ کرتا ہے۔
- Mid Control: Adjusts the mid-range frequency output.
- ٹریبل کنٹرول: اعلی تعدد آؤٹ پٹ کو ایڈجسٹ کرتا ہے۔
- بلند آواز: Engages or disengages a loudness contour for enhanced bass and treble at low volumes.
- توازن: Adjusts the left/right channel balance.
- والیوم: Master volume control for all outputs.
- ان پٹ سلیکٹ: Rotary knob to choose between Phono, AUX1, AUX2, and CD/DVD inputs.
- Tape Button: Activates the Tape Monitor loop.
- مونو بٹن: Combines stereo signals into a monaural output.
- کم فلٹر: Engages a low-frequency cut-off filter.
- خاموش کریں: Silences all audio output.
4.2. ریئر پینل
The rear panel houses all the necessary input and output connections for your audio system.
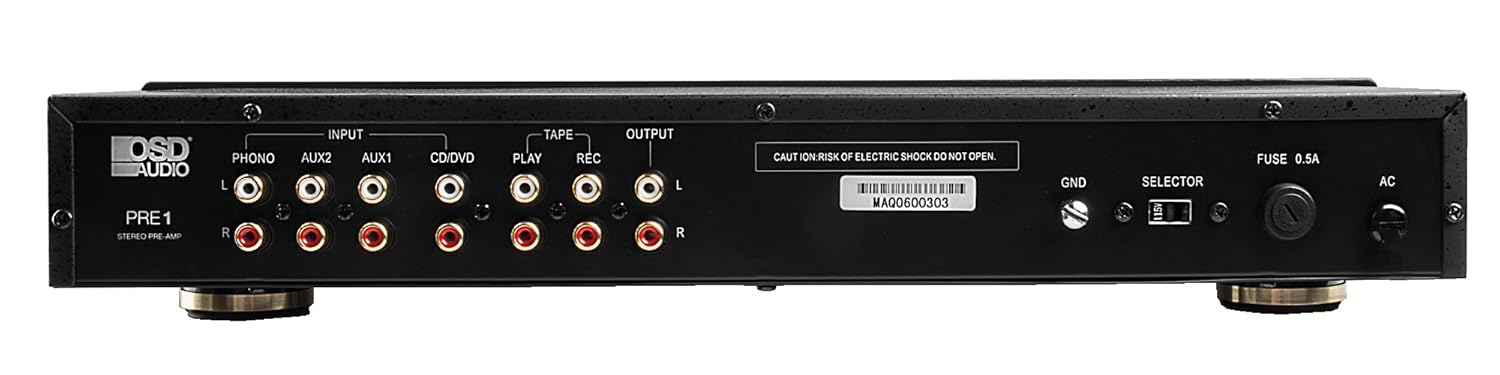
The rear panel of the PRE-1 Preamplifier, showing all input and output connections for various audio devices.
- Phono Input (L/R): RCA inputs for connecting a turntable. Includes a ground terminal.
- AUX1 Input (L/R): RCA inputs for general auxiliary devices.
- AUX2 Input (L/R): RCA inputs for a second auxiliary device.
- CD/DVD Input (L/R): RCA inputs for CD or DVD players.
- Tape Play (L/R): RCA inputs for the playback output of a tape deck or other recording device.
- Tape Rec (L/R): RCA outputs for connecting to the recording input of a tape deck or other recording device.
- Output (L/R): RCA outputs to connect to your main power ampزندگی
- Ground Terminal (GND): Connects to the ground wire of your turntable to reduce hum.
- سلیکٹر سوئچ: For internal configuration (typically left in default position unless specified).
- فیوز: Replace only with the specified fuse type and rating.
- AC پاور ان پٹ: Connects to the supplied power cable.
5. سیٹ اپ اور کنکشنز
Follow these steps to properly set up your OSD Audio PRE-1 Preampزندہ:
- جگہ کا تعین: Place the PRE-1 on a stable, flat surface, ensuring adequate ventilation around the unit. Avoid placing it near heat sources or in direct sunlight.
- بجلی بند: Ensure all audio components, including the PRE-1 and your main amplifier, are turned off before making any connections.
- منسلک ذرائع:
- ٹرنٹیبل: Connect the RCA cables from your turntable to the Phono Input (L/R) on the PRE-1. Connect the turntable's ground wire to the جی این ڈی terminal on the PRE-1.
- CD/DVD Player: Connect the RCA cables from your CD/DVD player to the CD/DVD Input (L/R).
- Other Devices (e.g., Streamer, Tuner): Connect RCA cables from these devices to the AUX1 Input (L/R) or AUX2 Input (L/R).
- Tape Deck: Connect the playback outputs of your tape deck to the Tape Play (L/R) inputs. Connect the recording inputs of your tape deck to the Tape Rec (L/R) آؤٹ پٹ
- سے جڑیں۔ Ampزندہ: مربوط کریں۔ Output (L/R) RCA jacks on the PRE-1 to the input jacks of your main power ampزندگی
- پاور کنکشن: فراہم کردہ پاور کیبل کو اس سے جوڑیں۔ AC پاور ان پٹ on the rear panel of the PRE-1, then plug it into a suitable wall outlet.
- ابتدائی پاور آن: Turn on your main power amplifier first, then turn on the PRE-1. When powering off, turn off the PRE-1 first, then your main ampزندگی
6. آپریٹنگ ہدایات
Once your PRE-1 is connected, follow these steps for basic operation:
- ان پٹ کو منتخب کریں: استعمال کریں۔ ان پٹ منتخب کریں rotary knob on the front panel to choose the desired audio source (Phono, AUX1, AUX2, CD/DVD).
- حجم کو ایڈجسٹ کریں: کے ساتھ شروع کریں۔ حجم knob at its minimum setting. Begin playing your selected audio source and slowly increase the volume to a comfortable listening level.
- ٹون کنٹرولز: استعمال کریں۔ باس, وسط، اور تگنا knobs to adjust the tonal characteristics of your audio. Turn clockwise to increase, counter-clockwise to decrease.
- بیلنس کنٹرول: کو ایڈجسٹ کریں۔ توازن knob to fine-tune the left and right channel output for optimal stereo imaging.
- بلند آواز: دبائیں اونچ نیچ button to activate a contour that boosts bass and treble frequencies, which can be beneficial at lower listening volumes. Press again to deactivate.
- کم فلٹر: دبائیں کم فلٹر button to engage a filter that reduces very low frequencies. This can help eliminate rumble from turntables or other unwanted low-frequency noise. Press again to deactivate.
- مونو: دبائیں مونو button to combine the left and right stereo channels into a single monaural signal. This is useful for playing mono recordings. Press again for stereo.
- خاموش کریں: دبائیں خاموش button to instantly silence the audio output. Press again to restore sound.
- مائیکروفون کا استعمال: Plug a microphone into the مائیک ان پٹ. Adjust the microphone's volume using the مائک لیول دستک
- Tape Monitoring/Recording: If you have a tape deck connected, select the appropriate input for playback. To record, ensure your tape deck is set to record and the PRE-1 is passing the desired source through the Tape Rec outputs.
7 دیکھ بھال
Proper care and maintenance will ensure the longevity and optimal performance of your PRE-1 Preampزندگی
- صفائی: Use a soft, dry cloth to clean the exterior of the unit. Do not use liquid cleaners, aerosols, or harsh chemicals, as they may damage the finish or internal components.
- وینٹیلیشن: Periodically check that the ventilation openings are free from dust and obstructions.
- رابطے: Occasionally check all cable connections to ensure they are secure. Loose connections can lead to signal loss or interference.
- ذخیرہ: اگر یونٹ کو لمبے عرصے تک ذخیرہ کر رہے ہیں، تو اسے پاور آؤٹ لیٹ سے منقطع کریں اور اسے براہ راست سورج کی روشنی اور انتہائی درجہ حرارت سے دور کسی ٹھنڈی، خشک جگہ پر محفوظ کریں۔
8 خرابیوں کا سراغ لگانا
If you experience issues with your OSD Audio PRE-1, refer to the following common problems and solutions:
| مسئلہ | ممکنہ وجہ | حل |
|---|---|---|
| کوئی طاقت نہیں۔ | Power cable not connected; Power outlet not active; Blown fuse | Ensure power cable is securely connected. Test the outlet with another device. Check and replace the fuse if necessary (refer to specifications for fuse type). |
| کوئی آواز آؤٹ پٹ نہیں ہے۔ | Incorrect input selected; Volume too low; Mute engaged; Loose audio cables; Main amplifier off or incorrect input selected | Select the correct input source. Increase the volume. Disengage Mute. Check all RCA cable connections. Ensure your main amplifier is on and set to the correct input. |
| مسخ شدہ آواز | Volume too high (clipping); Incorrect tone control settings; Faulty cables | Reduce the volume. Adjust Bass, Mid, and Treble controls to neutral or desired settings. Try replacing audio cables. |
| گنگنانا یا گونجنے والا شور | Ground loop; Loose ground wire (Phono); Interference from other electronics | Ensure turntable ground wire is connected to the PRE-1's GND terminal. Try moving the PRE-1 or other audio components away from power cables or other electronic devices. Use a ground loop isolator if necessary. |
| مائکروفون کام نہیں کر رہا ہے۔ | Mic not connected; Mic Level too low; Faulty microphone | Ensure microphone is securely plugged into the Mic Input. Increase the Mic Level. Test with another microphone if available. |
9. وضاحتیں
Below are the technical specifications for the OSD Audio PRE-1 Preampزندہ:
| فیچر | تفصیلات |
|---|---|
| ماڈل | PRE-1 |
| برانڈ | او ایس ڈی آڈیو |
| چینلز کی تعداد | 2 |
| چڑھنے کی قسم | سطح کا پہاڑ |
| یو پی سی | 819603012446 |
| ASIN | B01MPYJLPX |
| کارخانہ دار | او ایس ڈی آڈیو |
10. وارنٹی اور سپورٹ
OSD Audio products are designed for reliability and performance. For specific warranty details and terms, please refer to the warranty card included with your product or visit the official OSD Audio website. If you require technical assistance or have questions not covered in this manual, please contact OSD Audio customer support.
OSD Audio Customer Support: Please visit the OSD Audio webرابطے کی معلومات اور معاون وسائل کے لیے سائٹ۔