
SenseAir 00-0-0016
User Manual: CO2 + Temperature + Humidity Meter
Model: 00-0-0016 | Brand: SenseAir
1. تعارف
The SenseAir pSENSE RH is a portable instrument designed for accurate measurement of indoor air quality parameters. It precisely measures carbon dioxide (CO2) concentration, ambient temperature, and relative humidity. This device is equipped with an integrated alarm buzzer and advanced computational capabilities to display maximum (MAX), minimum (MIN), average, time-weighted average (TWA), and short-term exposure limit (STEL) values, making it an essential tool for environmental monitoring and assessment.
2. مصنوعات کی خصوصیات
- Measures CO2 concentration in ranges of 0-5000ppm (with an accuracy of ±30ppm ±5%rdg) and up to 9999ppm.
- Calculates and displays 8-hour Time-Weighted Average (TWA) and 15-minute Short-Term Exposure Limit (STEL) values.
- Provides MAX, MIN, and Average value display functions.
- Equipped with RS232 data output for connectivity and data logging.
- Includes an integrated alarm buzzer for high CO2 levels.
- Comes with a dedicated hard case for protection and portability.
3. آلہ ختمview
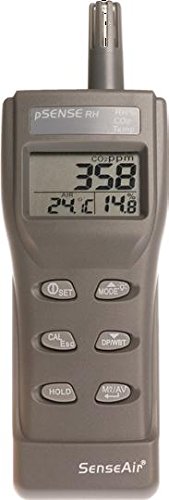
تصویر 1: سامنے والا view of the SenseAir pSENSE RH meter. The device features a digital display showing CO2 concentration (in ppm), air temperature (in °C), and relative humidity (in %). Below the display are six control buttons: SET, MODE, CAL/Esc, DP/WBT, HOLD, and M/AV. The top of the device houses the sensor probe.
کلیدی اجزاء:
- Sensor Probe: Located at the top, for CO2, temperature, and humidity detection.
- LCD ڈسپلے: Shows real-time readings for CO2 (ppm), Air Temperature (°C), and Relative Humidity (%).
- کنٹرول بٹن:
- سیٹ: Used for entering setup menus and confirming selections.
- ہدایات: Toggles between different display modes (e.g., current, MAX, MIN, AVG, TWA, STEL).
- CAL/Esc: Initiates calibration or exits a menu/function.
- DP/WBT: Likely for Dew Point or Wet Bulb Temperature display (specific function may vary by model).
- انعقاد: ڈسپلے پر موجودہ پڑھنے کو منجمد کرتا ہے۔
- M/AV: Likely for memory functions or switching between manual and automatic averaging.
- RS232 پورٹ: بیرونی آلات کے ساتھ ڈیٹا مواصلات کے لیے۔
4. سیٹ اپ
- ان باکسنگ: Carefully remove the pSENSE RH meter and its accessories from the packaging. Inspect for any signs of damage.
- بجلی کی فراہمی: Insert the required batteries into the designated compartment, observing correct polarity. Alternatively, connect the device to an appropriate power adapter if available.
- ابتدائی تعیناتی: For accurate readings, place the device in the environment you wish to monitor, ensuring the sensor probe is exposed to the ambient air and not obstructed. Avoid direct sunlight or strong drafts.
- پاور آن: Press the power button (if present, or the SET button for a moment) to turn on the device. The display should illuminate and show initial readings.
5. آپریٹنگ ہدایات
5.1 بنیادی پیمائش
Once powered on, the pSENSE RH will automatically begin measuring and displaying real-time CO2 concentration, temperature, and relative humidity on the LCD screen.
5.2 موڈ کا انتخاب
دبائیں موڈ button to cycle through different display modes. These typically include:
- موجودہ ریڈنگز
- Maximum (MAX) recorded values
- Minimum (MIN) recorded values
- Average (AVG) values
- 8-hour Time-Weighted Average (TWA)
- 15-minute Short-Term Exposure Limit (STEL)
5.3 Holding Readings
دبائیں پکڑو button to freeze the current readings on the display. Press it again to release and resume real-time measurements.
5.4 Data Output (RS232)
Connect the device to a computer or data logger via the RS232 port using a compatible cable. Refer to the specific software or communication protocol documentation for detailed instructions on data retrieval and analysis.
6 دیکھ بھال
6.1 صفائی
Wipe the device exterior with a soft, dry cloth. Do not use abrasive cleaners or solvents. Keep the sensor probe free from dust and debris.
6.2 انشانکن
Regular calibration ensures the accuracy of your pSENSE RH meter. To initiate calibration, press the CAL/Esc button. Follow the on-screen prompts or refer to the detailed calibration procedure in the full technical manual (if applicable) for specific instructions, which may involve exposure to a known CO2 concentration.
6.3 اسٹوریج
When not in use, store the device in its dedicated hard case in a cool, dry place, away from extreme temperatures and humidity.
7 خرابیوں کا سراغ لگانا
7.1 کوئی ڈسپلے/پاور نہیں۔
- بیٹری کی تنصیب کو چیک کریں اور یقینی بنائیں کہ بیٹریاں ختم نہیں ہوئی ہیں۔
- Verify power adapter connection if using external power.
7.2 غلط ریڈنگز
- Ensure the sensor probe is clean and unobstructed.
- Perform a calibration procedure as described in the Maintenance section.
- Avoid placing the device near heat sources, vents, or in direct sunlight, which can affect temperature and humidity readings.
7.3 Alarm Buzzer Issues
- Check the alarm threshold settings in the device's menu (refer to the full manual for navigation).
- Ensure the CO2 level is above the set threshold if the alarm is expected to sound.
If issues persist, contact SenseAir customer support for further assistance.
8. وضاحتیں
| پیرامیٹر | قدر |
|---|---|
| کارخانہ دار | SenseAir |
| پارٹ نمبر | 00-0-0016 |
| پروڈکٹ کے طول و عرض (L x W x H) | 20.9 x 5.8 x 7 سینٹی میٹر |
| CO2 پیمائش کی حد | 0-5000ppm (±30ppm ±5%rdg), 5001-9999ppm |
| حسابی قدریں | 8-hour TWA, 15-minute STEL, MAX, MIN, Average |
| ڈیٹا آؤٹ پٹ | RS232 |
| لوازمات شامل ہیں۔ | Dedicated hard case |
9. وارنٹی اور سپورٹ
For warranty information, technical support, or service inquiries, please contact SenseAir customer service directly. Details regarding warranty periods and service procedures are typically provided with the product documentation or available on the official SenseAir webسائٹ
SenseAir Official Webسائٹ: www.senseair.com (This is a placeholder link as no specific link was provided in the input data)
Ask a question about this manual
Ask about setup, troubleshooting, compatibility, parts, safety, or missing instructions. Manuals+ will review the question and use this page’s manual context to help answer it.