تعارف
Welcome to the world of sewing with your new Janome IT 1028 Glamour mechanical sewing machine. This manual provides essential information for the safe and efficient operation, setup, maintenance, and troubleshooting of your machine. Please read it thoroughly before using the machine to ensure optimal performance and longevity.
The Janome IT 1028 Glamour is designed for ease of use, featuring 12 stitch types, a free arm for circular sewing, an oscillating hook, automatic buttonholes, and adjustable stitch length and width. It also includes a double presser foot lift, feed dog lowering, a thread cutter, a needle threader, and a soft cover for protection.
حفاظتی ہدایات
لوگوں کو بجلی کے جھٹکے، جلنے، آگ لگنے یا زخمی ہونے کے خطرے کو کم کرنے کے لیے:
- Always unplug the machine from the electrical outlet immediately after using and before cleaning, removing covers, or making any user servicing adjustments.
- Do not allow the machine to be used as a toy. Close attention is necessary when the machine is used by or near children.
- Use this machine only for its intended use as described in this manual. Use only attachments recommended by the manufacturer.
- Never operate this machine if it has a damaged cord or plug, if it is not working properly, if it has been dropped or damaged, or dropped into water.
- کبھی بھی کسی چیز کو کسی بھی اوپننگ میں نہ ڈالیں اور نہ ہی ڈالیں۔
- باہر استعمال نہ کریں۔
- جہاں ایروسول (اسپرے) کی مصنوعات استعمال کی جا رہی ہوں یا جہاں آکسیجن دی جا رہی ہو وہاں کام نہ کریں۔
- انگلیوں کو حرکت پذیر حصوں سے دور رکھیں۔ سلائی مشین سوئی کے ارد گرد خصوصی دیکھ بھال کی ضرورت ہے۔
- ہمیشہ مناسب سوئی پلیٹ استعمال کریں۔ غلط پلیٹ سوئی کے ٹوٹنے کا سبب بن سکتی ہے۔
- جھکی ہوئی سوئیاں استعمال نہ کریں۔
- Do not pull or push fabric while stitching. This may deflect the needle causing it to break.
- Turn the sewing machine off when making any adjustments in the needle area, such as threading the needle, changing the needle, threading the bobbin, or changing the presser foot.
- Always unplug the machine when removing the light bulb.
- ڈوری پر کھینچ کر ان پلگ نہ کریں۔ ان پلگ کرنے کے لیے، پلگ کو پکڑیں، ڈوری کو نہیں۔
پروڈکٹ ختمview
کلیدی خصوصیات
- 12 Stitch Types: Versatile options for various sewing projects.
- آزاد بازو: Facilitates sewing cuffs, sleeves, and other small, circular items.
- Oscillating Hook: Ensures smooth and consistent stitch formation.
- سایڈست سلائی کی لمبائی اور چوڑائی: Provides control over stitch appearance.
- Automatic Four-Step Buttonhole: Simplifies the creation of professional-looking buttonholes.
- Double Presser Foot Lift: Allows for sewing thicker fabrics.
- Feed Dog Lowering: Useful for darning and free-motion quilting.
- تھریڈ کٹر: Conveniently trims threads.
- سوئی تھریڈر: Assists in quickly threading the needle.
- نرم کور: Protects the machine from dust and damage.
مشین کے اجزاء
Familiarize yourself with the main parts of your Janome IT 1028 Glamour sewing machine.

شکل 1: سامنے view of the Janome IT 1028 Glamour sewing machine with the soft cover in place. This image shows the overall design and the stitch selection and length dials.

تصویر 2: کلوز اپ view of the stitch selector dial (left) and stitch length dial (right) on the Janome IT 1028 Glamour. The decorative illustration on the machine body is also visible.
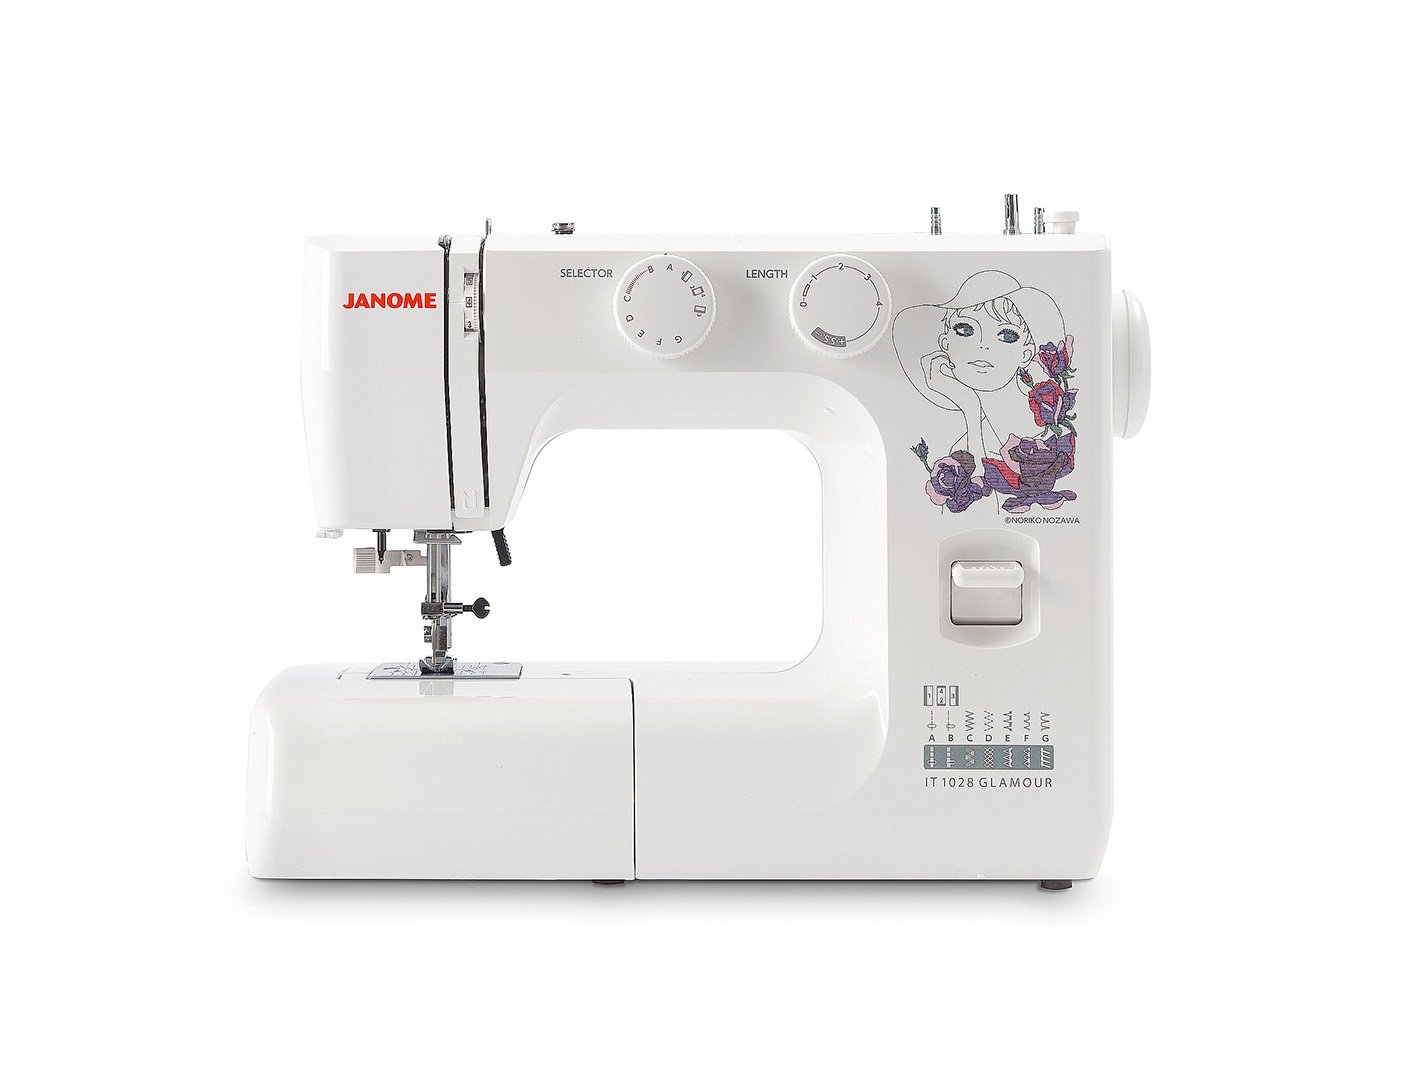
Figure 3: The Janome IT 1028 Glamour sewing machine with the accessory tray removed, revealing the free arm and the bobbin case area. This view is essential for bobbin insertion and cleaning.
سیٹ اپ
1. پیک کھولنا اور جگہ کا تعین کرنا
- مشین کو اس کی پیکیجنگ سے احتیاط سے ہٹا دیں۔
- مشین کو ایک مستحکم، ہموار سطح پر رکھیں۔
- Remove any protective films or packing materials.
2. پاور کنکشن
- Ensure the machine's power switch is in the "OFF" position.
- Connect the power cord to the machine's power input jack.
- بجلی کی تار کو کسی مناسب برقی آؤٹ لیٹ میں لگائیں۔
3 بوبن کو سمیٹنا
- سپول پن پر دھاگے کا ایک سپول رکھیں۔
- دھاگے کو اوپری تھریڈ گائیڈ کے ذریعے اور بوبن وائنڈنگ ٹینشن ڈسک کے گرد گائیڈ کریں۔
- بوبن میں سوراخ کے ذریعے دھاگے کو اندر سے داخل کریں۔
- Place the bobbin onto the bobbin winder spindle and push the spindle to the right.
- Start the machine. The bobbin will wind automatically. Stop when the bobbin is full.
- Cut the thread and push the bobbin winder spindle to the left. Remove the bobbin.
4. Inserting the Bobbin
- مشین بند کر دیں۔
- Open the bobbin cover plate located on the free arm.
- Insert the bobbin into the bobbin case with the thread running in the direction indicated by the arrows.
- Pull the thread through the tension spring and into the guide slot.
- بوبن کور پلیٹ بند کریں۔
5. Threading the Upper Thread
- پریسٹر فٹ لفٹر اٹھائیں۔
- سپول پن پر دھاگے کا ایک سپول رکھیں۔
- اوپری تھریڈ گائیڈ کے ذریعے دھاگے کی رہنمائی کریں۔
- Bring the thread down the right channel, up the left channel, and through the take-up lever from right to left.
- Continue guiding the thread down to the needle bar thread guide.
- بلٹ ان سوئی تھریڈر کا استعمال کریں یا دستی طور پر سوئی کو آگے سے پیچھے تک تھریڈ کریں۔
- Pull about 6 inches of thread through the needle eye.
6. Bringing Up the Bobbin Thread
- Hold the upper thread lightly with your left hand.
- Turn the handwheel towards you to lower the needle into the needle plate and then raise it.
- The upper thread will catch the bobbin thread, forming a loop.
- Pull the loop to bring the bobbin thread up through the needle plate hole.
- Pull both threads (upper and bobbin) under the presser foot and towards the back of the machine.
آپریٹنگ ہدایات
1. سلائی سلیکشن
کو موڑ دیں۔ سلائی سلیکٹر ڈائل (refer to Figure 2) to choose your desired stitch pattern. The available stitches are indicated by letters or symbols on the dial.
2. Adjusting Stitch Length and Width
- سلائی کی لمبائی: استعمال کریں۔ سلائی کی لمبائی کا ڈائل (refer to Figure 2) to adjust the length of your stitches. Higher numbers indicate longer stitches.
- سلائی کی چوڑائی: For stitches that allow width adjustment, use the corresponding dial or setting. (Note: The Janome IT 1028 Glamour has adjustable stitch width, typically integrated with the stitch selector or a separate dial. Consult the machine's markings for specific controls.)
3. Basic Sewing
- اپنے کپڑے کو دبانے والے پاؤں کے نیچے رکھیں۔
- پریسر فٹ لفٹر کو نیچے کریں۔
- مشین آن کریں۔
- Gently press the foot controller to start sewing. The harder you press, the faster the machine will sew.
- Guide the fabric gently with your hands, but do not pull or push forcefully.
- To secure the beginning and end of a seam, use the reverse lever to sew a few stitches backward.
- When finished, raise the needle to its highest position, lift the presser foot, and pull the fabric away from the machine.
- Use the built-in thread cutter or scissors to trim the threads.
4. Using the Free Arm
To use the free arm, simply slide off the accessory tray (refer to Figure 3). This exposes the narrow free arm, ideal for sewing small, tubular items like sleeves, pant hems, and cuffs.
5. Automatic Four-Step Buttonholes
The Janome IT 1028 Glamour features an automatic four-step buttonhole function. Refer to the stitch selector dial for the buttonhole settings (usually marked with a buttonhole symbol and steps 1-4).
- بٹن ہول پاؤں کو جوڑیں۔
- Mark the buttonhole position on your fabric.
- Set the stitch selector to the first buttonhole step.
- Sew the first side of the buttonhole.
- Change the stitch selector to the next step and sew the bar tack.
- Continue through all four steps, following the machine's markings for each segment of the buttonhole.
- Carefully cut open the buttonhole using a seam ripper, ensuring not to cut the stitches.
دیکھ بھال
1۔ مشین کی صفائی
Regular cleaning helps maintain your machine's performance. Always unplug the machine before cleaning.
- Bobbin Area: Remove the needle plate and bobbin case. Use a small brush to remove lint and dust from the bobbin area and feed dogs.
- بیرونی: Wipe the exterior surfaces with a soft, dry cloth. Do not use harsh chemicals or abrasive cleaners.
2 سوئی کی تبدیلی
Replace the needle regularly (after 8-10 hours of sewing) or if it becomes bent, dull, or damaged. A damaged needle can cause skipped stitches or fabric damage.
- مشین کو بند کریں اور اسے ان پلگ کریں۔
- سوئی سی ایل کو ڈھیلے کریں۔amp سکرو
- پرانی سوئی کو ہٹا دیں۔
- مشین کی پشت کی طرف فلیٹ سائیڈ کے ساتھ ایک نئی سوئی ڈالیں، جہاں تک یہ جائے گی اسے اوپر دھکیلیں۔
- سوئی cl کو سخت کریں۔amp محفوظ طریقے سے پیچ.
خرابی کا سراغ لگانا
یہ سیکشن عام مسائل کو حل کرتا ہے جن کا آپ کو سامنا ہو سکتا ہے۔ ان مسائل کے لیے جو یہاں درج نہیں ہیں، براہ کرم کسٹمر سپورٹ سے رابطہ کریں۔
| مسئلہ | ممکنہ وجہ | حل |
|---|---|---|
| چھوڑے ہوئے ٹانکے | غلط سوئی، جھکی ہوئی سوئی، غلط تھریڈنگ، کپڑے کے لیے سوئی کا غلط سائز۔ | انجکشن کو تبدیل کریں، دوبارہ تھریڈ مشین، درست سوئی کی قسم/سائز کو یقینی بنائیں۔ |
| Thread Breakage (Upper) | Improper threading, tension too tight, poor quality thread, bent needle, burr on needle plate. | Re-thread machine, adjust upper tension, use quality thread, replace needle, check needle plate for damage. |
| Thread Breakage (Bobbin) | Improperly wound bobbin, bobbin inserted incorrectly, lint in bobbin case, tension too tight. | Re-wind bobbin, re-insert bobbin correctly, clean bobbin case, adjust bobbin tension (if adjustable). |
| ناہموار ٹانکے | Incorrect tension settings, pulling/pushing fabric, wrong presser foot. | Adjust tension, guide fabric gently, use appropriate presser foot. |
| مشین شروع نہیں ہو رہی | Not plugged in, power switch off, foot controller not connected. | Check power connections, ensure switch is ON, connect foot controller. |
وضاحتیں
- ماڈل نمبر: 8100000017663 (IT 1028 Glamour)
- برانڈ: جینوم
- مواد: پلاسٹک
- وزن: 8 کلوگرام
- طول و عرض (P x L x H): 10 cm x 35 cm x 25 cm (Depth x Width x Height)
- طاقت کا منبع: الیکٹرک کیبل
- Stitch Types: 12
- ہک کی قسم: چشم کشا
- بٹن ہول کی قسم: Automatic Four-Step
وارنٹی اور سپورٹ
For warranty information, service, or technical support, please refer to the warranty card included with your product or contact your authorized Janome dealer or customer service center. Keep your purchase receipt as proof of purchase.