
1. تعارف
This manual provides detailed instructions for the safe and efficient installation, operation, and maintenance of your RAGGIE RG-PT30 MPPT Solar Charge Controller. Please read this manual thoroughly before attempting any installation or operation to ensure optimal performance and longevity of the device.
2. حفاظتی ہدایات
- Ensure all connections are correct and secure before applying power. Incorrect wiring can damage the controller and connected devices.
- Always connect the battery first, then the solar panel, and finally the load. Disconnect in the reverse order: load, then solar panel, then battery.
- Do not disassemble or attempt to repair the controller yourself. Refer to qualified personnel for service.
- براہ راست سورج کی روشنی، زیادہ درجہ حرارت اور نمی سے دور، اچھی ہوادار جگہ پر کنٹرولر انسٹال کریں۔
- Use appropriate circuit breakers or fuses for the battery and solar panel circuits.
- Wear protective eyewear when working with batteries.
3. پروڈکٹ ختمview
The RAGGIE RG-PT30 is an advanced Maximum Power Point Tracking (MPPT) solar charge controller designed to optimize the power harvest from your solar panels and efficiently charge your battery bank. It supports 12V and 24V battery systems and features a 30A charging capacity, an intuitive LED display, and multiple USB output ports for charging external devices.
3.1 کلیدی خصوصیات
- MPPT (Maximum Power Point Tracking) Technology for enhanced charging efficiency.
- خودکار 12V/24V سسٹم والیومtagای پہچان.
- 30A maximum charge current.
- LED screen display for real-time monitoring of input, battery, and output status.
- Four 5V 2A USB output ports for device charging.
- Comprehensive electronic protection functions.
3.2 اجزاء کی شناخت

شکل 1: سامنے View of the RAGGIE RG-PT30 Controller. This image shows the front panel of the solar charge controller, featuring the LED display at the top, two control buttons (MENU and POWER) below the display, and four 5V 2A USB output ports at the bottom right. The main terminals for solar input, battery, and load are located at the very bottom.
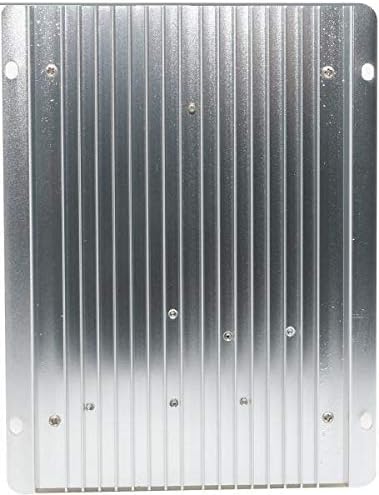
شکل 2: پیچھے View of the RAGGIE RG-PT30 Controller. This image displays the rear side of the solar charge controller, characterized by its metallic heat sink fins. These fins are designed to dissipate heat generated during operation, ensuring the controller maintains optimal temperature and performance.
4. سیٹ اپ اور انسٹالیشن
4.1 کنٹرولر لگانا
- ایک خشک، ہوادار جگہ کا انتخاب کریں، جو براہ راست سورج کی روشنی اور نمی سے محفوظ ہو۔
- Mount the controller vertically on a non-flammable surface to allow for proper heat dissipation.
- Ensure there is sufficient clearance around the controller for air circulation.
4.2 وائرنگ رابطے
Follow the connection order strictly to prevent damage to the controller or system components. Use appropriate wire gauges for your system's current and distance.
- بیٹری کو جوڑیں: Connect the positive and negative terminals of the battery to the corresponding battery terminals on the controller. The controller will automatically detect the system voltage (12V یا 24V)۔
- سولر پینل کو جوڑیں: Connect the positive and negative terminals of the solar panel(s) to the corresponding solar input terminals on the controller.
- ڈی سی لوڈ کو جوڑیں (اختیاری): Connect the positive and negative terminals of your DC load to the corresponding load terminals on the controller.
Important: Ensure correct polarity for all connections. Reverse polarity can cause permanent damage.
5. آپریٹنگ ہدایات
5.1 ایل ای ڈی ڈسپلے
The LED screen provides real-time information about your solar system:
- ان پٹ: والیوم دکھاتا ہے۔tage and current from the solar panel.
- بیٹری: بیٹری والیوم دکھاتا ہے۔tagای اور چارج کرنٹ۔
- آؤٹ پٹ: Indicates the load voltagای اور موجودہ.
5.2 بٹن کے افعال
- مینو بٹن: Press to cycle through different display parameters or enter settings mode.
- پاور بٹن: Press to turn the DC load output ON/OFF. Long press may enter or exit certain settings.
5.3 USB آؤٹ پٹ
The four 5V 2A USB ports can be used to charge compatible electronic devices. These ports are active when the controller is powered and the battery has sufficient charge.
6 دیکھ بھال
- باقاعدہ معائنہ: وقتاً فوقتاً تمام وائرنگ کنکشن کو سختی اور سنکنرن کے لیے چیک کریں۔
- صفائی: کنٹرولر کو صاف اور دھول اور ملبے سے پاک رکھیں۔ صفائی کے لیے خشک کپڑا استعمال کریں۔
- وینٹیلیشن: Ensure that the ventilation openings and heat sink fins are not obstructed.
- بیٹری چیک: Regularly check the battery's state of charge and electrolyte level (for flooded batteries).
7 خرابیوں کا سراغ لگانا
| مسئلہ | ممکنہ وجہ | حل |
|---|---|---|
| کوئی ڈسپلے/کنٹرولر آن نہیں ہے۔ | بیٹری منسلک نہیں ہے یا کم والیومtage; reverse polarity. | بیٹری کنکشن اور والیوم چیک کریں۔tage درست قطبیت کو یقینی بنائیں۔ |
| بیٹری چارج نہیں ہو رہی | Solar panel not connected; low solar input; faulty panel/wiring. | Check solar panel connections. Verify solar panel output voltage. Ensure sufficient sunlight. |
| لوڈ کام نہیں کر رہا ہے۔ | Load output turned off; overload; faulty load. | Press POWER button to turn on load. Reduce load. Check load device. |
| USB پورٹس کام نہیں کر رہے ہیں۔ | بیٹری جلدtage too low; controller fault. | Ensure battery is adequately charged. If problem persists, contact support. |
8. وضاحتیں
| پیرامیٹر | قدر |
|---|---|
| ماڈل | RG-PT30 |
| برانڈ | RAGGIE |
| چارج موڈ | MPPT (زیادہ سے زیادہ پاور پوائنٹ ٹریکنگ) |
| نظام جلد۔tage | 12V / 24V Auto Recognition |
| زیادہ سے زیادہ چارج کرنٹ | 30A |
| ڈسپلے کی قسم | ایل ای ڈی اسکرین |
| USB آؤٹ پٹ | 4 x 5V / 2A |
| ASIN | B07PC3TNCB |
| پہلی تاریخ دستیاب ہے۔ | 3 مارچ 2019 |
9. وارنٹی اور سپورٹ
For warranty information or technical support, please refer to the documentation provided with your purchase or contact your retailer. Keep your purchase receipt as proof of purchase.