1. پروڈکٹ ختمview
The OOYCYOO 100 Amp MPPT Solar Charge Controller, Model KP60 100, is designed for efficient management of solar power systems. It automatically identifies 12V or 24V battery systems and is compatible with various battery types, including AGM, Sealed, Gel, Flooded, and Lithium. This controller features advanced Maximum Power Point Tracking (MPPT) technology to maximize energy harvest from solar panels, ensuring optimal charging for your battery bank.
Key features include a backlit LCD display for real-time monitoring, enhanced safety protections, and a high DC/DC transfer efficiency of up to 98.7%.

شکل 1: سامنے view of the OOYCYOO 100 Amp MPPT Solar Charge Controller, showing the LCD display and connection terminals.
2. حفاظتی ہدایات
براہ کرم تنصیب اور آپریشن سے پہلے تمام ہدایات اور انتباہات کو احتیاط سے پڑھیں۔ ان ہدایات پر عمل کرنے میں ناکامی کے نتیجے میں بجلی کا جھٹکا لگ سکتا ہے، آگ لگ سکتی ہے یا شدید چوٹ لگ سکتی ہے۔
- Ensure all wiring is correctly polarized and securely connected to prevent damage to the controller and connected devices.
- Always disconnect the solar panel array and battery before installing or adjusting the controller.
- آتش گیر مواد اور براہ راست سورج کی روشنی سے دور، اچھی ہوادار جگہ پر کنٹرولر انسٹال کریں۔
- Do not disassemble or attempt to repair the controller. Refer to qualified personnel for service.
- زیادہ کرنٹ سے بچانے کے لیے تمام کنکشنز کے لیے مناسب سرکٹ بریکر یا فیوز استعمال کریں۔
- تنصیب کے دوران مناسب ذاتی حفاظتی سامان، بشمول آنکھوں کی حفاظت اور موصلیت والے دستانے پہنیں۔
3. Product Components and Connections
The controller features clearly labeled terminals for solar panel input, battery connection, and load output. It also includes a remote temperature sensor port and USB charging ports.

شکل 2: تفصیلی view of the controller's LCD display, 5S Reset button, Solar Panel Terminal, Battery Terminal, Load Terminal, USB 5V2A ports, Remote Temp Sensor port, and RS485 Communication Port.
پیکیج کا مواد:
- 1 x OOYCYOO 100A MPPT Solar Charge Controller (Model K2500W)
- 1 ایکس درجہ حرارت سینسر
- 1 ایکس یوزر مینوئل (انگریزی)
4. تکنیکی تفصیلات
The following table outlines the technical specifications for the OOYCYOO 100 Amp MPPT Solar Charge Controller (Model KP60 100).
| پیرامیٹر | تفصیلات |
|---|---|
| ریٹیڈ چارج کرنٹ | 100A |
| سسٹم برائے نام والیومtage | 12V/24VDC Auto Identifying |
| 12V System Max. PV Input Power | 1300W |
| 24V System Max. PV Input Power | 2600W |
| زیادہ سے زیادہ پی وی اوپن سرکٹ والیومtagای (آواز) | 100VDC |
| بیٹری والیومtagای رینج | 9V ~ 32V |
| Power Terminal Wire Gauge | 10 AWG |
| طول و عرض (L x W x H) | 12 x 7.8 x 3.2 انچ (30.5 x 19.8 x 8.1 سینٹی میٹر) |
| وزن | 8.84 پاؤنڈ (4 کلوگرام) |
| ڈسپلے کی قسم | LCD |
| آپریٹنگ درجہ حرارت | 45°C (113°F) تک |
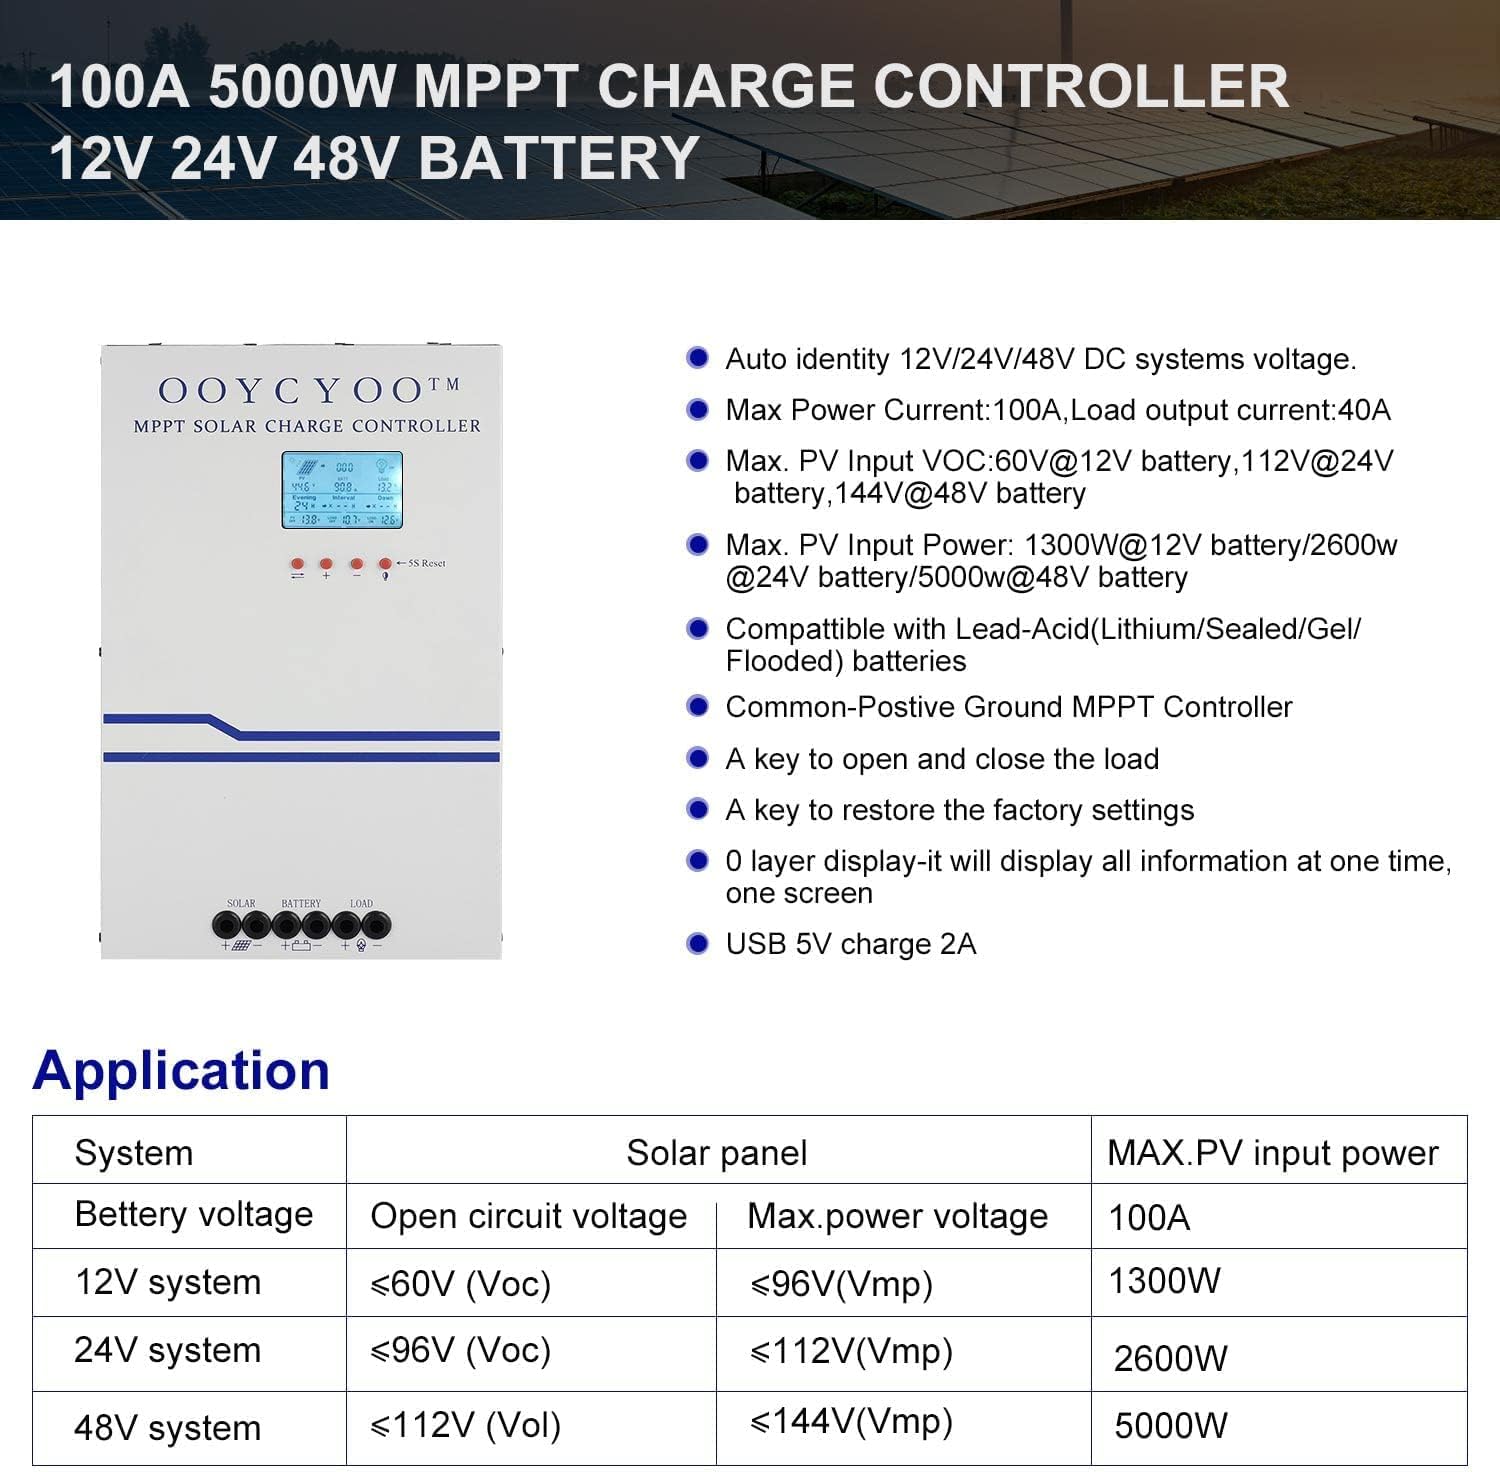
Figure 3: Application table detailing maximum PV input power and voltage for 12V, 24V, and 48V systems.
5. انسٹالیشن گائیڈ
آپ کے سولر چارج کنٹرولر کے محفوظ اور موثر آپریشن کے لیے مناسب تنصیب بہت ضروری ہے۔ احتیاط سے ان اقدامات پر عمل کریں:
5.1 کنٹرولر لگانا
- ایک خشک، ہوادار جگہ کا انتخاب کریں، جو براہ راست سورج کی روشنی، زیادہ درجہ حرارت اور نمی سے محفوظ ہو۔
- Ensure sufficient clearance around the controller for proper airflow, especially around the cooling vents.
- مناسب فاسٹنرز کا استعمال کرتے ہوئے کنٹرولر کو عمودی طور پر غیر آتش گیر سطح پر لگائیں۔
5.2 وائرنگ رابطے
Connect the components in the following order: Battery > Solar Panel > Load. Always ensure correct polarity.
- بیٹری کو جوڑیں: Connect the battery cables to the battery terminals on the controller. Ensure the positive (+) and negative (-) terminals are correctly matched. The controller will automatically detect the battery voltage (12V یا 24V)۔
- سولر پینل کو جوڑیں: Connect the solar panel cables to the PV input terminals on the controller. Verify correct polarity. Ensure the open circuit voltage (Voc) of your solar array does not exceed 100VDC.
- لوڈ کو جوڑیں: Connect your DC load to the load output terminals. Ensure the load current does not exceed the controller's rated load current.
- درجہ حرارت سینسر کو مربوط کریں: Plug the remote temperature sensor into its designated port. This sensor helps the controller optimize charging based on battery temperature.
The controller is compatible with various battery types:

Figure 4: The controller supports AGM, Sealed, Gel, Flooded, and Lithium-Iron phosphate batteries for 12V/24V/48V systems.
6. آپریشن گائیڈ
Once installed, the controller will begin operation. The LCD display provides real-time system status and allows for configuration.
6.1 LCD ڈسپلے
The backlit LCD display shows various parameters such as battery voltage, charging current, solar panel voltage, load status, and accumulated energy (KWH). Use the buttons below the display to navigate through the different screens and access settings.
6.2 بنیادی ترتیبات
The controller allows users to set parameters for different battery types (Lithium, LiFePO4, Li(NiCoMn)O2, Flooded, Sealed, Gel). Refer to the on-screen menu for specific adjustments to absorption voltagای، فلوٹ والیومtagای، اور کم والیومtage disconnect settings. A load timer function is also available for controlling DC loads.
6.3 کولنگ فین آپریشن
The built-in cooling fan activates automatically when the internal temperature exceeds 45°C (113°F) and turns off when the temperature drops below 40°C (104°F). This mechanism ensures optimal performance and extends the lifespan of the controller.
7 دیکھ بھال
Regular maintenance helps ensure the longevity and optimal performance of your solar charge controller.
- صفائی: Periodically clean the controller's exterior with a dry cloth. Ensure cooling vents are free from dust and debris.
- رابطے: تنگی اور سنکنرن کے لیے تمام وائرنگ کنکشنز کا سالانہ معائنہ کریں۔ ڈھیلا کنکشن زیادہ گرمی اور نقصان کا سبب بن سکتا ہے۔
- ماحولیات: تصدیق کریں کہ تنصیب کا ماحول خشک اور ہوادار ہے۔
8 خرابیوں کا سراغ لگانا
The controller incorporates multiple protection functions to safeguard your system. If an issue arises, check the LCD display for error codes or indicators.
8.1 تحفظ کے افعال
- PV Over Current/Power Protection
- PV Short Circuit Protection
- PV ریورس پولرٹی پروٹیکشن
- Night Reverse Charging Protection
- بیٹری ریورس پولرٹی پروٹیکشن
- جلد پر بیٹریtage تحفظ
- بیٹری اوور ڈسچارج پروٹیکشن
- Battery Overheating, Controller Overheating Protection
- Lithium Battery Low Temperature Protection
- لوڈ شارٹ سرکٹ تحفظ
- اوورلوڈ تحفظ
- TVS ہائی والیومtagای عارضی تحفظ۔
8.2 عام مسائل
- کوئی چارجنگ نہیں: Check solar panel connections, ensure sufficient sunlight, and verify battery voltage is within operating range.
- لوڈ کام نہیں کر رہا: Check load connections, ensure battery voltage کم والیوم سے اوپر ہے۔tage disconnect setting, and verify load timer settings.
- زیادہ گرم ہونا: Ensure adequate ventilation around the controller and that cooling vents are clear.
- غلط جلد۔tagای ریڈنگز: Verify all connections are secure and the temperature sensor is properly installed.
اگر ان پوائنٹس کو چیک کرنے کے بعد بھی مسائل برقرار رہتے ہیں، تو براہ کرم کسٹمر سپورٹ سے رابطہ کریں۔
9. وارنٹی اور سپورٹ
The OOYCYOO 100 Amp MPPT Solar Charge Controller is a professional product. For any questions or technical assistance, please contact us directly via email. We are committed to providing prompt support and ensuring your satisfaction.
مخصوص وارنٹی شرائط و ضوابط کے لیے براہ کرم اپنی خریداری کی دستاویزات دیکھیں۔