
1. تعارف
خریداری کے لیے آپ کا شکریہasing the MUSE M-10 Red Radio Alarm Clock. This manual provides essential information for the safe and efficient operation of your device. Please read these instructions carefully before use and retain them for future reference.

Figure 1: MUSE M-10 Red Radio Alarm Clock. This image shows the front view of the red alarm clock with its digital LED display showing '12:00' and various control buttons on the top panel.
2. حفاظتی ہدایات
- آلات کو چلانے سے پہلے تمام ہدایات پڑھیں۔
- آگ یا جھٹکے کے خطرات سے بچنے کے لیے اس آلے کو بارش یا نمی کے سامنے نہ رکھیں۔
- یقینی بنائیں کہ پاور اڈاپٹر آسانی سے قابل رسائی ہے۔
- صرف مینوفیکچرر کی طرف سے مخصوص منسلکات/لوازمات استعمال کریں۔
- Do not place the product in direct sunlight or near heat sources.
- Avoid placing the product on surfaces that are unstable or subject to vibration.
- سی کو نہ کھولیں۔asing; تمام خدمات کو اہل اہلکاروں کو بھیجیں۔
- مقامی ضابطوں کی پیروی کرتے ہوئے، استعمال شدہ بیٹریوں کو ذمہ داری سے ٹھکانے لگائیں۔
3. پروڈکٹ ختمview
3.1 Front Panel and Display
The front panel features a clear 0.6-inch white LED display for time and alarm indicators.
3.2 ٹاپ پینل کنٹرولز
The top panel houses all control buttons for easy access:
- ایم ای ایم: Memory button for saving and recalling radio presets.
- سیٹ: Button for setting time and alarm parameters.
- AL1: Alarm 1 setting button.
- AL2: Alarm 2 setting button.
- << HR: Hour adjustment button (backward).
- MIN >>: Minute adjustment button (forward).
- اسنوز: Activates the snooze function during an alarm.
- نیند: نیند ٹائمر فنکشن کو چالو کرتا ہے۔
- دھیما: ڈسپلے کی چمک کو ایڈجسٹ کرتا ہے۔

شکل 2: ختمview of the MUSE M-10 Red Radio Alarm Clock's functions, including its 0.6-inch white LED display, PLL radio, 20 FM presets, dimmer, dual alarm, snooze, and sleep features.
4. سیٹ اپ
4.1 پاور کنکشن
Connect the provided AC adapter to the DC IN jack on the rear of the unit and then plug it into a standard wall outlet. The unit will power on and the display will light up.
4.2 بیٹری بیک اپ کی تنصیب
For time and alarm settings backup during a power outage, install 2 x AAA batteries (not included) into the battery compartment located on the bottom of the unit. Ensure correct polarity (+/-) when inserting batteries.
5. آپریٹنگ ہدایات
5.1 وقت کا تعین
- دبائیں اور تھامیں۔ سیٹ گھنٹے کے ہندسے فلیش تک بٹن.
- استعمال کریں۔ << HR or MIN >> گھنٹے کو ایڈجسٹ کرنے کے لیے بٹن۔
- دبائیں سیٹ again, and the minute digits will flash.
- استعمال کریں۔ << HR or MIN >> منٹ کو ایڈجسٹ کرنے کے لئے بٹن.
- دبائیں سیٹ ایک بار پھر تصدیق کرنے اور ٹائم سیٹنگ موڈ سے باہر نکلنے کے لیے۔
5.2 الارم سیٹ کرنا (الارم 1 اور الارم 2)
یونٹ میں دو آزاد الارم موجود ہیں۔
- دبائیں اور تھامیں۔ AL1 (یا AL2) button until the alarm hour digits flash.
- استعمال کریں۔ << HR or MIN >> مطلوبہ الارم گھنٹے سیٹ کرنے کے لیے بٹن۔
- دبائیں AL1 (یا AL2) again, and the alarm minute digits will flash.
- استعمال کریں۔ << HR or MIN >> مطلوبہ الارم منٹ سیٹ کرنے کے لیے بٹن۔
- دبائیں AL1 (یا AL2) again to select the alarm source: بزر or ریڈیو.
- دبائیں AL1 (یا AL2) once more to confirm and activate the alarm. An alarm icon will appear on the display.
5.3 ایف ایم ریڈیو آپریشن
The unit has a PLL FM radio with 20 preset stations.
- ٹیوننگ: دبائیں << HR or MIN >> buttons to manually tune the radio frequency. Press and hold these buttons for automatic scanning to the next available station.
- پری سیٹ محفوظ کرنا: اپنے مطلوبہ اسٹیشن پر ٹیون کریں۔ دبائیں اور تھامیں۔ ایم ای ایم button until 'P01' (or the next available preset number) flashes. Use << HR or MIN >> پہلے سے سیٹ نمبر کو منتخب کرنے کے لیے، پھر دبائیں۔ ایم ای ایم دوبارہ بچانے کے لئے.
- یاد رکھنا مختصراً دبائیں۔ ایم ای ایم محفوظ کردہ پری سیٹ اسٹیشنوں کے ذریعے سائیکل کرنے کے لیے بٹن۔
5.4 اسنوز فنکشن۔
جب الارم بجتا ہے تو دبائیں اسنوز کریں تقریباً 9 منٹ کے لیے الارم کو عارضی طور پر خاموش کرنے کے لیے بٹن۔ اس مدت کے بعد دوبارہ الارم لگے گا۔
5.5 سلیپ ٹائمر فنکشن
دبائیں سونا button repeatedly to set a sleep timer (e.g., 90, 60, 30, 15 minutes, or OFF). The radio will play for the selected duration and then automatically turn off.
5.6 ڈسپلے ڈمر
دبائیں ڈیمر button repeatedly to cycle through display brightness levels: High, Low, or Off.

Figure 3: Key features of the MUSE M-10 Red Radio Alarm Clock, including snooze, radio or buzzer alarm, dimmable display, and FM PLL radio with 20 presets.
6 دیکھ بھال
- صفائی: یونٹ کو نرم، خشک کپڑے سے صاف کریں۔ کھرچنے والے کلینر یا سالوینٹس کا استعمال نہ کریں۔
- بیٹری کی تبدیلی: Replace backup batteries annually or when the display shows signs of dimming during power outages
- ذخیرہ: اگر یونٹ کو ایک توسیعی مدت کے لیے ذخیرہ کر رہے ہیں، تو رساو کو روکنے کے لیے بیک اپ بیٹریاں ہٹا دیں۔
7 خرابیوں کا سراغ لگانا
| مسئلہ | ممکنہ وجہ | حل |
|---|---|---|
| کوئی پاور/ڈسپلے آف نہیں۔ | پاور اڈاپٹر منسلک نہیں ہے یا خراب ہے۔ | پاور اڈاپٹر کنکشن چیک کریں۔ ایک مختلف آؤٹ لیٹ آزمائیں۔ |
| الارم نہیں بجتا ہے۔ | الارم کو چالو نہیں کیا گیا یا غلط سیٹ کیا گیا ہے۔ | Ensure alarm icon is visible on display. Re-check alarm time and source settings. |
| ریڈیو کا ناقص استقبال | FM antenna not extended or poor signal area. | Fully extend the FM wire antenna. Adjust its position for better reception. |
| پاور OU کے بعد ضائع ہونے والا وقت/ترتیباتtage | بیک اپ بیٹریاں انسٹال یا ختم نہیں ہوئی ہیں۔ | Install new AAA batteries for backup. |
8. وضاحتیں
- ماڈل: M-10 ریڈ
- برانڈ: MUSE
- ڈسپلے: 0.6-inch White LED, Digital
- ریڈیو: FM PLL Radio with 20 Presets
- الارم: Dual Alarm (Buzzer or Radio)
- خصوصی خصوصیات: Snooze, Sleep Timer, Display Dimmer (High/Low/Off)
- طاقت کا منبع: AC Adapter (included), 2 x AAA batteries for backup (not included)
- طول و عرض (L x W x H): 12 x 7 x 10.9 سینٹی میٹر (تقریباً 4.7 x 2.8 x 4.3 انچ)
- وزن: 200 گرام (تقریباً 0.44 پونڈ)
- مواد: پلاسٹک
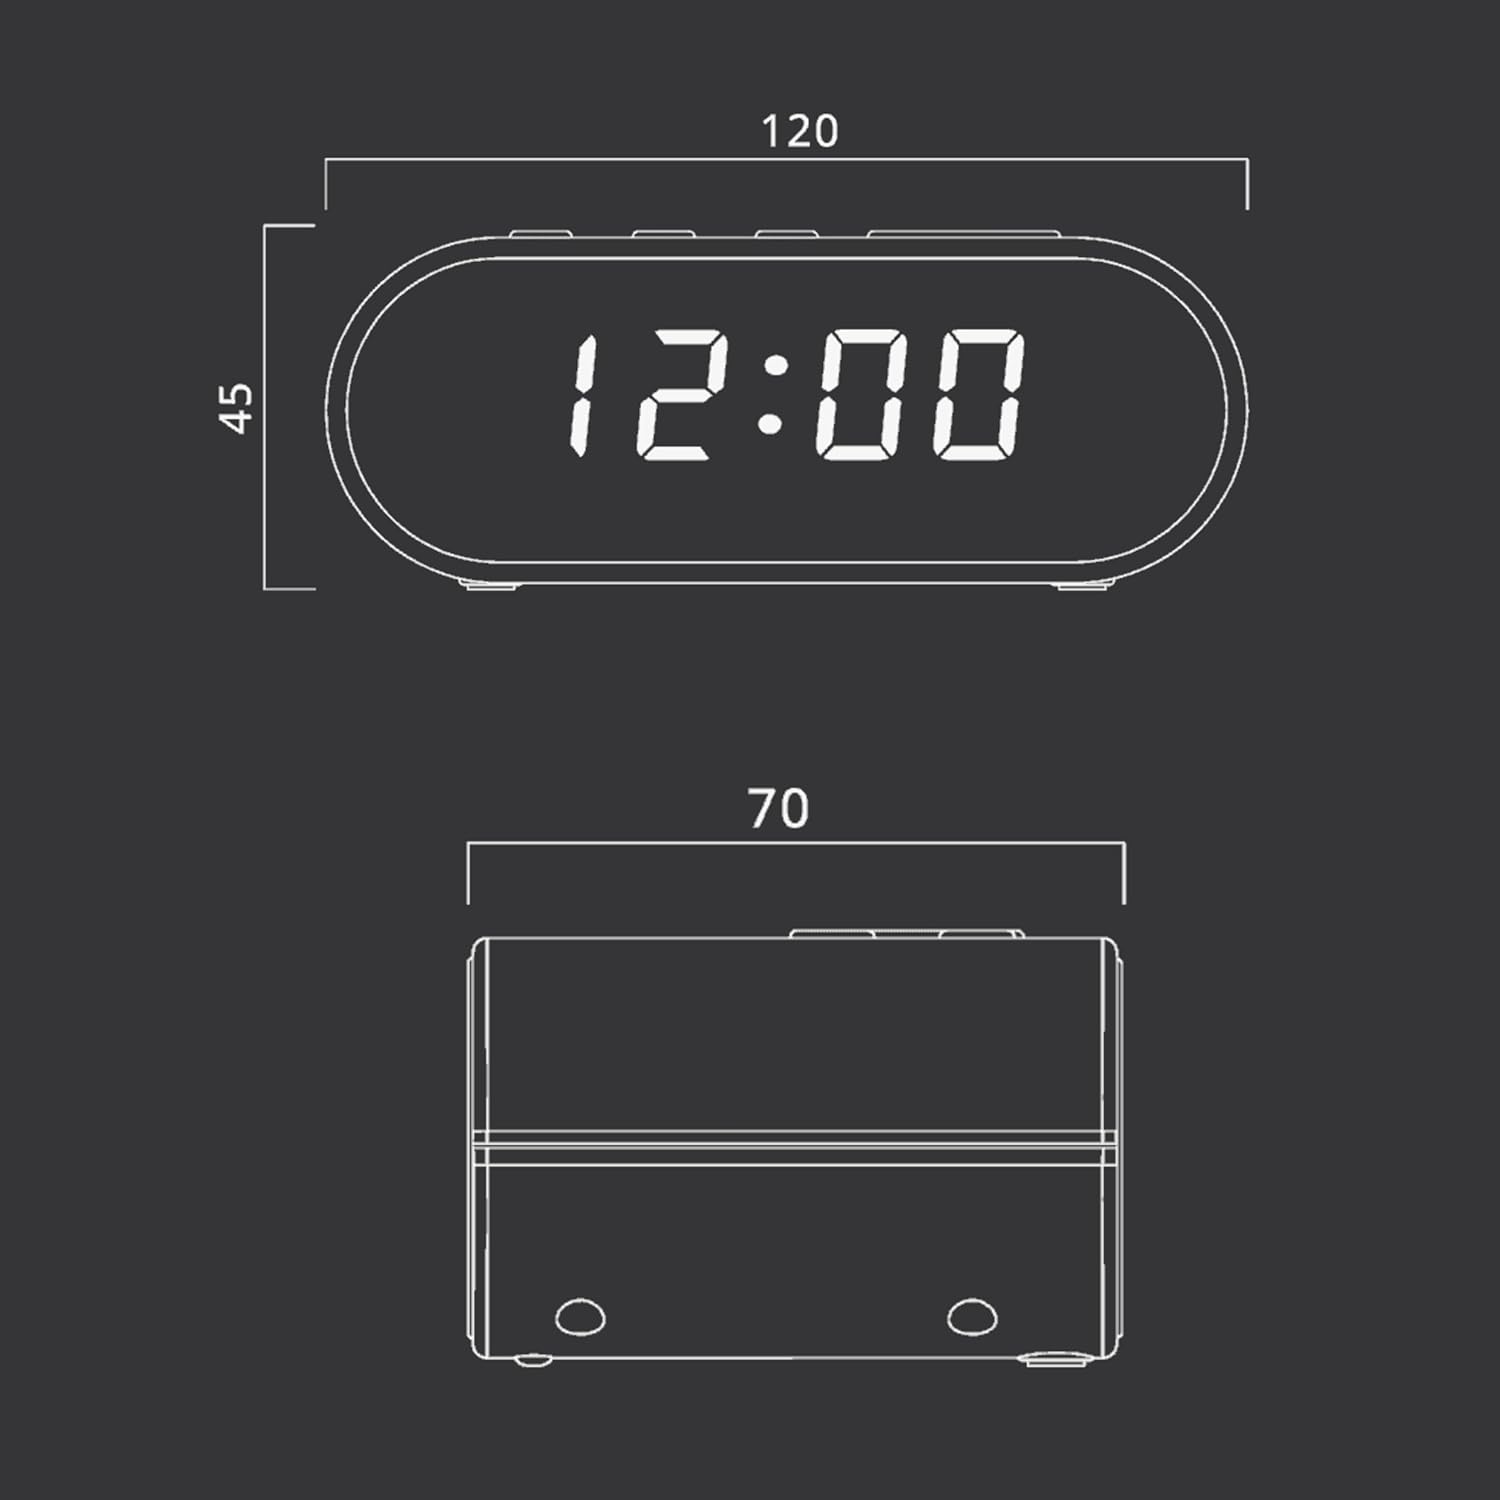
Figure 4: Dimensional drawing of the MUSE M-10 Red Radio Alarm Clock, showing its length (120mm), width (70mm), and height (45mm).
9. وارنٹی اور سپورٹ
For warranty information or technical support, please refer to the warranty card included with your product or contact your local MUSE distributor. Keep your purchase receipt as proof of purchase.