
Sorand AC 230V Floor Heating Thermostat
Sorand AC 230V Digital Programmable Floor Heating Thermostat User Manual
Model: AC 230V Floor Heating Thermostat
تعارف
This manual provides comprehensive instructions for the installation, operation, and maintenance of your Sorand AC 230V Digital Programmable Floor Heating Thermostat. Please read this manual carefully before installation and use to ensure proper function and safety.
The thermostat is designed for electronic floor heating systems and other electrical heating elements. It features a large LCD with backlight, programmable temperature settings, and internal/external temperature sensing capabilities.
حفاظتی معلومات
- تنصیب ایک مستند الیکٹریشن کے ذریعہ انجام دی جانی چاہئے۔
- یقینی بنائیں کہ تنصیب یا دیکھ بھال سے پہلے بجلی منقطع ہے۔
- ترموسٹیٹ کو پانی یا ضرورت سے زیادہ نمی کے سامنے نہ رکھیں۔
- مخصوص والیوم کے اندر کام کریں۔tage اور موجودہ حدود۔
پیکیج کے مشمولات
تصدیق کریں کہ تمام اشیاء پیکیج میں موجود ہیں:
- 1 x Sorand AC 230V Digital Programmable Floor Heating Thermostat
- 1 x External Temperature Sensor Cable (approx. 3 meters)
- 2 ایکس بڑھتے ہوئے پیچ
- 1 ایکس یوزر مینوئل (یہ دستاویز)

Image: Contents of the Sorand thermostat package, showing the main unit, external sensor cable, mounting screws, and the instruction manual.
سیٹ اپ اور انسٹالیشن
اہم: Installation should only be carried out by a qualified electrician. Ensure the main power supply is turned off before commencing any wiring work.
وائرنگ ڈایاگرام
Refer to the wiring diagram on the back of the thermostat unit for correct connections. The terminals are typically labeled as follows:
- L1, N1: Power input (AC 230V)
- LOAD (1, 2): Connection to the heating element
- NTC (5, 6): Connection for the external floor temperature sensor

تصویر: پیچھے view of the Sorand thermostat, displaying the wiring terminals and a simplified diagram for electrical connections.
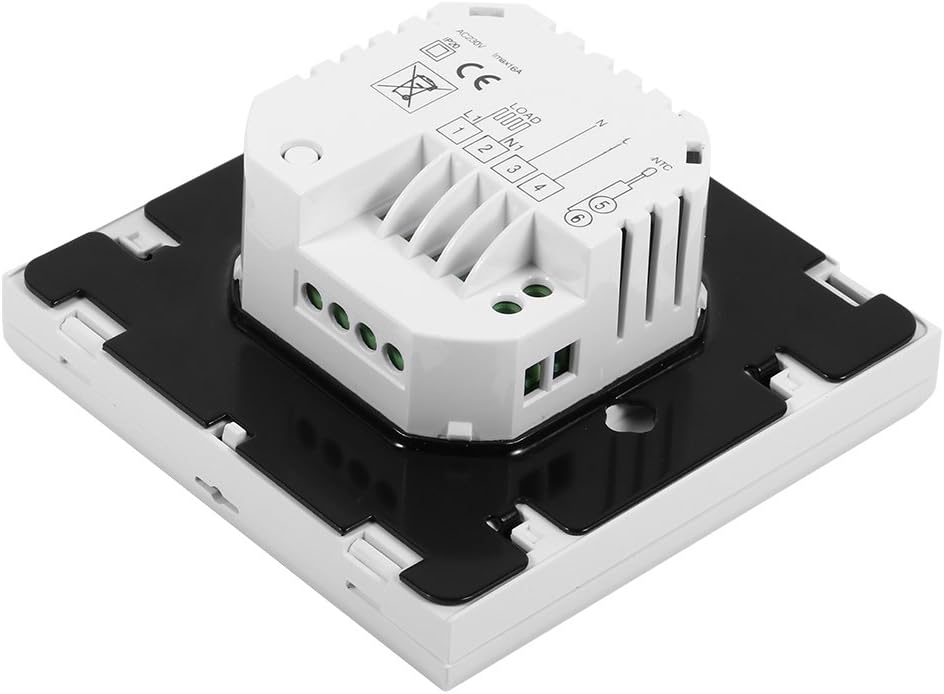
تصویر: سائیڈ view of the Sorand thermostat, illustrating the internal components and ports for wiring connections.
چڑھنا
- Prepare a standard electrical wall box (86x86mm recommended).
- Connect the power supply, heating load, and external sensor wires according to the wiring diagram.
- Carefully push the wired thermostat into the wall box.
- فراہم کردہ پیچ کا استعمال کرتے ہوئے تھرموسٹیٹ کو دیوار کے خانے میں محفوظ کریں۔
- Attach the front panel of the thermostat.
آپریٹنگ ہدایات
The thermostat features a large LCD and touch-sensitive buttons for easy operation.
بٹن کے افعال
- ⏻ (پاور): تھرموسٹیٹ کو آن/آف کرتا ہے۔
- ↻ (Mode/Cycle): Switches between manual mode and programmable mode.
- ⏱ (Clock/Time): Sets the time and enters programming mode.
- ▲ (Up Arrow): Increases temperature setting or adjusts values.
- ▼ (Down Arrow): Decreases temperature setting or adjusts values.

تصویر: سامنے view of the Sorand thermostat, highlighting the LCD screen and the five touch-sensitive control buttons below it.
وقت اور دن کی ترتیب
- دبائیں اور تھامیں۔ ⏱ ٹائم سیٹنگ موڈ میں داخل ہونے کے لیے 3 سیکنڈ کے لیے بٹن۔
- استعمال کریں۔ ▲ اور ▼ گھنٹے کو ایڈجسٹ کرنے کے لیے بٹن دبائیں، پھر دبائیں۔ ⏱ to confirm and move to minutes, then day of the week.
- دبائیں ⏱ again to exit, or wait for 10 seconds for automatic exit.
دستی موڈ آپریشن
In manual mode, the thermostat maintains a constant temperature set by the user.
- دبائیں ↻ button to switch to manual mode (indicated by a hand icon or similar on the display).
- استعمال کریں۔ ▲ اور ▼ آپ کا مطلوبہ درجہ حرارت طے کرنے کیلئے بٹن۔
- The thermostat will now maintain this temperature.
Programmable Mode Operation (6 Periods)
The thermostat allows for 6 programmable periods per day, enabling different temperature settings at different times.
- دبائیں ↻ button to switch to programmable mode (indicated by a clock icon or similar).
- دبائیں اور تھامیں۔ ⏱ پروگرامنگ موڈ میں داخل ہونے کے لیے 3 سیکنڈ کے لیے بٹن۔
- The display will show the first period (e.g., "Period 1"). Use ▲ اور ▼ to set the start time and desired temperature for this period.
- دبائیں ⏱ to move to the next period and repeat the process for all 6 periods.
- After setting all periods, press ⏱ again or wait for automatic exit to save settings.
The thermostat will automatically follow the programmed schedule.
Sensor Selection (Internal/External)
The thermostat can use its internal sensor or the external floor sensor. The selection method is typically found in advanced settings or by a specific button combination. Refer to the on-screen indicators for the active sensor.
دیکھ بھال
- ترموسٹیٹ کے ڈسپلے کو صاف کریں اور casing ایک نرم، خشک کپڑے کے ساتھ. کھرچنے والے کلینر یا سالوینٹس کا استعمال نہ کریں۔
- Ensure the thermostat is free from dust and debris to maintain optimal performance.
- No user-serviceable parts inside. Do not attempt to open or repair the unit.
خرابی کا سراغ لگانا
| مسئلہ | ممکنہ وجہ | حل |
|---|---|---|
| تھرموسٹیٹ آن نہیں ہو رہا ہے۔ | بجلی کی فراہمی نہیں؛ غلط وائرنگ. | Check circuit breaker. Verify wiring connections (consult a qualified electrician). |
| حرارتی نظام آن/آف نہیں ہو رہا ہے۔ | Incorrect temperature setting; thermostat in OFF mode; wiring issue. | Adjust set temperature. Ensure thermostat is ON. Check heating element wiring. |
| غلط درجہ حرارت پڑھنا۔ | Sensor malfunction; incorrect sensor selected. | Verify sensor connection. Check if internal or external sensor is active. |
| ڈسپلے خالی یا ٹمٹماہٹ ہے۔ | Power fluctuation; internal fault. | Reset power to the thermostat. If issue persists, contact support. |
وضاحتیں
| فیچر | تفصیل |
|---|---|
| برانڈ | Sorand |
| ماڈل | AC 230V Floor Heating Thermostat |
| کام کرنے والی جلدtage | AC 230V، 50/60Hz |
| لوڈ کرنٹ | 12/16A (Electric Heating) |
| درستگی | ±0.5℃ |
| Set-point Temperature Range | 5℃ - 35℃ |
| Limit Temperature Range | 5℃ - 99℃ |
| بجلی کی کھپت | <0.3W |
| درجہ حرارت سینسر | NTC (Internal and External) |
| Surface Size | Approx. 86 x 86 x 40mm (3.4 x 3.4 x 1.6 inches) |
| External Sensor Cable Length | تقریبا 3 میٹر (9.8 فٹ) |
| مواد | PC+ABS |
| ڈسپلے کی قسم | بیک لائٹ کے ساتھ ڈیجیٹل LCD |
| کنٹرول کا طریقہ | ٹچ پیڈ کنٹرول |
وارنٹی اور سپورٹ
This product is covered by the manufacturer's standard warranty. Please refer to the product packaging or your point of purchase for specific warranty terms and conditions.
For technical support, troubleshooting assistance, or warranty claims, please contact your retailer or the manufacturer directly. Keep your purchase receipt as proof of purchase.
Ask a question about this manual
Ask about setup, troubleshooting, compatibility, parts, safety, or missing instructions. Manuals+ will review the question and use this page’s manual context to help answer it.