تعارف
This user manual provides comprehensive instructions for assembling and enjoying your TuKIIE DIY Miniature Dollhouse Kit, specifically the Elegant Studio model. This kit is designed to enhance creativity, imagination, patience, and practical ability through hands-on assembly. It is suitable for individuals aged 14 years and up, and can be a rewarding project to complete alone or with family and friends.
The Elegant Studio kit features a detailed miniature office scene, complete with a desk, chair, typewriter, books, and various decorative elements. Once assembled, it serves as a beautiful decorative piece with an integrated LED light.

Image: The fully assembled Elegant Studio miniature dollhouse kit, showcasing its intricate details including a desk, chair, typewriter, and various decorative items.
کیا شامل ہے۔
Your TuKIIE DIY Miniature Dollhouse Kit (Elegant Studio) package includes the following components:
- پیکیج باکس
- Instruction Manual (English, colorful)
- دھول کا احاطہ
- All necessary DIY Miniature Dollhouse Kit components (pre-cut wooden pieces, paper cutouts, fabric, small accessories, LED light components).
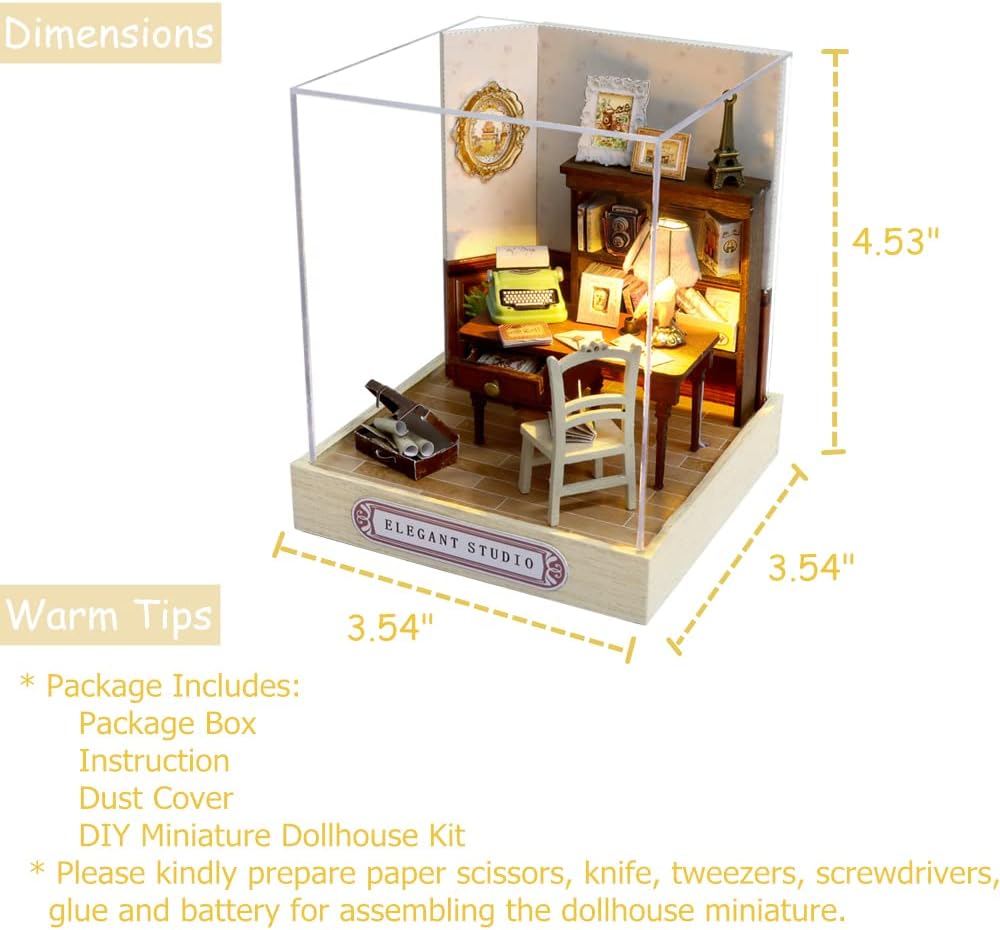
Image: A visual representation of the package contents and the final assembled dimensions of the Elegant Studio kit.
مطلوبہ اوزار (شامل نہیں)
To successfully assemble your dollhouse kit, you will need to prepare the following tools, which are not included in the package due to transportation regulations:
- کاغذ کی قینچی
- Craft Knife (or utility knife)
- چمٹی
- Screwdrivers (small, suitable for miniature screws)
- حکمران
- Silicone Liquid Glue (or other suitable craft adhesive)
- 3 x Batteries (type not specified, but typically AAA for LED lights in similar kits)
اسمبلی کی ہدایات
The assembly process for the Elegant Studio dollhouse kit typically takes about one day to complete. Please follow the detailed, colorful English instruction manual provided in your kit. Patience is key to a successful and enjoyable building experience.
جنرل اسمبلی کے اقدامات:
- تیاری: Unpack all components and organize them. Familiarize yourself with the instruction manual, identifying parts and understanding the sequence of steps.
- Cutting and Shaping: Carefully cut out paper components using sharp scissors or a craft knife. Some pieces may require folding or shaping as indicated in the manual.
- چپکانا: Apply silicone liquid glue sparingly to attach components. Allow sufficient drying time for each glued section before proceeding to the next step to ensure stability.
- Connecting Wooden Pieces: Wooden furniture and structural elements are precisely cut. Fit them together carefully. Some connections may require small screws (included) or glue.
- تفصیل: Attach small accessories, books, pictures, and other decorative items to bring the scene to life. Pay close attention to the placement shown in the manual's illustrations.
- ایل ای ڈی لائٹ کی تنصیب: Install the LED light components as per the instructions. This typically involves connecting wires and inserting batteries into the designated battery box. Ensure connections are secure for proper illumination.
- Dust Cover Placement: Once assembly is complete, carefully place the clear dust cover over the finished dollhouse to protect it from dust and damage.
Visual Guides for Assembly:

تصویر: تفصیلی view of the miniature desk area, showing the typewriter, lamp, and various small items. This highlights the intricate components you will assemble.

تصویر: ایک کولاج شوasing various detailed elements of the Elegant Studio, such as the illuminated lamp, the green typewriter, and miniature books and frames.
سرکاری اسمبلی ویڈیو:
Video: An official assembly guide and showcase for the TuKIIE DIY Miniature Dollhouse Kit, demonstrating key features and the overall building process. (Duration: 0:54)
آپریٹنگ ہدایات
ایل ای ڈی لائٹ آپریشن:
The Elegant Studio kit includes an LED light to illuminate your miniature scene. After installing the required batteries (3 x AAA, not included) into the battery box and connecting the light wires as per the assembly manual, you can turn the light on and off using the switch located on the battery box. Ensure the batteries are inserted with correct polarity.

Image: The Elegant Studio miniature dollhouse with its LED light illuminated, showcasing the cozy ambiance it creates.
دیکھ بھال
To keep your TuKIIE DIY Miniature Dollhouse Kit in excellent condition:
- دھول: Regularly dust the dollhouse and its components using a soft, dry brush or a can of compressed air. The included dust cover will significantly reduce dust accumulation.
- صفائی: For stubborn spots, gently wipe with a slightly damp cloth, then immediately dry. Avoid harsh chemicals or abrasive cleaners.
- ہینڈلنگ: Handle the assembled dollhouse with care, especially when moving it, as some miniature parts can be delicate.
- ذخیرہ: Store the dollhouse in a stable, dry environment away from direct sunlight and extreme temperatures to prevent material degradation.
- بیٹری کی تبدیلی: If the LED light dims or stops working, replace the batteries with fresh ones.
Troubleshooting & Assembly Tips
While assembling your dollhouse, you might encounter some common challenges. Here are some tips and solutions:
- Tiny Pieces & Intricate Details: Many components are very small and require precision.
- استعمال کریں۔ sharp, small scissors or a craft knife for cutting paper pieces, especially intricate shapes like cupcake holders.
- چمٹی are essential for handling and placing small parts accurately.
- استعمال کرنے پر غور کریں۔ میگنفائنگ گلاس if you have difficulty seeing small details.
- Instructions Clarity: If certain steps in the manual seem unclear, try to visualize the final outcome or refer to the product images for guidance. Sometimes, a different perspective can help.
- Wood Piece Discrepancies: Occasionally, slight variations in wood material batches may occur, leading to minor size differences.
- If a wooden piece doesn't fit perfectly, gently sand the edges to achieve a better fit.
- Ensure pieces are correctly oriented before applying glue or force.
- گلو کی درخواست: Use glue sparingly to avoid excess and ensure clean assembly. Allow adequate drying time for each step to prevent parts from shifting.
- صبر کلید ہے: This is a detailed craft project. Do not rush the process. Take breaks if you feel frustrated, and return to it with a fresh mind. Enjoy the therapeutic aspect of creation.
وضاحتیں
| فیچر | تفصیل |
|---|---|
| پروڈکٹ کے طول و عرض (اسمبلڈ) | 3.54 x 3.54 x 4.53 انچ |
| شے کا وزن | 7 اونس |
| پیمانہ | 1:24 پیمانہ |
| تجویز کردہ عمر | 14 سال اور اس سے اوپر |
| اہم مواد | لکڑی |
| لائٹنگ | LED (batteries not included) |
وارنٹی اور سپورٹ
TuKIIE is committed to providing high-quality products. For any questions, concerns, or assistance with your DIY Miniature Dollhouse Kit, please refer to the contact information provided on the product packaging or reach out to TuKIIE customer support through the retailer's platform where you purchased the item. Please retain your proof of purchase for any warranty claims.
While specific warranty details are not provided in this manual, standard consumer rights apply. We recommend checking the retailer's return and warranty policies for detailed information.