
ETA ETA251590000
ETA Falco Smart Robot Vacuum Cleaner with Mopping Function User Manual
ماڈل: ETA251590000
1. تعارف
Thank you for choosing the ETA Falco Smart Robot Vacuum Cleaner with Mopping Function. This manual provides essential information for the safe and efficient operation, maintenance, and troubleshooting of your device. Please read this manual thoroughly before using the product and keep it for future reference.
اہم حفاظتی معلومات
- ہمیشہ یقینی بنائیں کہ روبوٹ ایک مستحکم، سطح کی سطح پر رکھا گیا ہے۔
- آلے کو پانی اور نمی سے دور رکھیں۔
- Do not allow children or unauthorized persons to operate the robot.
- Use only the original charging adapter and accessories provided.
- Before cleaning or maintenance, ensure the robot is powered off and unplugged from the charging station.
- Avoid operating the robot near open flames or flammable materials.
2. پروڈکٹ ختمview
اجزاء اور کنٹرولز
Familiarize yourself with the main parts and controls of your ETA Falco Smart robot vacuum cleaner.
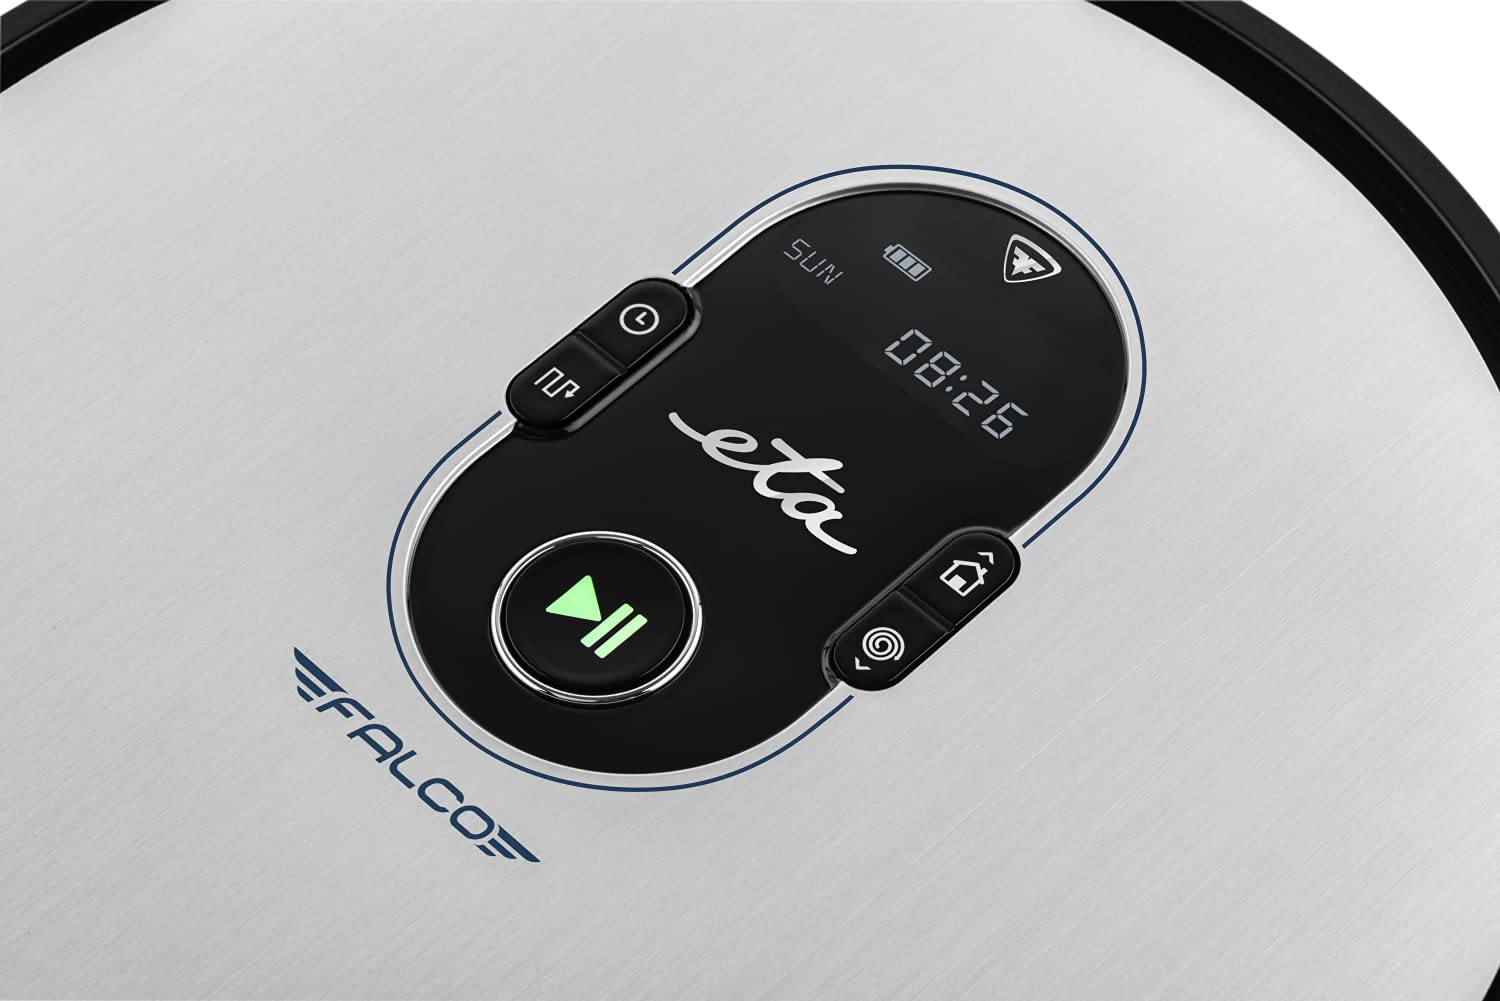
تصویر 2.1: Top panel controls. This image shows the main control panel on the top of the robot, including buttons for power, scheduling, and return to charging station, along with a digital display.

تصویر 2.2: زیریں view. This image displays the bottom of the robot, highlighting the main brush, two side brushes, and the mop attachment.

تصویر 2.3: Underside diagram. This diagram labels the key components on the robot's underside, including the side brushes, main brush, and mop attachment.
3. پیکیج کے مشمولات
پیک کھولنے پر، براہ کرم یقینی بنائیں کہ درج ذیل تمام اشیاء موجود ہیں:
- ETA Falco Smart Robot Vacuum Cleaner
- چارجنگ اسٹیشن
- چارجنگ اڈاپٹر
- ریموٹ کنٹرول
- 2x Spare Side Brushes
- Special Rotary and Lamella Brush
- 2x Cleaning Cloths (Mop Pads)
- اسپیئر HEPA فلٹر
- Mop Attachment with 300 ml Water Tank
- ورچوئل وال
4. سیٹ اپ
4.1 ابتدائی چارجنگ
- Place the charging station against a wall in an open area, ensuring there are no obstacles within 1 meter to the sides and 2 meters in front.
- Connect the charging adapter to the charging station and plug it into a power outlet.
- Place the robot vacuum cleaner on the charging station. Ensure the charging contacts align. The robot will begin charging automatically. A full charge takes approximately 5 hours.
4.2 سائیڈ برش انسٹال کرنا
Attach the side brushes to the designated posts on the underside of the robot by pressing them down until they click into place. Ensure the 'L' and 'R' markings on the brushes match the corresponding markings on the robot.
4.3 Connecting to the ETA SMART App
The ETA SMART app enhances the functionality of your robot. Download the app from your smartphone's app store. Follow the in-app instructions to connect your robot to your home Wi-Fi network and pair it with the app.
4.4 Setting up the Virtual Wall
The virtual wall creates an invisible barrier to restrict the robot's access to certain areas. Place the virtual wall device on the floor where you want to create a boundary. Ensure the infrared beam is directed towards the area you wish to block. The robot will detect this beam and avoid crossing it.

تصویر 4.1: Robot with charging station and virtual wall. This image shows the robot positioned near its charging station, with a virtual wall device placed nearby to illustrate its function.
5. آپریٹنگ ہدایات
5.1 صفائی کے طریقے
The ETA Falco Smart offers four distinct cleaning modes:
- اسمارٹ: General cleaning mode for optimal coverage.
- کلاسک: Standard cleaning pattern.
- EDGE: دیواروں اور فرنیچر کے کناروں کے ساتھ صاف کرتا ہے۔
- سپاٹ: Concentrated cleaning in a specific area.
You can select these modes via the ETA SMART app or the remote control.
5.2 صفائی کا نظام الاوقات
Use the ETA SMART app to set a cleaning schedule for your robot. You can program specific times and days for the robot to automatically start cleaning.
5.3 دستی کنٹرول
You can manually control the robot's movement and functions using the remote control or the ETA SMART app. The app also allows you to monitor cleaning activity, battery charge, and view cleaning routes.

تصویر 5.1: ETA Smart App features. This image displays the ETA Smart App interface on a smartphone, highlighting features such as remote control, cleaning history, activity monitoring, battery status, cleaning modes (SMART, CLASSIC, EDGE, SPOT), cleaning schedule, mopping intensity control, and suction power adjustment.
5.4 موپنگ فنکشن
- Fill the 300 ml water tank with clean water. Do not use detergents or cleaning solutions that are not approved for robot vacuums.
- Attach a clean mop pad to the mop attachment.
- Slide the mop attachment into the designated slot on the underside of the robot.
- صفائی کا چکر شروع کریں۔ روبوٹ بیک وقت ویکیوم اور موپ کرے گا۔
6 دیکھ بھال
باقاعدگی سے دیکھ بھال بہترین کارکردگی کو یقینی بناتی ہے اور آپ کے روبوٹ ویکیوم کلینر کی عمر میں توسیع کرتی ہے۔
6.1 Cleaning the Dust Bin and Filter
- ڈسٹ بن ریلیز بٹن کو دبائیں اور ڈسٹ بن کو ہٹا دیں۔
- ڈسٹ بن کو کھولیں اور اس کے مواد کو کوڑے دان میں خالی کریں۔
- Remove the HEPA filter and primary filter. Tap them gently to remove dust. If washable, rinse under running water and allow to air dry completely before reinserting.
- Wipe the inside of the dust bin with a dry cloth.
- Reassemble the filters and dust bin, then reinsert into the robot.
6.2 مین برش کی صفائی
- روبوٹ کو پلٹائیں۔
- ریلیز ٹیبز کو دبا کر مین برش کور کو ہٹا دیں۔
- مین برش کو باہر نکالیں۔
- Use the cleaning tool (if provided) or scissors to remove hair and debris tangled around the brush.
- Clean the brush compartment.
- Reinsert the main brush and secure the cover.
6.3 سائیڈ برش کی صفائی
Periodically check the side brushes for tangled hair or debris. If necessary, remove them by gently pulling upwards and clean them. Replace worn or damaged brushes with the spare ones provided.
6.4 Cleaning the Mop Pad and Water Tank
After each mopping session, remove the mop pad and wash it thoroughly. Empty any remaining water from the water tank and rinse it. Allow both to air dry completely before storing or reusing.
6.5 صفائی کے سینسر
Wipe the anti-drop sensors, bumper sensors, and charging contacts on the robot and charging station with a clean, dry cloth to ensure proper function.
7 خرابیوں کا سراغ لگانا
If your robot vacuum cleaner encounters an issue, refer to the following common problems and solutions:
| مسئلہ | ممکنہ وجہ | حل |
|---|---|---|
| روبوٹ آن نہیں ہوتا ہے۔ | کم بیٹری؛ پاور سوئچ آف | روبوٹ کو چارج کریں؛ یقینی بنائیں کہ پاور سوئچ آن ہے۔ |
| روبوٹ چارج نہیں کر رہا ہے۔ | Charging contacts dirty; Charging station unplugged | Clean charging contacts; Ensure charging station is plugged in |
| ناقص صفائی کی کارکردگی | ڈسٹ بن بھرا ہوا؛ برش الجھ گئے؛ فلٹر بند | Empty dust bin; Clean brushes; Clean/replace filter |
| روبوٹ اکثر پھنس جاتا ہے۔ | Obstacles on floor; Sensors dirty | Clear floor of cables/small items; Clean sensors |
| Virtual wall not working | Virtual wall batteries low; Incorrect placement | Replace batteries; Adjust virtual wall position |
اگر ان حلوں کو آزمانے کے بعد بھی مسئلہ برقرار رہتا ہے، تو براہ کرم کسٹمر سپورٹ سے رابطہ کریں۔
8. وضاحتیں
Technical specifications for the ETA Falco Smart Robot Vacuum Cleaner (Model ETA251590000):
| فیچر | تفصیل |
|---|---|
| کارخانہ دار | ای ٹی اے |
| پروڈکٹ کے طول و عرض (L x W x H) | 32.5 x 33.5 x 7.5 سینٹی میٹر |
| وزن | 250 گرام |
| آئٹم ماڈل نمبر | ETA251590000 (T2261) |
| ماڈل رنگین | نیلا |
| مواد | پلاسٹک |
| پاور کی قسم | بیٹری سے چلنے والا |
| والیومtage | 3 Volts (14.4V Li-ion battery, 2400 mAh) |
| پیکیج میں اشیاء کی تعداد | 1 |
| خصوصی خصوصیات | Pet brush compatibility, Smart App control, Floating brush system, HEPA filter, Virtual wall |
| شامل اجزاء | Battery, Filter, Charging station, Adapter, Remote control, Side brushes, Rotary brush, Cleaning cloths, Mop attachment, Virtual wall |
| بیٹری کی ساخت | لیتھیم آئن |
| بیٹری کی زندگی | 120 منٹ تک |
| چارج کرنے کا وقت | تقریبا 5 گھنٹے |
| سطح کی سفارش | ٹکڑے ٹکڑے |
| کنٹرولر کی قسم | ایپ کنٹرول |
| اسپیئر پارٹس کی دستیابی | اسپیئر پارٹس کے بارے میں معلومات دستیاب نہیں ہیں۔ |
9. وارنٹی اور سپورٹ
For warranty information, product support, or to inquire about spare parts, please refer to the warranty card included with your purchase or visit the official ETA webسائٹ وارنٹی کے دعووں کے لیے اپنی خریداری کا ثبوت رکھیں۔
Ask a question about this manual
Ask about setup, troubleshooting, compatibility, parts, safety, or missing instructions. Manuals+ will review the question and use this page’s manual context to help answer it.