
1. تعارف
خریداری کے لیے آپ کا شکریہasing the JCPOWER JC1800.5 5-Channel Ampزندہ کرنے والا یہ دستی آپ کی مناسب تنصیب، آپریشن اور دیکھ بھال کے لیے ضروری معلومات فراہم کرتا ہے۔ ampزندہ کرنے والا زیادہ سے زیادہ کارکردگی اور حفاظت کو یقینی بنانے کے لیے یونٹ کو انسٹال کرنے یا چلانے کی کوشش کرنے سے پہلے براہ کرم اس دستی کو اچھی طرح پڑھیں۔
The JC1800.5 is designed to deliver high-quality audio performance for your vehicle's sound system, featuring a 5-channel configuration for versatile speaker and subwoofer setups.
2. حفاظتی ہدایات
تنصیب اور آپریشن کے دوران درج ذیل حفاظتی تدابیر پر عمل کریں:
- پیشہ ورانہ تنصیب کی سفارش کی جاتی ہے: Installation of this product requires experience with electrical wiring and car audio systems. Professional installation is highly recommended.
- بیٹری منقطع کریں: Always disconnect the vehicle's negative battery terminal before starting any installation work to prevent electrical shorts.
- مناسب وائرنگ: Ensure all wiring is correctly connected and insulated to prevent short circuits and damage to the amplifier or vehicle's electrical system. Use appropriate gauge wires as specified.
- چڑھنا: پہاڑ amplifier securely in a dry, well-ventilated area, away from direct sunlight, heat sources, and moisture. Ensure adequate airflow around the unit to prevent overheating.
- فیوز: Always use fuses of the specified rating. Never replace a fuse with one of a higher amperage or bypass the fuse.
- حجم کی سطحیں: Prolonged exposure to high volume levels can cause hearing damage. Adjust the volume to a comfortable level.
- حرارت کی کھپت: دی amplifier generates heat during operation. Do not cover the amplifier or obstruct its heat sinks.
3. پیکیج کے مشمولات
تصدیق کریں کہ تمام اشیاء پیکیج میں موجود ہیں:
- JCPOWER JC1800.5 5-Channel Ampزندگی
- صارف دستی (یہ دستاویز)
- بڑھتے ہوئے ہارڈ ویئر (پیچ)
- Spare Fuses (if included)

Figure 3.1: JCPOWER JC1800.5 Ampاس کی خوردہ پیکیجنگ میں لائفائر۔
4. سیٹ اپ اور انسٹالیشن
آپ کی کارکردگی اور لمبی عمر کے لیے مناسب تنصیب بہت ضروری ہے۔ amplifier. Refer to the diagram below for connection points.
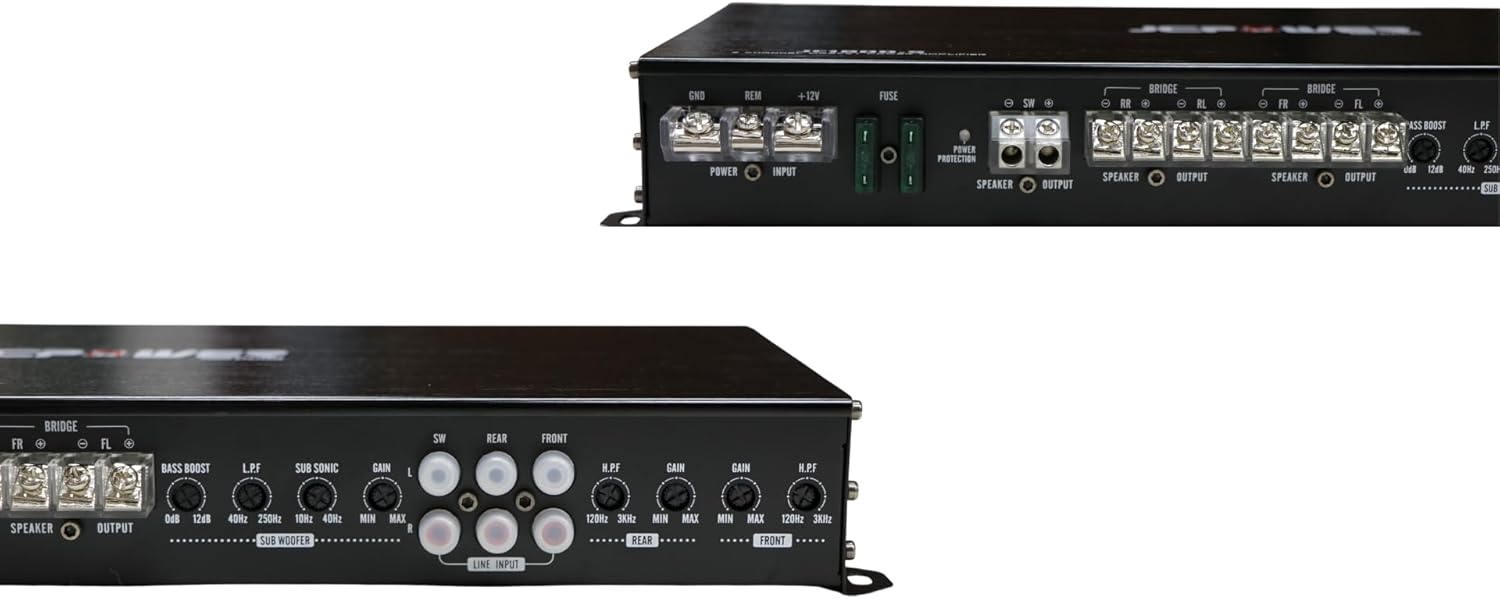
Figure 4.1: Rear panel connections and controls of the JCPOWER JC1800.5 ampزندگی
4.1. بجلی کے رابطے
- گراؤنڈ (GND): Connect a heavy-gauge wire (minimum 8 AWG, preferably 4 AWG) from the amplifier's GND terminal to a clean, unpainted metal point on the vehicle's chassis. Ensure a solid, low-resistance connection.
- ریموٹ (REM): Connect a 18 AWG wire from the ampآپ کے ہیڈ یونٹ کے ریموٹ ٹرن آن آؤٹ پٹ پر لائفائر کا REM ٹرمینل۔ یہ تار موڑ دیتا ہے۔ ampآپ کی کار سٹیریو کے ساتھ لائفائر آن اور آف۔
- +12V (پاور): Connect a heavy-gauge wire (minimum 8 AWG, preferably 4 AWG) from the amplifier's +12V terminal directly to the positive terminal of the vehicle's battery. Install an in-line fuse holder within 18 inches (45 cm) of the battery, using a fuse of appropriate amperage (تصریحات کا حوالہ دیں)۔
4.2 اسپیکر کنکشنز
The JC1800.5 is a 5-channel amplifier. Channels 1-4 are typically used for full-range speakers, and Channel 5 (Subwoofer channel) is for a subwoofer.
- Connect your front speakers to the FR+ and FR- terminals and FL+ and FL- terminals.
- Connect your rear speakers to the RR+ and RR- terminals and RL+ and RL- terminals.
- Connect your subwoofer to the SW+ and SW- terminals.
- Ensure correct polarity (+ to + and - to -) for all speaker connections. Incorrect polarity can lead to poor sound quality.
- Bridging (Channels 1-4): Channels 1-4 can be bridged to power two speakers at higher power. Refer to the amplifier's specifications for minimum impedance when bridging. Connect the speaker to the FL+ and FR- terminals for one bridged channel, and RL+ and RR- for the other.
4.3. Input Connections (RCA)
RCA کیبلز کو اپنے ہیڈ یونٹ کے پری سے جوڑیںamp پر متعلقہ RCA ان پٹ جیکس کو آؤٹ پٹ amplifier (FRONT, REAR, SUBWOOFER). Ensure a secure connection.
5. آپریٹنگ اور ایڈجسٹمنٹ
After installation, carefully adjust the ampزیادہ سے زیادہ آواز کی کارکردگی کے لیے لائفائر کی ترتیبات۔
5.1. ایڈجسٹمنٹ حاصل کریں۔
GAIN کنٹرول سے میل کھاتا ہے۔ amplifier's input sensitivity to the output of your head unit. It is نہیں ایک حجم کنٹرول.
- کو موڑ دیں۔ amplifier's GAIN controls to their minimum (counter-clockwise) position.
- اپنے ہیڈ یونٹ کا حجم اس کی زیادہ سے زیادہ کے تقریباً 75-80% پر سیٹ کریں۔
- آہستہ آہستہ بڑھائیں۔ amplifier's GAIN control until you hear slight distortion, then back it off slightly until the sound is clear.
- Repeat for FRONT, REAR, and SUBWOOFER channels independently.
5.2. Crossover Settings (LPF/HPF)
The built-in crossovers allow you to direct specific frequency ranges to your speakers.
- ایل پی ایف (کم پاس فلٹر): Used for subwoofers. This allows frequencies نیچے the set point to pass through. Adjust the LPF for the subwoofer channel (typically 80Hz-120Hz) to blend with your main speakers.
- HPF (ہائی پاس فلٹر): Used for full-range speakers. This allows frequencies اوپر the set point to pass through. Adjust the HPF for the FRONT and REAR channels (typically 80Hz-100Hz) to prevent low frequencies from distorting smaller speakers.
5.3. باس بوسٹ
The BASS BOOST control (on the subwoofer channel) provides an increase in output at a specific low frequency. Use sparingly, as excessive bass boost can lead to distortion and potential speaker damage.
6 دیکھ بھال
باقاعدگی سے دیکھ بھال آپ کی لمبی عمر اور کارکردگی کو یقینی بناتی ہے۔ ampزندگی
- صفائی: وقتا فوقتا مسح کریں۔ amplifier's exterior with a soft, dry cloth. Do not use harsh chemicals or abrasive cleaners. Ensure ventilation fins are free of dust and debris.
- رابطے: کبھی کبھار تمام پاور، گراؤنڈ، ریموٹ اور سپیکر کے کنکشنز کو چیک کریں تاکہ یہ یقینی بنایا جا سکے کہ وہ محفوظ اور سنکنرن سے پاک ہیں۔
- ماحولیات: یقینی بنائیں amplifier remains in a dry, well-ventilated environment. Avoid exposing it to extreme temperatures or moisture.
7 خرابیوں کا سراغ لگانا
اگر آپ کو اپنے ساتھ مسائل کا سامنا کرنا پڑتا ہے۔ amplifier، درج ذیل عام مسائل اور حل کی طرف رجوع کریں:
| مسئلہ | ممکنہ وجہ | حل |
|---|---|---|
| کوئی پاور / پاور ایل ای ڈی آف نہیں ہے۔ | اڑا ہوا فیوز Poor power/ground connection کوئی ریموٹ ٹرن آن سگنل نہیں۔ | فیوز چیک کریں اور تبدیل کریں۔ تصدیق کریں کہ تمام پاور اور زمینی کنکشن محفوظ ہیں۔ Check remote wire connection and head unit output |
| No Sound / Protection LED On | اسپیکر شارٹ سرکٹ زیادہ گرم ہونا کم جلدtage | Check speaker wiring for shorts مناسب وینٹیلیشن کو یقینی بنائیں؛ اجازت دیں amplifier to cool Check battery and charging system |
| مسخ شدہ آواز | گین سیٹ بہت اونچا غلط کراس اوور ترتیبات اسپیکر مائبادا مماثلت | منافع کی ترتیب کو کم کریں۔ Adjust LPF/HPF settings اس بات کی تصدیق کریں کہ اسپیکر کی رکاوٹ اندر ہے۔ amplifier's limits |
| Engine Noise (Whine) | ناقص زمینی رابطہ RCA cables routed near power wires Faulty RCA cables | Improve ground connection Reroute RCA cables away from power wires Replace RCA cables |
8. وضاحتیں
Key technical specifications for the JCPOWER JC1800.5 ampزندہ:
- چینلز: 5
- RMS Power Output (4 ohm): 35 W x 4 CH + 250 W x 1 CH
- RMS Power Output (2 ohm): 50 W x 4 CH + 500 W x 1 CH
- Bridged Power Output (4 ohm): 100 W x 2 CH (for channels 1-4)
- کل آؤٹ پٹ پاور: 250 Watts (as per product data, likely peak or combined)
- چڑھنے کی قسم: Independent Mount
- پروڈکٹ وزن: 3 کلوگرام
- پیکیج کے طول و عرض: 47.6 x 22.2 x 7 سینٹی میٹر
- ماڈل نمبر: جے سی 1800.5
9. وارنٹی اور سپورٹ
JCPOWER products are designed and manufactured to the highest quality standards. This product is covered by a limited warranty against defects in materials and workmanship. The specific terms and duration of the warranty may vary by region and retailer.
For warranty service, technical support, or further inquiries, please contact your authorized JCPOWER dealer or visit the official JCPOWER webرابطے کی معلومات کے لیے سائٹ۔
وارنٹی کے دعووں کے لیے براہ کرم اپنی خریداری کا ثبوت اپنے پاس رکھیں۔