
1. تعارف
Thank you for choosing the Hikvision AE-DN2016-F3 1080p HD In-Car IP Camera. This device is designed to provide reliable video recording of your journeys, enhancing driving safety and providing evidence in case of incidents. Featuring a 135° wide-angle lens, Full HD resolution, built-in Wi-Fi, and a G-sensor, this dashcam offers comprehensive surveillance for your vehicle.
Please read this manual carefully before operating the device to ensure proper use and optimal performance. Keep this manual for future reference.
2. حفاظتی معلومات
To prevent injury to yourself or others, and to avoid damage to your device, please observe the following safety precautions:
- ڈیوائس کو انتہائی درجہ حرارت، طویل عرصے تک براہ راست سورج کی روشنی، یا زیادہ نمی کے سامنے نہ رکھیں۔
- Ensure the dashcam is installed securely and does not obstruct the driver's view یا گاڑی کی حفاظتی خصوصیات میں مداخلت کریں (مثلاً، ایئر بیگ)۔
- صرف فراہم کردہ پاور اڈاپٹر اور کیبلز استعمال کریں۔ غیر مجاز لوازمات کا استعمال آلہ کو نقصان پہنچا سکتا ہے اور وارنٹی کو باطل کر سکتا ہے۔
- Do not attempt to disassemble, repair, or modify the device yourself. Contact authorized service personnel for any repairs.
- Comply with all local laws and regulations regarding in-car camera usage and privacy.
- ڈیوائس کو بچوں سے دور رکھیں۔
3. پیکیج کے مشمولات
Please check the package for the following items. If any item is missing or damaged, contact your retailer.
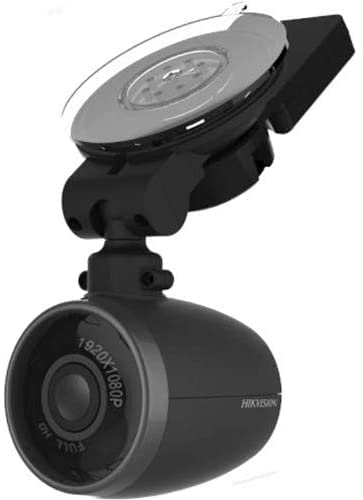
Image: Contents of the Hikvision AE-DN2016-F3 Dashcam package, showing the dashcam, power adapter, micro remote, power cable, quick connect window mount, and user manual.
- ڈیش کیم: The main recording unit.
- پاور اڈاپٹر: For connecting the dashcam to your vehicle's power outlet.
- Micro Remote: A small remote control for specific functions.
- بجلی کی تار: USB cable for connecting the dashcam to the power adapter.
- Quick Connect Window Mount: For attaching the dashcam to the windshield.
- مالکان کا دستورالعمل: یہ ہدایت گائیڈ۔
4. تنصیب
4.1 ڈیش کیم کو لگانا
- ایک مقام کا انتخاب کریں: Select a position on your front windshield that does not obstruct your view or interfere with the driver's side airbag. Typically, this is behind the rearview آئینہ
- ونڈشیلڈ کو صاف کریں: Ensure the chosen area on the windshield is clean and dry for optimal adhesion of the mount.
- ماؤنٹ منسلک کریں: Secure the quick connect window mount to the cleaned area of the windshield. Press firmly to ensure it is properly adhered.
- ڈیش کیم منسلک کریں: Connect the dashcam to the quick connect window mount. The magnetic connection allows for easy attachment and detachment. Adjust the camera angle to ensure it captures the road ahead effectively (135° viewزاویہ)۔
4.2 پاور کنکشن
- Connect one end of the power cable to the dashcam's power input port.
- Connect the other end of the power cable to the provided power adapter.
- Plug the power adapter into your vehicle's 12V power outlet (cigarette lighter socket).
- Route the power cable neatly along the windshield and dashboard edges to avoid obstruction and ensure safety.
4.3 SD کارڈ داخل کرنا
The device supports up to a 128GB SD card for video recording. An SD card is required for recording functionality.
- Locate the SD card slot on the dashcam.
- Insert the SD card into the slot with the contacts facing the correct direction until it clicks into place.
- To remove, gently push the SD card until it pops out.
5. آپریشن
5.1 پاور آن/آف۔
The dashcam is designed for plug-and-play operation. Once connected to the vehicle's power supply and the engine is started, the dashcam will automatically power on and begin recording. When the engine is turned off, the dashcam will automatically save the current recording and power off.
5.2 ریکارڈنگ موڈز
- مسلسل ریکارڈنگ: The dashcam continuously records video in a loop. When the SD card is full, the oldest files کو نئی ریکارڈنگز کے ذریعے اوور رائٹ کر دیا جائے گا۔
- ایمرجنسی ریکارڈنگ (G-Sensor): The built-in G-sensor detects sudden impacts or strong vibrations (e.g., during a collision). When triggered, the current video segment is automatically locked and saved to a protected folder, preventing it from being overwritten by continuous recording.
5.3 وائی فائی کنیکٹیویٹی
The dashcam features a built-in Wi-Fi module, allowing you to connect it to your smartphone via a dedicated app. This enables live view, video playback, downloading recordings, and adjusting settings.
- Download the official Hikvision dashcam app from your smartphone's app store (iOS/Android).
- ڈیش کیم آن کریں۔
- On your smartphone, go to Wi-Fi settings and connect to the dashcam's Wi-Fi network (SSID and password can usually be found on the device or in the app's initial setup).
- Open the app to manage your dashcam.
5.4 Using the Micro Remote
The micro remote can be used to manually trigger an emergency recording or take a snapshot, depending on its configuration within the app. Refer to the app's instructions for specific remote functions.
6. Settings and App Usage
The Hikvision dashcam app provides a user-friendly interface to customize your dashcam's settings:
- ویڈیو ریزولوشن: Adjust recording quality (e.g., 1080p, 720p).
- لوپ ریکارڈنگ کا دورانیہ: Set the length of video segments (e.g., 1, 3, 5 minutes).
- جی سینسر کی حساسیت: Adjust the sensitivity of the G-sensor to prevent false triggers or ensure proper detection.
- آڈیو ریکارڈنگ: Enable or disable the built-in microphone.
- تاریخ/وقت سینٹamp: Ensure accurate date and time are displayed on recordings.
- وائی فائی کی ترتیبات: Change Wi-Fi SSID and password if desired.
- فرم ویئر اپ ڈیٹس: Check for and install the latest firmware for improved performance and features.
For detailed instructions on each setting, please refer to the in-app help section.
7 دیکھ بھال
- صفائی: Use a soft, dry cloth to clean the camera lens and body. Do not use chemical cleaners or abrasive materials.
- ایس ڈی کارڈ فارمیٹنگ: It is recommended to format the SD card regularly (e.g., once a month) using the dashcam's app to maintain optimal recording performance and prevent data corruption. Back up any important fileفارمیٹنگ سے پہلے s۔
- ذخیرہ: If storing the dashcam for an extended period, remove it from the vehicle and store it in a cool, dry place away from direct sunlight.
8 خرابیوں کا سراغ لگانا
| مسئلہ | ممکنہ حل |
|---|---|
| ڈیش کیم آن نہیں ہے۔ |
|
| Recording stops or fails. |
|
| وائی فائی کنکشن کے مسائل۔ |
|
| ویڈیو کا معیار خراب ہے۔ |
|
9. وضاحتیں
| فیچر | تفصیل |
|---|---|
| ماڈل | AE-DN2016-F3 |
| ویڈیو ریزولوشن | 1080p فل ایچ ڈی |
| Viewآئی اینگل | 135° تک |
| آڈیو | بلٹ ان مائیکروفون اور اسپیکر |
| کنیکٹوٹی | Built-in Wi-Fi Module, Wi-Fi AP Function |
| سینسر | Built-in G-Sensor Module |
| ذخیرہ | Supports up to 128GB SD Card (for video recording) |
| چڑھنا | Magnetic Connection between Camera and Bracket |
| کنٹرول کا طریقہ | ٹچ (ایپ کے ذریعے) |
| پارٹ نمبر | 3353 |
| ASIN | B09PC5RJT1 |
10. وارنٹی اور سپورٹ
Hikvision products are designed for reliability and performance. This product comes with a standard manufacturer's warranty. For specific warranty terms and conditions, please refer to the warranty card included in your package or visit the official Hikvision webسائٹ
If you encounter any issues or require technical assistance, please contact Hikvision customer support or your authorized dealer. Provide your product model number (AE-DN2016-F3) and purchase details when seeking support.
آن لائن وسائل: For the latest information, FAQs, and software updates, please visit the official Hikvision support webسائٹ