
1. تعارف
This manual provides detailed instructions for the safe and efficient operation of your InFocus P120 INL412 Multimedia Projector (Model INL4128). Please read this manual thoroughly before using the projector and keep it for future reference. This projector is designed for high-quality image projection, suitable for various applications including presentations, home entertainment, and gaming.
2. حفاظتی معلومات
پروجیکٹر کو پہنچنے والے نقصان کو روکنے اور صارف کی حفاظت کو یقینی بنانے کے لیے درج ذیل حفاظتی تدابیر پر عمل کریں:
- وینٹیلیشن: پروجیکٹر کے ارد گرد مناسب وینٹیلیشن کو یقینی بنائیں۔ وینٹیلیشن کے سوراخوں کو مسدود نہ کریں۔ دیواروں یا دیگر اشیاء سے کم از کم 30 سینٹی میٹر (12 انچ) کا فاصلہ برقرار رکھیں۔
- طاقت کا منبع: صرف مخصوص پاور سپلائی اور والیوم استعمال کریں۔tage. Connect the power cord securely.
- حرارت: The projector generates heat during operation. Do not touch the projector's vents or exhaust areas directly after use.
- لائٹ آؤٹ پٹ: براہ راست پروجیکٹر کے لینس میں مت دیکھیں جب ایلamp آن ہے، کیونکہ تیز روشنی آنکھ کو نقصان پہنچا سکتی ہے۔
- جگہ کا تعین: Place the projector on a stable, level surface. Avoid placing it in direct sunlight, near heat sources, or in areas with high humidity or dust.
- صفائی: صفائی سے پہلے بجلی کی تار منقطع کریں۔ نرم، خشک کپڑا استعمال کریں۔ مائع یا ایروسول کلینر استعمال نہ کریں۔
- سروسنگ: خود پروجیکٹر کی خدمت کرنے کی کوشش نہ کریں۔ تمام سروسنگ کو اہل سروس اہلکاروں سے رجوع کریں۔
3. پروڈکٹ ختمview
3.1 Top Panel and Lens Area
The top panel features the control buttons for basic operation and the lens area with focus and zoom adjustments.

تصویر 3.1: اوپر view of the InFocus P120 INL412 projector, highlighting the control panel on the right and the lens adjustment area on the left. The InFocus logo is visible on the top surface.
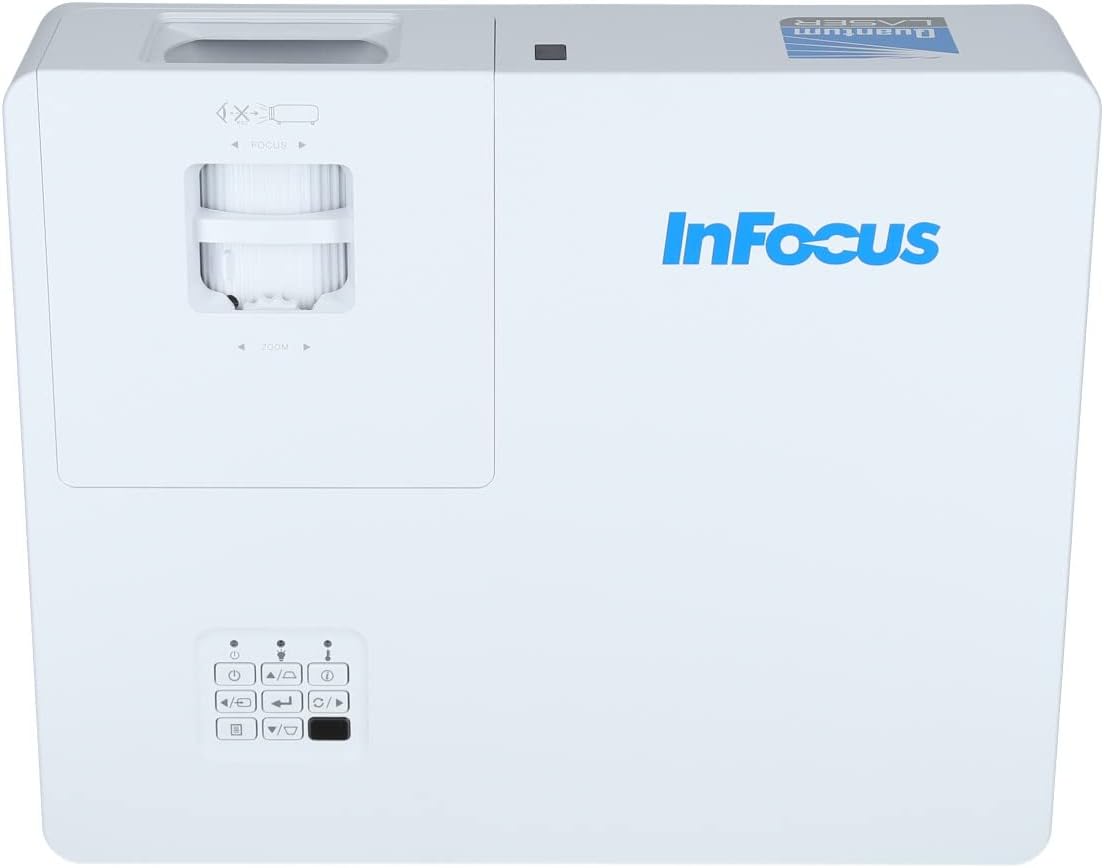
شکل 3.2: ایک قریب view of the projector's top panel, showing the focus and zoom rings near the lens opening and the array of control buttons for power, menu, source selection, and navigation.
3.2 ریئر پینل کنکشنز
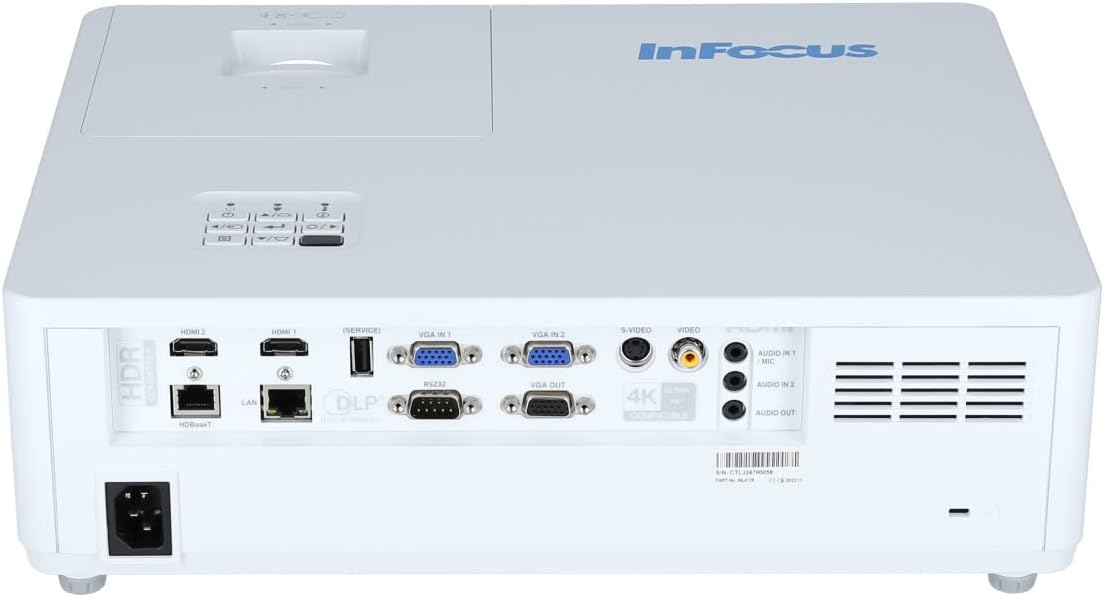
The rear panel provides various input and output ports for connecting external devices.

Figure 3.3: Rear panel of the InFocus P120 INL412 projector, displaying a comprehensive array of connectivity options including HDMI (x2), USB, S-Video, Ethernet (LAN), VGA In (x2), VGA Out, RS232, and Audio In/Out ports. The power input is located on the bottom left.
Key ports include:
- HDMI 1 اور 2: For connecting high-definition digital video and audio sources.
- USB: For connecting USB devices, potentially for media playback or firmware updates.
- S-ویڈیو: For connecting older video sources.
- VGA IN 1 & 2: For connecting computers or other devices with VGA output.
- VGA آؤٹ: For connecting to an external monitor.
- ایتھرنیٹ (LAN): نیٹ ورک کنیکٹیویٹی اور کنٹرول کے لیے۔
- Audio IN 1 & 2 / Audio OUT: ینالاگ آڈیو کنکشن کے لیے۔
- RS232: سیریل کنٹرول کے لیے۔
- پاور ان پٹ: AC پاور کی ہڈی کو جوڑنے کے لیے۔
3.3 Front and Side Panels
The front panel houses the projection lens and front ventilation, while the side panels feature additional ventilation grilles.

شکل 3.4: سامنے view of the InFocus P120 INL412 projector, displaying the main projection lens on the right and the extensive front ventilation grille on the left, crucial for heat dissipation.
شکل 3.5: طرف view of the InFocus P120 INL412 projector, illustrating the side ventilation grilles that contribute to maintaining optimal operating temperature.
4. سیٹ اپ
4.1 پروجیکٹر کی جگہ کا تعین
Position the projector on a stable, flat surface or mount it securely. Ensure the projector is within the optimal projection distance for your screen size. Maintain clear space around the projector for proper ventilation.
4.2 کنیکٹنگ ڈیوائسز
Before connecting any cables, ensure the projector and all source devices are powered off.
- HDMI کنکشن: Connect an HDMI cable from your source device (e.g., laptop, Blu-ray player, gaming console) to either the HDMI 1 or HDMI 2 port on the projector.
- VGA کنکشن: Connect a VGA cable from your computer to either VGA IN 1 or VGA IN 2. For audio, connect a separate audio cable from your computer's audio output to the corresponding Audio IN port on the projector.
- USB کنکشن: Insert a USB drive into the USB port for media playback (if supported by firmware) or service functions.
- ایتھرنیٹ (LAN) کنکشن: Connect an Ethernet cable to the LAN port for network control or updates.
- آڈیو آؤٹ پٹ: If using external speakers, connect an audio cable from the Audio OUT port on the projector to your audio system.
4.3 پاور کنکشن
Connect the power cord to the projector's power input and then plug the other end into a grounded electrical outlet.
5. آپریٹنگ ہدایات
5.1 پاور آن/آف۔
- پاور آن: دبائیں طاقت button on the projector's control panel or the remote control. The power indicator light will change.
- بجلی بند: دبائیں طاقت button again. A confirmation message may appear. Press the button a second time to confirm shutdown. Allow the projector to cool down before unplugging it.
5.2 فوکس اور زوم کو ایڈجسٹ کرنا
Rotate the focus ring around the lens until the image appears sharp and clear. Use the zoom ring to adjust the image size to fit your screen.
5.3 ان پٹ ماخذ کا انتخاب
دبائیں ماخذ button on the control panel or remote control to cycle through available input sources (HDMI 1, HDMI 2, VGA 1, VGA 2, S-Video, USB). Select the input corresponding to your connected device.
5.4 مینو نیویگیشن
استعمال کریں۔ مینو button to access the on-screen display (OSD) menu. Use the arrow buttons to navigate through menu options and the داخل کریں۔ منتخب کرنے کے لیے بٹن۔ دبائیں مینو دوبارہ باہر نکلنے کے لیے.
6 دیکھ بھال
6.1 لینز کی صفائی
Gently wipe the lens with a soft, lint-free cloth specifically designed for optical surfaces. Do not use abrasive cleaners or excessive force, as this can scratch the lens.
6.2 Cleaning the Projector Exterior
پروجیکٹر کے سی کو صاف کرنے کے لیے نرم، خشک کپڑا استعمال کریں۔asing. For stubborn dirt, dampen the cloth slightly with water, then wipe dry immediately. Avoid getting liquids into the projector's openings.
6.3 Ventilation Care
Regularly check the projector's ventilation grilles for dust accumulation. Use a soft brush or a vacuum cleaner with a brush attachment to gently remove dust from the vents to ensure proper airflow and prevent overheating.
7 خرابیوں کا سراغ لگانا
7.1 کوئی تصویر نہیں دکھائی گئی۔
- Ensure the projector is powered on and the power indicator light is solid.
- Verify that the video cable (HDMI, VGA, etc.) is securely connected to both the projector and the source device.
- Check that the correct input source is selected on the projector.
- Confirm that the source device (laptop, player) is powered on and outputting a signal.
7.2 تصویر دھندلی یا فوکس سے باہر ہے۔
- پروجیکٹر لینس پر فوکس کی انگوٹھی کو اس وقت تک ایڈجسٹ کریں جب تک کہ تصویر تیز نہ ہو۔
- یقینی بنائیں کہ پروجیکٹر اسکرین سے صحیح فاصلے پر ہے۔
- اگر پروجیکٹر کا لینس گندا نظر آتا ہے تو اسے صاف کریں۔
7.3 کوئی آواز نہیں۔
- If using HDMI, ensure the source device's audio output is set to HDMI.
- If using VGA, ensure a separate audio cable is connected from the source to the projector's Audio IN port.
- پروجیکٹر اور سورس ڈیوائس دونوں پر والیوم سیٹنگ چیک کریں۔
- If using external speakers, ensure they are properly connected to the Audio OUT port and powered on.
8. وضاحتیں
| فیچر | تفصیل |
|---|---|
| برانڈ | InFocus |
| کارخانہ دار | فوکس میں |
| ماڈل کا نام | P120 INL412 |
| ماڈل نمبر | INL4128 |
| سال | 2023 |
| ہارڈ ویئر انٹرفیس | Ethernet, HDMI, S-Video, USB |
| اشیاء کی تعداد | 1 |
| پہلو کا تناسب | 16:9 |
| واٹtage | 341 واٹ |
| بیٹریاں شامل ہیں۔ | نہیں |
| بیٹریاں درکار ہیں۔ | نہیں |
| فارم فیکٹر | ڈیسک ٹاپ |
| چڑھنے کی قسم | ٹیبل ماؤنٹ |
| ریموٹ کنٹرول شامل ہے۔ | جی ہاں |
| مصنوعات کے طول و عرض | 56.13 x 46.48 x 25.15 سینٹی میٹر |
| شے کا وزن | 5.5 کلوگرام |
| زیادہ سے زیادہ تصویری سائز | 308.28 انچ |
| کم از کم تصویری سائز | 910.63 ملی میٹر |
| پہلی دستیاب تاریخ | 5 جنوری 2022 |
9. وارنٹی اور سپورٹ
For warranty information and technical support, please refer to the documentation included with your purchase or visit the official InFocus webسائٹ وارنٹی کے دعووں کے لیے اپنی خریداری کا ثبوت رکھیں۔