
1. تعارف
This manual provides instructions for the installation, operation, and maintenance of your NETGEAR GS305P 5-Port PoE Gigabit Ethernet Unmanaged Switch. This device is designed to expand your network connectivity with both standard Gigabit Ethernet and Power over Ethernet (PoE+) capabilities, ideal for small office or home network environments.
2. پیکیج کے مشمولات
تصدیق کریں کہ آپ کے پیکیج میں درج ذیل آئٹمز ہیں:
- NETGEAR GS305P 5-Port PoE Gigabit Ethernet Unmanaged Switch (GS305Pv3)
- پاور اڈاپٹر
- والماؤنٹ کٹ
- فوری انسٹالیشن گائیڈ

Image: The NETGEAR GS305P switch, power adapter, and power cord as typically found in the package.
3. پروڈکٹ ختمview
The NETGEAR GS305P is an unmanaged switch featuring 5 Gigabit Ethernet ports, with 4 of these ports supporting PoE+ (Power over Ethernet Plus). It provides a total power budget of 63W for connected PoE devices. The switch is designed for plug-and-play operation, requiring no software installation or configuration.
ویڈیو: ایک اوورview of the NETGEAR 5-Port PoE Switch, demonstrating its features and ease of use.
فرنٹ پینل

Image: Front panel of the GS305P switch, highlighting the 5 Gigabit Ethernet ports and LED indicators for power, PoE Max, link/activity, and PoE fault.
- پاور ایل ای ڈی: طاقت کی حیثیت کی نشاندہی کرتا ہے۔
- PoE میکس ایل ای ڈی: Illuminates when PoE power consumption is near maximum capacity.
- Link/Activity LEDs (Ports 1-5): Green for 1000Mbps link, Yellow for 10/100Mbps link. Blinks to indicate activity.
- PoE Status LEDs (Ports 1-4): Green for PoE powered, Yellow for PoE fault.
- ایتھرنیٹ پورٹس (1-5): RJ-45 ports for network connections. Ports 1-4 support PoE+.
4. سیٹ اپ اور انسٹالیشن
The NETGEAR GS305P switch is designed for simple plug-and-play installation. No software configuration is required.
4.1 سوئچ کو جوڑنا
- Connect the power adapter to the switch's power input and then plug the power adapter into an electrical outlet. The Power LED on the switch will illuminate.
- ایتھرنیٹ کیبل کا استعمال کرتے ہوئے اپنے روٹر یا موڈیم کو سوئچ پر موجود 5 گیگابٹ ایتھرنیٹ پورٹس میں سے کسی سے جوڑیں۔
- Connect your network devices (computers, printers, network storage) to the remaining Gigabit Ethernet ports. For PoE-powered devices (e.g., IP cameras, wireless access points), connect them to ports 1-4.

Image: A diagram illustrating the plug-and-play nature of the unmanaged switch, connecting various devices like WiFi Access Points, IP Cameras, Computers, and NAS.
4.2 بڑھتے ہوئے اختیارات
The GS305P switch can be placed on a desktop or mounted on a wall. A wallmount kit is included for secure installation.
- ڈیسک ٹاپ پلیسمنٹ: Ensure the switch is placed on a flat, stable surface with adequate ventilation.
- وال ماؤنٹ: Use the provided wallmount kit to secure the switch to a wall. Refer to the quick installation guide for detailed steps on wall mounting.
5. سوئچ کو چلانا
Once connected, the switch operates automatically. The LEDs provide visual feedback on the network status.
- پاور آن: The Power LED will be green when the switch is receiving power.
- Network Activity: The Link/Activity LEDs will light up when a device is connected and blink to indicate data transmission.
- PoE پاور: For PoE-powered devices, the PoE Status LED will be green when power is being supplied. If a PoE fault occurs, the LED will turn yellow.
- خاموش آپریشن: The fanless design ensures quiet operation, making it suitable for noise-sensitive environments.
6 دیکھ بھال
اپنے سوئچ کی بہترین کارکردگی اور لمبی عمر کو یقینی بنانے کے لیے، دیکھ بھال کے ان رہنما خطوط پر عمل کریں:
- صفائی: سوئچ کے بیرونی حصے کو صاف کرنے کے لیے نرم، خشک کپڑا استعمال کریں۔ مائع یا ایروسول کلینر استعمال نہ کریں۔
- وینٹیلیشن: اس بات کو یقینی بنائیں کہ زیادہ گرمی سے بچنے کے لیے وینٹیلیشن کے سوراخوں کو مسدود نہیں کیا گیا ہے۔
- ماحولیات: Operate the switch within its specified temperature and humidity ranges. Avoid direct sunlight or extreme temperatures.
- کیبل مینجمنٹ: Keep network cables organized to prevent strain on ports and improve airflow.
7 خرابیوں کا سراغ لگانا
If you encounter issues with your NETGEAR GS305P switch, refer to the following common troubleshooting steps:
- کوئی طاقت نہیں: Ensure the power adapter is securely connected to the switch and a working electrical outlet. Check the Power LED.
- کوئی لنک/سرگرمی نہیں: Verify that Ethernet cables are properly connected to both the switch and the connected device. Try a different cable or port. Check the Link/Activity LED.
- PoE ڈیوائس آن نہیں ہے: Ensure the device is PoE-compatible and connected to one of the PoE+ ports (1-4). Check the PoE Status LED for the port; a yellow light indicates a fault. Verify the total power budget (63W) is not exceeded by all connected PoE devices.
- سست نیٹ ورک کی رفتار: Ensure all connected devices and cables support Gigabit Ethernet for optimal performance. Check for excessive network traffic.
8. وضاحتیں
Key technical specifications for the NETGEAR GS305P switch:
| فیچر | تفصیل |
|---|---|
| ماڈل | GS305P (GS305Pv3) |
| بندرگاہوں کی تعداد | 5 گیگابٹ ایتھرنیٹ پورٹس |
| PoE+ پورٹس | 4 (Ports 1-4) |
| کل PoE پاور بجٹ | 63W |
| ڈیٹا کی منتقلی کی شرح | 1000 Mbps (گیگا بٹ) |
| سوئچ کی قسم | غیر منظم |
| کیس کا مواد | دھات |
| طول و عرض (L x W x H) | 9.5" x 6.7" x 3.4" (approximate, from product data) |
| والیومtage | 240 Volts (Power adapter input) |
| آپریٹنگ ماحول | Designed for indoor use in U.S. & CA. |
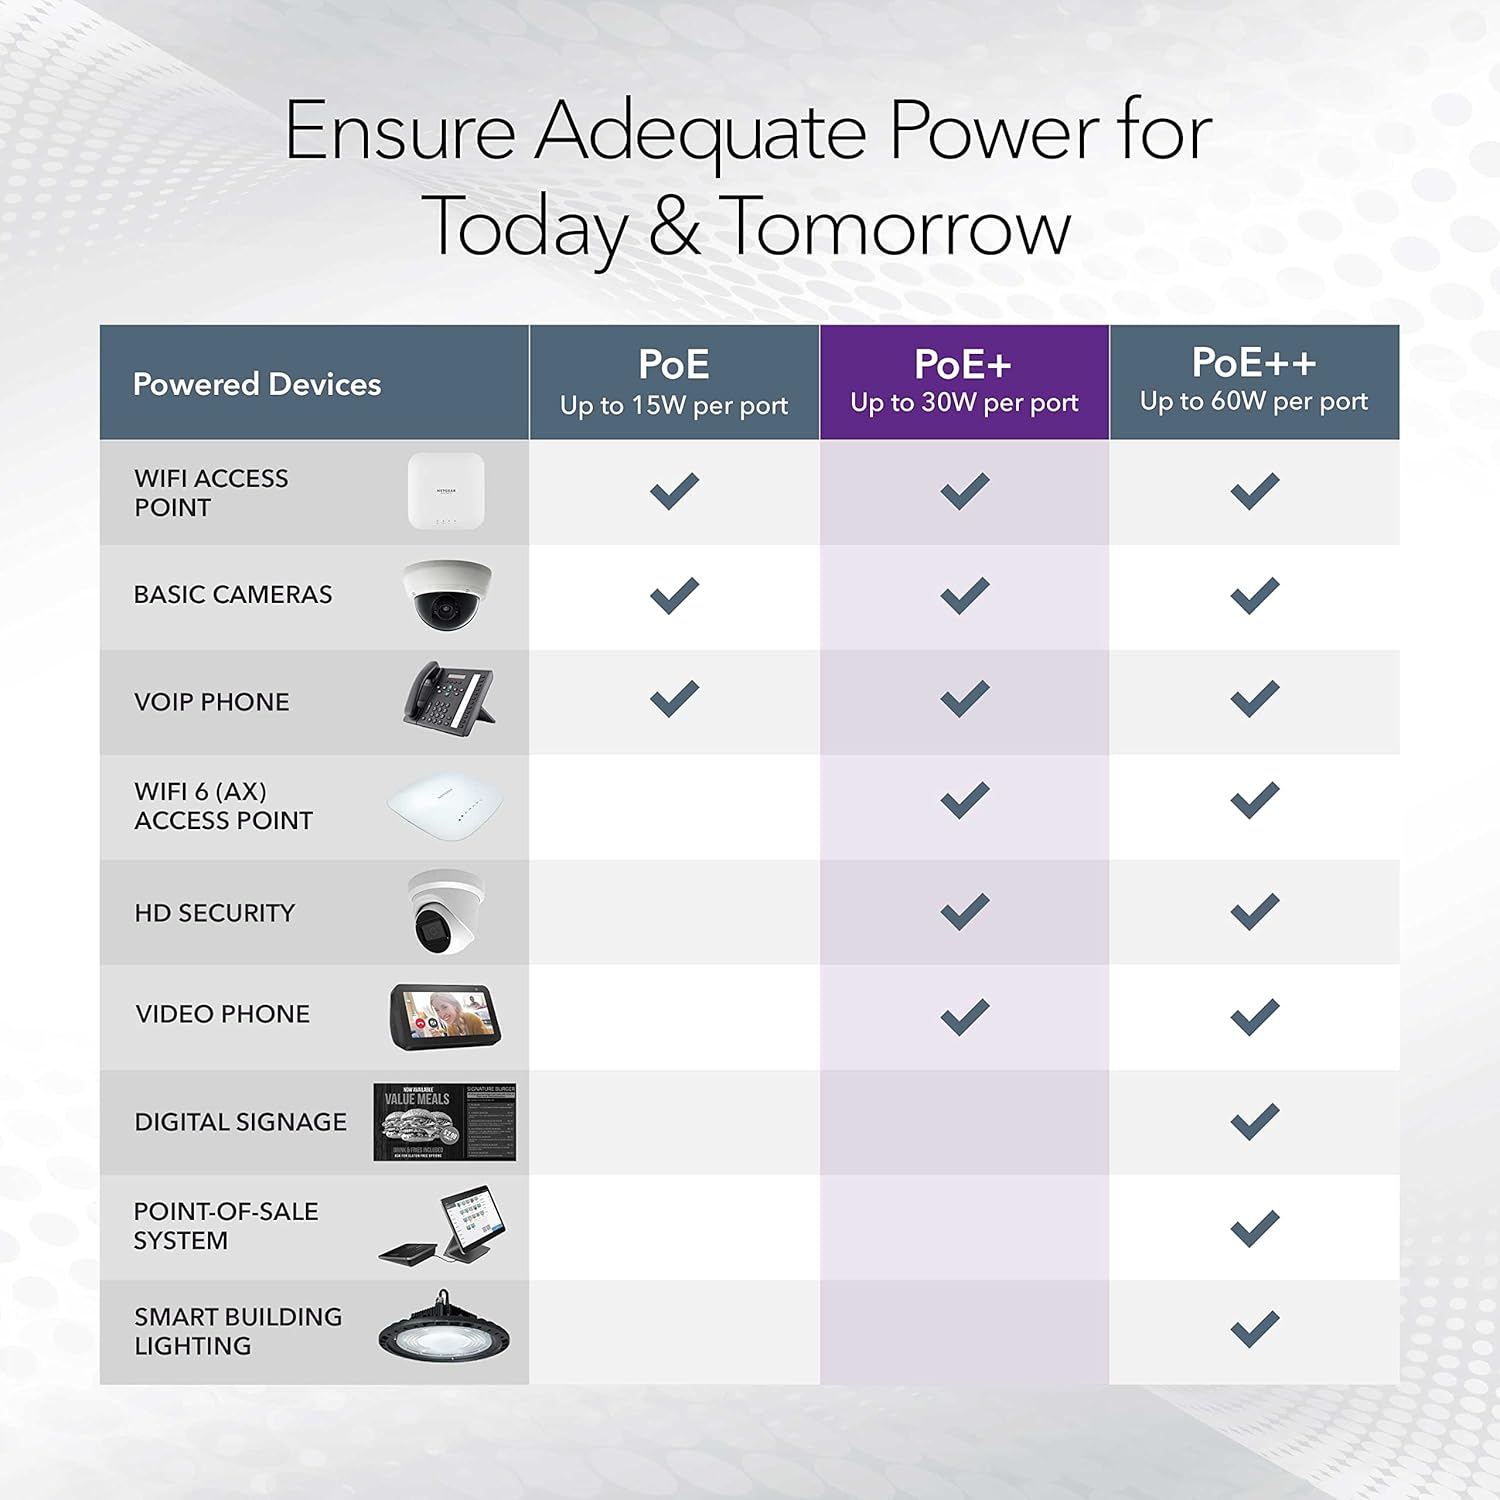
Image: A table illustrating the power capabilities of PoE, PoE+, and PoE++ for different powered devices.
9. وارنٹی اور سپورٹ
9.1 وارنٹی کی معلومات
The NETGEAR GS305P switch comes with an industry-leading 3 سال کی محدود ہارڈ ویئر وارنٹی. Please retain your proof of purchase for warranty claims. For full warranty terms and conditions, refer to the official NETGEAR webسائٹ یا دستاویزات آپ کے پروڈکٹ کے ساتھ شامل ہیں۔
9.2 تکنیکی معاونت
For technical assistance, product registration, or to access additional resources, visit the official NETGEAR support website. You can find FAQs, firmware updates, and community forums there.
NETGEAR سپورٹ Webسائٹ: www.netgear.com/support