Foxeer Reaper Extreme 2.5W
Foxeer Reaper Extreme 2.5W VTX User Manual
Model: Reaper Extreme 2.5W
1. پروڈکٹ ختمview
The Foxeer Reaper Extreme 2.5W is a high-power 5.8GHz Video Transmitter (VTX) designed for FPV (First Person View) long-range drones. It features adjustable power output levels, including Pitmode, 25mW, 200mW, 500mW, 1.5W, and 2.5W, providing flexibility for various flight scenarios and regulatory requirements. Its compact size and wide input voltage range make it suitable for a broad range of FPV builds.

تصویر 1: اوپر view of the Foxeer Reaper Extreme 2.5W VTX, featuring a teal-colored heatsink with the Foxeer logo and mounting screw locations.
2. وضاحتیں
| فیچر | تفصیلات |
|---|---|
| پروڈکٹ کا نام | Reaper Extreme 2.5W |
| ان پٹ جلدtage | 7~36V (2-8S LiPo compatible) |
| آؤٹ پٹ والیمtage | 5V (for camera/FC) |
| چینلز | 40CH |
| پاور آؤٹ پٹ | Pitmode / 25mW / 200mW / 500mW / 1.5W / 2.5W |
| کھپت | 1.2A at 9V (at max power) |
| وزن | 13 گرام |
| طول و عرض | 36mm x 27.5mm x 8mm |
| بڑھتے ہوئے سوراخ پیٹرن | 20x20mm (standard FPV stack size) |
| اینٹینا رابط | ایم ایم سی ایکس |
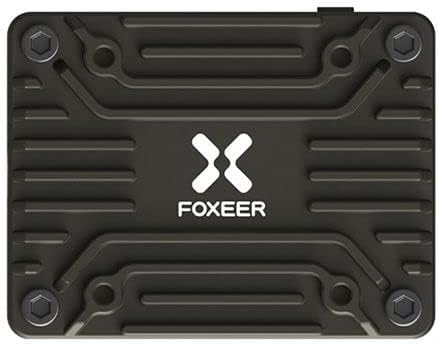
Figure 2: Pinout and feature diagram of the Foxeer Reaper Extreme VTX, indicating connections for Video, GND, 5V Out, Tramp, and 7-36V In, along with control buttons (KEY, CH, BAND, PWR) and MMCX antenna connector.
3. سیٹ اپ اور انسٹالیشن
Proper installation is crucial for optimal performance and longevity of your VTX. Always ensure power is disconnected before making any connections.
3.1 وائرنگ ڈایاگرام
Connect the VTX to your flight controller (FC) and camera according to the following pinout:
- ویڈیو: Connect to the video input of your FPV camera.
- GND: Connect to a common ground point on your FC or PDB.
- 5V آؤٹ: Provides regulated 5V power for your FPV camera.
- TRAMP: Connect to a UART TX pad on your FC for SmartAudio/Tramp protocol control.
- 7~36V IN: Connect directly to your main battery voltage (2-8S LiPo). Ensure correct polarity.

شکل 3: تفصیلی view of the Foxeer Reaper Extreme VTX connection pads, illustrating the layout for Video, GND, 5V Out, Tramp, and power input.
3.2 چڑھنا
The Reaper Extreme VTX features a 20x20mm mounting pattern, allowing it to be stacked with most modern flight controllers and ESCs. Use appropriate standoffs and screws to secure the VTX, ensuring no components are short-circuited by the frame or other electronics.
3.3 اینٹینا کنکشن۔
Connect a 5.8GHz FPV antenna to the MMCX connector. Ensure the antenna is securely attached before powering on the VTX. Running the VTX without an antenna can cause permanent damage.
4. آپریٹنگ ہدایات
The Foxeer Reaper Extreme VTX can be configured via physical buttons or through SmartAudio/Tramp protocol via your flight controller's OSD (On-Screen Display).
4.1 بٹن کنٹرول
The VTX has four buttons: KEY, CH, BAND, and PWR. These buttons allow manual adjustment of channels, bands, and power levels.
- CH (چینل): Short press to cycle through channels (CH1-CH8).
- بینڈ: Short press to cycle through bands (A, B, E, F, R).
- PWR (طاقت): Long press to cycle through power levels (Pitmode, 25mW, 200mW, 500mW, 1.5W, 2.5W).
- کلید: This button may be used for locking/unlocking settings or other advanced functions depending on firmware. Refer to the latest Foxeer documentation for specific usage.
نوٹ: Always ensure you are operating within legal power limits for your region. Use Pitmode or low power for testing to avoid interference.
4.2 SmartAudio/Tramp پروٹوکول
For convenient configuration, connect the VTX's TRAMP pad to a UART TX pad on your flight controller. Enable the VTX (SmartAudio or Tramp) feature in your flight controller's Betaflight/ArduPilot configurator. This allows you to change VTX settings directly from your FPV goggles' OSD menu.
5. دیکھ بھال اور دیکھ بھال
- حرارت کا انتظام: The Reaper Extreme VTX can generate significant heat, especially at higher power outputs. Ensure adequate airflow around the VTX during operation. Avoid enclosing it in tight spaces without ventilation.
- Antenna Protection: Always connect an antenna before powering on the VTX. Disconnecting the antenna while powered can permanently damage the VTX.
- صفائی: Keep the VTX free from dirt, dust, and moisture. If it gets wet, ensure it is completely dry before reapplying power.
- جسمانی معائنہ: Periodically inspect the VTX for any signs of physical damage, loose connections, or burnt components.
6 خرابیوں کا سراغ لگانا
6.1 کوئی ویڈیو سگنل نہیں۔
- کنکشن چیک کریں: Verify all wiring (Video, GND, Power) is correct and secure.
- اینٹینا: Ensure the antenna is properly connected to the VTX and the receiver.
- طاقت: Confirm the VTX is receiving adequate power (7-36V). Check for correct polarity.
- Channel/Band Mismatch: Ensure your FPV goggles/receiver are set to the exact same channel and band as the VTX.
- Pitmode: Check if the VTX is in Pitmode (very low power output). Increase power if necessary.
6.2 Poor Video Quality / Static
- Antenna Quality/Placement: Use a good quality antenna. Ensure it is not obstructed by carbon fiber or other components.
- پاور آؤٹ پٹ: Increase the VTX power output if you are experiencing range issues or heavy interference.
- مداخلت: Keep the VTX away from other noisy electronics (ESCs, motors, high-current wires). Add capacitors to your power system if experiencing power line noise.
- Frequency Overlap: Ensure no other FPV systems nearby are using the same frequency.
6.3 VTX Overheating
- ہوا کا بہاؤ: Ensure sufficient airflow around the VTX. Avoid mounting it in enclosed spaces.
- پاور آؤٹ پٹ: Operating at 2.5W for extended periods, especially on the ground, will generate significant heat. Reduce power if not needed.
- اینٹینا: Verify the antenna is securely connected. Running without an antenna causes rapid overheating and damage.
7. وارنٹی اور سپورٹ
For specific warranty information, technical support, or service inquiries, please refer to the official Foxeer webسائٹ یا اپنے خوردہ فروش سے رابطہ کریں۔ وارنٹی کے دعووں کے لیے اپنی خریداری کا ثبوت رکھیں۔
This manual provides general guidelines. Specifications and features are subject to change without prior notice.
متعلقہ دستاویزات - Reaper Extreme 2.5W
 |
FOXEER Reaper Extreme VTX: نردجیکرن، آپریشن، اور فریکوئینسی گائیڈ FOXEER ریپر ایکسٹریم 5.8GHz FPV ویڈیو ٹرانسمیٹر (VTX) کے لیے جامع گائیڈ۔ اس کی خصوصیات، ایل ای ڈی اشارے، چینل، بینڈ اور پاور کے لیے بٹن کنٹرول، فریکوئنسی ٹیبل، غیر مقفل کرنے کی خصوصیات، اور پی آئی ٹی موڈ کے بارے میں جانیں۔ Tr پر مشتمل ہے۔amp پروٹوکول کی حمایت. |
 |
Foxeer Reaper Extreme VTX تفصیلات اور آپریشن گائیڈ Foxeer Reaper Extreme VTX کے لیے تفصیلی وضاحتیں، LED اشارے، بٹن آپریشنز، فریکوئنسی ٹیبلز، اور غیر مقفل طریقہ کار۔ |
 |
Foxeer Reaper Extreme VTX User Manual User manual for the Foxeer Reaper Extreme VTX, detailing specifications, button operations, frequency tables, and PIT mode. |
 |
Foxeer Reaper Extreme VTX: Specifications and Operation Guide Comprehensive guide to the Foxeer Reaper Extreme VTX, detailing its specifications, frequency bands, power levels, and button operations for FPV drone enthusiasts. |
 |
Foxeer Reaper Extreme VTX: نردجیکرن، آپریشن، اور فریکوئینسی گائیڈ Comprehensive guide to the Foxeer Reaper Extreme VTX, covering its specifications, LED indicators, button operations, frequency table, unlock features, and PIT mode. Includes details on power output, channels, and Tramp پروٹوکول کی حمایت. |
 |
Foxeer Reaper Extreme VTX: نردجیکرن، آپریشن، اور فریکوئینسی گائیڈ Foxeer Reaper Extreme VTX کے لیے جامع گائیڈ، اس کی تفصیلات، LED اسٹیٹس انڈیکیٹرز، چینل، بینڈ، اور پاور سلیکشن کے لیے بٹن کنٹرول، فریکوئنسی ٹیبل، اور PIT موڈ اور پاور انلاکنگ جیسی جدید خصوصیات کی تفصیل۔ سیٹ اپ اور آپریشن کے لیے ضروری نوٹ شامل ہیں۔ |
Ask a question about this manual
Ask about setup, troubleshooting, compatibility, parts, safety, or missing instructions. Manuals+ will review the question and use this page’s manual context to help answer it.