
1. تعارف
The SMARTGEN HAT600PBI Series Dual Power Synchronous ATS Controller is an advanced, intelligent module designed for automatic transfer systems. It integrates programmable functions, automatic measurement, an LCD display, and digital communication capabilities. This controller combines digitalization, intelligence, and networking to provide reliable and precise dual power transfer, minimizing operational errors. It is suitable for various power supply configurations including Mains-Mains, Mains-Gen, Gen-Gen, and supports PC, CB, and CC class ATS applications, ensuring synchronous transfer between two power sources. Its compact design, sophisticated circuitry, straightforward wiring, and high reliability make it ideal for diverse applications in sectors such as electric power, telecommunications, petroleum, and intelligent buildings.
2. کلیدی خصوصیات
- LCD 132x64 pixel display with backlight, supporting multiple languages (Simplified Chinese, English, Other), operated via push buttons.
- Configurable system types: Mains (1#) & Mains (2#), Mains (1#) & Generator (2#), Generator (1#) & Mains (2#), Generator (1#) & Generator (2#).
- Master power source selection (S1 or S2) with options for Auto Transfer Auto Recover and Auto Transfer Non Recover.
- Measures and displays 2-way 3-phase Voltage, Frequency, and Phase Sequence Status.
- Collects and displays load active power, reactive power, apparent power, power factor, and current.
3. پروڈکٹ ختمview
The HAT600PBI controller features a user-friendly interface for monitoring and control.
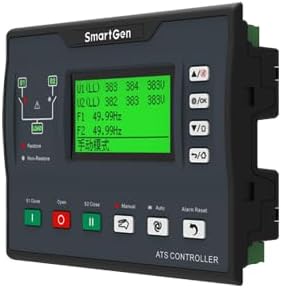
شکل 3.1: سامنے View of HAT600PBI Controller. This image displays the front panel of the HAT600PBI controller, featuring an LCD screen that shows voltage and frequency readings, along with various control buttons for operation and navigation. The buttons include 'Close', 'Open', 'Manual', 'Auto', and 'Alarm Reset'.
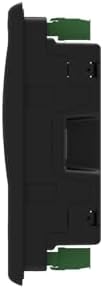
شکل 3.2: طرف View of HAT600PBI Controller. یہ تصویر سائیڈ پرو کی وضاحت کرتی ہے۔file of the HAT600PBI controller, highlighting its compact design and mounting features.

شکل 3.3: پیچھے View of HAT600PBI Controller. This image shows the rear panel of the HAT600PBI controller, detailing the numerous connection terminals for inputs, outputs, power supply, current monitoring, as well as USB and Ethernet communication ports.
4. سیٹ اپ اور انسٹالیشن
Installation of the HAT600PBI controller should be performed by qualified personnel. Ensure all local electrical codes and safety regulations are followed.
4.1 چڑھنا
Mount the controller in a suitable enclosure, ensuring adequate ventilation and protection from environmental factors. Refer to the physical dimensions for proper panel cutout.
4.2 الیکٹریکل کنکشن
Connect the following to the appropriate terminals on the rear of the controller (refer to Figure 3.3 and Section 6 for detailed wiring diagrams):
- بجلی کی فراہمی: Connect the DC and AC power inputs.
- والیومtagای ان پٹ: Connect the 2-way 3-phase voltage inputs for S1 and S2.
- Current Inputs: Connect current transformers (CTs) for load current monitoring.
- کنٹرول نتائج: Connect to the ATS switching mechanisms (e.g., circuit breakers, contactors).
- معاون ان پٹ/آؤٹ پٹ: Connect any required auxiliary signals.
- مواصلاتی بندرگاہیں: Connect RS485, USB, or Ethernet cables for remote monitoring and configuration.
Ensure all connections are secure and correctly polarized. Incorrect wiring can damage the unit or connected equipment.
5. آپریٹنگ ہدایات
The HAT600PBI controller is designed for intuitive operation via its front panel LCD and push buttons.
5.1 پاور آن
Once all electrical connections are complete and verified, apply power to the controller. The LCD will illuminate and display the initial startup screen, followed by real-time system status.
5.2 مینو کو نیویگیٹ کرنا
Use the navigation buttons (typically Up/Down arrows and OK/Enter) to scroll through menus and confirm selections. The LCD provides clear prompts for various settings and monitoring screens.
5.3 سسٹم کنفیگریشن
Access the system settings menu to configure parameters such as:
- سسٹم کی قسم: Select between Mains-Mains, Mains-Gen, Gen-Mains, or Gen-Gen based on your power sources.
- Master Power Source: Designate S1 or S2 as the primary power source.
- منتقلی موڈ: Choose between Auto Transfer Auto Recover (ATAR) or Auto Transfer Non Recover (ATNR) based on desired behavior after power restoration.
- زبان: Select the preferred display language.
Save all changes before exiting the configuration menu.
5.4 Monitoring Parameters
The controller continuously monitors and displays critical parameters:
- والیومtage (L-L, L-N) for both S1 and S2.
- Frequency for both S1 and S2.
- Phase Sequence Status.
- Load Active Power, Reactive Power, Apparent Power, Power Factor, and Current.
Regularly check these values to ensure stable operation.
5.5 Manual Operation and Alarm Reset
Use the 'Manual' button to switch to manual control mode, allowing direct control of the transfer switches via 'Close' and 'Open' buttons. The 'Alarm Reset' button clears any active alarms displayed on the LCD.
6. وائرنگ ڈایاگرام
Proper wiring is crucial for the safe and correct operation of the HAT600PBI controller. The following diagram illustrates typical application wiring. Always consult this diagram and any specific project documentation during installation.

Figure 6.1: Typical Application Wiring Diagrams. This comprehensive image provides multiple wiring diagrams for the HAT600PBI controller, detailing connections for different ATS configurations including SGG-N, SGG-M, Feiteng, Contactor, and Breaker applications. It shows connections for S1 and S2 power inputs, load, current inputs, and communication (RS485).
7 دیکھ بھال
Regular maintenance ensures the longevity and reliable operation of your HAT600PBI controller.
7.1 معمول کا معائنہ
- Periodically inspect the controller for any visible damage, loose connections, or signs of overheating.
- Ensure the mounting is secure and free from excessive vibration.
- Check for dust accumulation, especially around ventilation openings.
7.2 صفائی
Use a soft, dry cloth to clean the exterior of the controller. Do not use abrasive cleaners or solvents. For internal cleaning, if necessary, disconnect power and use compressed air to remove dust.
7.3 فرم ویئر اپڈیٹس
Check the SMARTGEN official webکسی بھی دستیاب فرم ویئر اپ ڈیٹس کے لیے وقتاً فوقتاً سائٹ۔ کسی بھی اپ ڈیٹ کے طریقہ کار کے لیے فراہم کردہ ہدایات پر احتیاط سے عمل کریں۔
8 خرابیوں کا سراغ لگانا
This section provides basic troubleshooting steps for common issues. For complex problems, contact technical support.
8.1 No Power to Controller
- Verify the DC and AC power supply connections are secure and providing the correct voltage.
- Check any external fuses or circuit breakers in the power supply circuit.
8.2 Incorrect Readings on LCD
- والیوم کو یقینی بنائیںtage and current transformer (CT) connections are correct and securely fastened.
- Verify the CT ratios are correctly configured in the controller's settings.
- ان پٹ والیوم کو چیک کریں۔tage and frequency directly with a multimeter to compare against controller readings.
8.3 Automatic Transfer Failure
- Check the status of both power sources (S1 and S2) to ensure they are within acceptable parameters.
- Verify the system type and transfer mode settings are correctly configured.
- Inspect the control outputs and the connected ATS switching mechanisms for proper operation.
- Check for any active alarms that might be preventing transfer.
9. وضاحتیں
| پیرامیٹر | قدر |
|---|---|
| برانڈ | SMARTGEN |
| مواد | دھات |
| شے کا وزن | 0.8 کلوگرام |
| ڈسپلے کی قسم | LCD |
| آپریٹنگ درجہ حرارت | 20 ڈگری سیلسیس |
10. وارنٹی اور سپورٹ
For warranty information, technical support, or service inquiries, please contact your authorized SMARTGEN dealer or visit the official SMARTGEN website. Ensure you have your product model number (HAT600PBI) and purchase details available when seeking support.