1. تعارف
This manual provides instructions for the safe operation, maintenance, and troubleshooting of your FLEX 24V Brushless Cordless 1/2-Inch Hammer Drill Turbo Mode Kit, model FX1271T-2B. Please read this manual thoroughly before using the tool to ensure proper and safe operation.
The FLEX FX1271T-2B is a powerful 24V brushless cordless hammer drill designed for demanding drilling and driving applications. It features a 1/2-inch full-metal ratcheting chuck, two-speed settings, a Turbo Mode for increased speed, and an anti-kickback safety feature. This kit includes the drill, a 2.5Ah Lithium-Ion Battery, a 5.0Ah Lithium-Ion Battery, and a 160W Fast Charger.
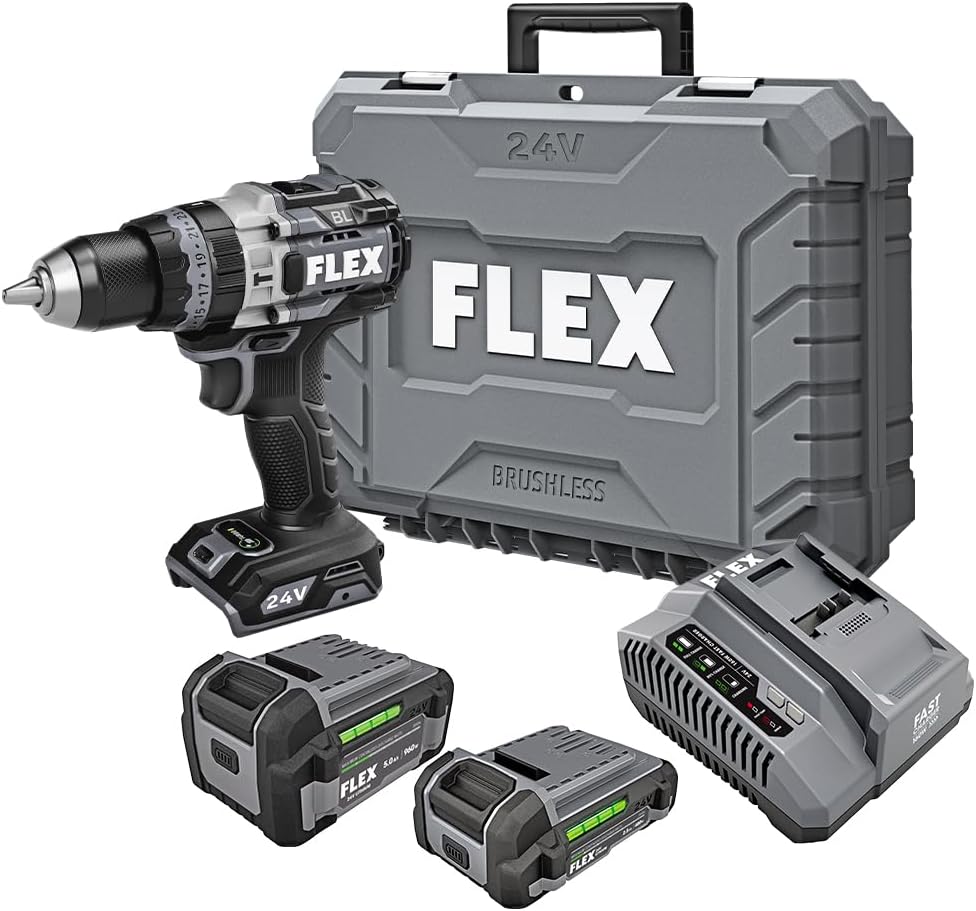
Figure 1: FLEX 24V Brushless Cordless 1/2-Inch Hammer Drill Kit (FX1271T-2B) including drill, two batteries, charger, and carrying case.
2. عام سیفٹی ہدایات۔
انتباہ: اس پاور ٹول کے ساتھ فراہم کردہ تمام حفاظتی انتباہات، ہدایات، عکاسی اور وضاحتیں پڑھیں۔ ذیل میں دی گئی تمام ہدایات پر عمل کرنے میں ناکامی کے نتیجے میں برقی جھٹکا، آگ، اور/یا شدید چوٹ لگ سکتی ہے۔
2.1 کام کے علاقے کی حفاظت
- کام کے علاقے کو صاف اور اچھی طرح سے روشن رکھیں۔ بے ترتیبی یا تاریک علاقے حادثات کو دعوت دیتے ہیں۔
- دھماکہ خیز ماحول، جیسے آتش گیر مائعات، گیسوں، یا دھول کی موجودگی میں بجلی کے اوزار نہ چلائیں۔ پاور ٹولز چنگاریاں پیدا کرتے ہیں جو دھول یا دھوئیں کو بھڑکا سکتے ہیں۔
- پاور ٹول چلاتے ہوئے بچوں اور دیکھنے والوں کو دور رکھیں۔ خلفشار آپ کو کنٹرول کھونے کا سبب بن سکتا ہے۔
2.2 الیکٹریکل سیفٹی
- پاور ٹول پلگ کو آؤٹ لیٹ سے مماثل ہونا چاہیے۔ کسی بھی طرح سے پلگ میں ترمیم نہ کریں۔ ارتھڈ (گراؤنڈ) پاور ٹولز کے ساتھ کوئی بھی اڈاپٹر پلگ استعمال نہ کریں۔ غیر ترمیم شدہ پلگ اور میچنگ آؤٹ لیٹس بجلی کے جھٹکے کے خطرے کو کم کر دیں گے۔
- زمینی یا زمینی سطحوں، جیسے پائپ، ریڈی ایٹرز، رینجز اور ریفریجریٹرز سے جسم کے رابطے سے گریز کریں۔ اگر آپ کا جسم مٹی یا گراؤنڈ ہے تو بجلی کے جھٹکے لگنے کا خطرہ بڑھ جاتا ہے۔
- بجلی کے آلات کو بارش یا گیلے حالات میں بے نقاب نہ کریں۔ بجلی کے آلے میں پانی داخل ہونے سے بجلی کے جھٹکے کا خطرہ بڑھ جائے گا۔
2.3 ذاتی حفاظت
- ہمیشہ آنکھوں کی حفاظت کا لباس پہنیں۔ حفاظتی شیشے، چشمیں، یا چہرے کی ڈھال کا استعمال کریں۔
- ٹول کو طویل مدت تک چلاتے وقت سماعت کا تحفظ پہنیں۔
- مناسب طریقے سے کپڑے. ڈھیلے کپڑے یا زیورات نہ پہنیں۔ اپنے بالوں اور کپڑوں کو حرکت پذیر حصوں سے دور رکھیں۔
- چوکس رہیں، دیکھیں کہ آپ کیا کر رہے ہیں، اور پاور ٹول چلاتے وقت عقل کا استعمال کریں۔
2.4 ٹول کا استعمال اور دیکھ بھال
- طاقت کے آلے کو مجبور نہ کریں۔ اپنی درخواست کے لیے صحیح پاور ٹول استعمال کریں۔
- کوئی بھی ایڈجسٹمنٹ کرنے، لوازمات کو تبدیل کرنے، یا پاور ٹولز کو ذخیرہ کرنے سے پہلے بیٹری پیک کو پاور ٹول سے منقطع کریں۔
- غیر فعال پاور ٹولز کو بچوں کی پہنچ سے دور رکھیں اور پاور ٹول یا ان ہدایات سے ناواقف افراد کو پاور ٹول چلانے کی اجازت نہ دیں۔
- پاور ٹولز اور لوازمات کو برقرار رکھیں۔ حرکت پذیر حصوں کی غلط ترتیب یا بائنڈنگ، پرزوں کی ٹوٹ پھوٹ، اور کسی بھی دوسری حالت کی جانچ کریں جو پاور ٹول کے آپریشن کو متاثر کر سکتی ہے۔
2.5 بیٹری ٹول کا استعمال اور دیکھ بھال
- صرف مینوفیکچرر کی طرف سے مخصوص چارجر کے ساتھ ری چارج کریں۔ ایک چارجر جو ایک قسم کے بیٹری پیک کے لیے موزوں ہے دوسرے بیٹری پیک کے ساتھ استعمال کرنے پر آگ لگنے کا خطرہ پیدا کر سکتا ہے۔
- پاور ٹولز صرف خاص طور پر نامزد بیٹری پیک کے ساتھ استعمال کریں۔ کسی دوسرے بیٹری پیک کا استعمال چوٹ اور آگ کا خطرہ پیدا کر سکتا ہے۔
- جب بیٹری پیک استعمال میں نہ ہو، تو اسے دیگر دھاتی اشیاء سے دور رکھیں، جیسے کاغذ کے کلپس، سکے، چابیاں، کیل، پیچ یا دیگر چھوٹی دھاتی اشیاء، جو ایک ٹرمینل سے دوسرے ٹرمینل سے رابطہ قائم کر سکتی ہیں۔ بیٹری ٹرمینلز کو ایک ساتھ چھوٹا کرنے سے جلنے یا آگ لگ سکتی ہے۔
- ناروا حالات میں، بیٹری سے مائع نکالا جا سکتا ہے۔ رابطے سے بچیں. اگر اتفاقی طور پر رابطہ ہو جائے تو پانی سے دھولیں۔ اگر مائع آنکھوں سے رابطہ کرے تو اس کے علاوہ طبی مدد حاصل کریں۔ بیٹری سے خارج ہونے والا مائع جلن یا جلنے کا سبب بن سکتا ہے۔
3. اجزاء شامل ہیں
Your FLEX 24V Brushless Cordless 1/2-Inch Hammer Drill Kit (FX1271T-2B) includes the following items:
- FLEX 24V Brushless Cordless 1/2-Inch Hammer Drill
- (1) FLEX 24V 2.5Ah Lithium-Ion Battery (FX0111-1)
- (1) FLEX 24V 5.0Ah Lithium-Ion Battery (FX0121-1)
- FLEX 160W فاسٹ چارجر
- معاون ہینڈل
- کیرینگ کیس

Figure 2: The FLEX Advantage highlights the included 2.5Ah and 5.0Ah Lithium-Ion batteries, emphasizing their power, runtime, and fast charging capabilities.
4. سیٹ اپ اور ابتدائی استعمال
4.1 بیٹری چارج کرنا
- Connect the 160W Fast Charger to a standard power outlet.
- بیٹری پیک کو چارجر پر اس وقت تک سلائیڈ کریں جب تک کہ یہ اپنی جگہ پر کلک نہ کرے۔
- The charger's indicator lights will show the charging status. A fully charged battery will be indicated by a solid green light.
- مکمل چارج ہونے کے بعد، چارجر سے بیٹری کو ہٹا دیں۔
4.2 بیٹری انسٹال کرنا
- Align the battery pack with the battery port on the base of the drill handle.
- بیٹری کو پورٹ میں اس وقت تک سلائیڈ کریں جب تک کہ یہ محفوظ طریقے سے اپنی جگہ پر لاک نہ ہوجائے۔ اس بات کو یقینی بنائیں کہ یہ آپریشن کے دوران حادثاتی طور پر بے گھر ہونے سے بچنے کے لیے مکمل طور پر بیٹھا ہوا ہے۔
- To remove the battery, press the release button(s) on the sides of the battery pack and slide it out.
4.3 معاون ہینڈل کو جوڑنا
For improved control and safety, especially during high-torque applications or hammer drilling, attach the auxiliary handle.
- معاون ہینڈل CL ڈھیلا کریں۔amp by rotating it counter-clockwise.
- Slide the handle over the front of the drill body, positioning it to your preferred angle.
- cl کو سخت کریں۔amp by rotating it clockwise until the handle is securely fastened.

Figure 3: The drill with the auxiliary handle attached, providing enhanced control and stability, particularly when the anti-kickback feature engages.
4.4 Installing Drill Bits or Accessories
- یقینی بنائیں کہ ڈرل بند ہے اور حفاظت کے لیے بیٹری ہٹا دی گئی ہے۔
- Grip the rear collar of the 1/2-inch full-metal ratcheting chuck and rotate the front collar counter-clockwise to open the chuck jaws.
- ڈرل بٹ یا لوازمات کو چک جبڑوں میں مکمل طور پر داخل کریں۔
- Rotate the front collar clockwise to tighten the chuck jaws firmly around the bit. The ratcheting mechanism will provide an audible click when securely tightened.
- Gently pull on the bit to ensure it is properly secured.

Figure 4: Detail of the 1/2-inch full-metal ratcheting chuck, designed for secure bit retention and durability.
5. آپریٹنگ ہدایات
5.1 پاور آن/آف اور سپیڈ کنٹرول
- ٹرگر سوئچ: Squeeze the trigger switch to turn the drill on. Release it to turn the drill off.
- متغیر رفتار: The trigger switch is pressure-sensitive, allowing for variable speed control. Pressing the trigger further increases the speed.
- فارورڈ/ ریورس سلیکٹر: Located above the trigger, push the selector left for forward rotation (drilling/driving) and right for reverse rotation (removing screws). Center position locks the trigger for safety.
5.2 Gear Selection (2-Speed)
The drill features a 2-speed gearbox for optimal performance across various applications.
- گیئر 1 (کم رفتار، ہائی ٹارک): Slide the gear selector switch to position '1'. Ideal for driving screws, drilling large holes, or applications requiring maximum torque.
- Gear 2 (High Speed, Lower Torque): Slide the gear selector switch to position '2'. Suitable for fast drilling of smaller holes in wood or metal.
NOTE: Always ensure the drill is stopped before changing gear settings to prevent damage to the gearbox.
5.3 Mode Selection (Drill, Drive, Hammer Drill)
Rotate the collar behind the chuck to select the desired operating mode:
- ڈرل موڈ (ڈرل آئیکن): For drilling holes in wood, metal, and plastics.
- Drive Mode (Screw Icon): For driving screws. The clutch settings (numbered ring) allow you to adjust the torque to prevent over-driving screws or damaging materials.
- Hammer Drill Mode (Hammer Icon): For drilling into masonry, brick, and concrete. This mode combines rotary action with a hammering motion.
5.4 ٹربو موڈ
The Turbo Mode button, located on top of the drill, provides an immediate increase in speed for faster results when needed.
- دبائیں ٹربو button during operation to engage maximum speed.
- Release the button to return to the previously selected speed setting.

Figure 5: The Turbo Mode button, when pressed, provides increased speed for rapid task completion.
5.5 Anti-Kickback Feature
The drill is equipped with an advanced anti-kickback braking technology. If the drill bit binds during operation, the system will detect the sudden rotational force and rapidly stop the motor to reduce the risk of kickback and potential injury.
5.6 انٹیگریٹڈ ایل ای ڈی لائٹ
An LED light is integrated into the drill to illuminate the work area, improving visibility in dimly lit conditions. The light activates when the trigger is pressed.

Figure 6: The integrated LED light provides illumination for improved visibility in dark work environments.
5.7 Drilling into Masonry (Hammer Drill Mode)
چنائی، اینٹوں یا کنکریٹ میں سوراخ کرتے وقت:
- Select Hammer Drill Mode.
- Ensure the auxiliary handle is securely attached and held firmly with both hands.
- مناسب چنائی ڈرل بٹس کا استعمال کریں.
- Apply steady, firm pressure to the drill, allowing the hammering action to break up the material.

Figure 7: The FLEX hammer drill in action, demonstrating its capability to drill into tough materials with 1,400 in-lbs of torque.
6 دیکھ بھال
6.1 صفائی
- کسی بھی صفائی یا دیکھ بھال کو انجام دینے سے پہلے ہمیشہ بیٹری پیک کو منقطع کریں۔
- وینٹیلیشن کے سوراخوں سے دھول اور ملبے کو صاف کرنے کے لیے نرم برش یا کمپریسڈ ہوا کا استعمال کریں۔
- ٹول ہاؤسنگ کو اشتہار کے ساتھ صاف کریں۔amp کپڑا سخت کیمیکل یا کھرچنے والے کلینر کا استعمال نہ کریں۔
- چک کے جبڑوں کو صاف ستھرا اور ملبے سے پاک رکھیں تاکہ یہ یقینی بنایا جا سکے کہ تھوڑا سا گرفت مناسب ہے۔
6.2 اسٹوریج
- ٹول، بیٹریاں، اور چارجر کو براہ راست سورج کی روشنی اور نمی سے دور، ٹھنڈی، خشک جگہ پر اسٹور کریں۔
- Ensure batteries are partially charged (not fully depleted or fully charged for long-term storage) before storing.
- Store the tool in its carrying case to protect it from damage.
7 خرابیوں کا سراغ لگانا
| مسئلہ | ممکنہ وجہ | حل |
|---|---|---|
| ڈرل شروع نہیں ہوتی۔ | بیٹری چارج نہیں ہوئی یا غلط طریقے سے انسٹال ہوئی ہے۔ Forward/Reverse selector in center (locked) position. | بیٹری کو چارج کریں اور یقینی بنائیں کہ یہ محفوظ طریقے سے انسٹال ہے۔ Move selector to forward or reverse position. |
| آپریشن کے دوران بجلی کا نقصان۔ | بیٹری چارج کم ہے۔ اوورلوڈ تحفظ کو چالو کر دیا گیا۔ | بیٹری ری چارج کریں۔ Reduce pressure on the tool; allow it to cool down. |
| چک میں بٹ پھسل جاتا ہے۔ | چک کافی سخت نہیں. Chuck jaws are dirty or worn. | چک کو مضبوطی سے مضبوط کریں۔ Clean chuck jaws. If problem persists, chuck may need replacement. |
| ضرورت سے زیادہ کمپن یا شور۔ | Damaged or bent drill bit. ڈھیلے اجزاء۔ | Replace drill bit. Check for loose screws or parts. If problem persists, discontinue use and contact service. |
8. وضاحتیں
| فیچر | تفصیل |
|---|---|
| ماڈل نمبر | FX1271T-2B |
| والیومtage | 24 وولٹ |
| چک سائز | 1/2-انچ |
| چک کی قسم | Full-Metal Ratcheting |
| زیادہ سے زیادہ ٹارک | 1400 انچ پاؤنڈ |
| زیادہ سے زیادہ گردشی رفتار | 2500 RPM |
| رفتار کی تعداد | 2 |
| بیٹری کی صلاحیت (شامل) | 2.5 Ah, 5.0 Ah Lithium-Ion |
| Charger Type (Included) | 160W فاسٹ چارجر |
| خصوصی خصوصیات | Turbo Mode, Anti-Kickback, LED Light, Brushless Motor |
| شے کا وزن | 15.37 پاؤنڈز (کِٹ) |
| مصنوعات کے طول و عرض | 7.2"L x 4"W x 10"H (Tool) |
| سوراخ کرنے کی صلاحیت (لکڑی) | 2 انچ |
| سوراخ کرنے کی صلاحیت (دھاتی) | 2 انچ |
9. وارنٹی اور سپورٹ
9.1 FLEX Limited Lifetime Warranty
This FLEX tool is protected by the FLEX Limited Lifetime Warranty. To qualify for this warranty, you must register your new FLEX tool, battery, or charger within 30 days of purchase through December 31, 2025. Registration can be completed at registermyFLEX.com.
Please refer to the official FLEX website or your product packaging for full terms and conditions of the warranty.
9.2 کسٹمر سپورٹ
For technical assistance, replacement parts, or warranty claims, please contact FLEX customer support. Contact information can typically be found on the FLEX official webسائٹ یا آپ کی مصنوعات کی پیکیجنگ پر۔
When contacting support, please have your model number (FX1271T-2B) and purchase date available.