
تعارف
This manual provides essential information for the installation, operation, and maintenance of your KICKER CXA400.1 Mono Class D Car Amplifier and CXARC Remote Bass Control. Please read this manual thoroughly to ensure proper use and to achieve optimal performance from your audio system.

تصویر: اوپر view of the KICKER CXA400.1 Mono Class D Car Ampزندگی
The KICKER CXA400.1 amplifier is designed for efficient power delivery to subwoofers, featuring a Class-D power plant and a compact design. The KICKER CXARC remote control allows for convenient adjustment of bass levels.
حفاظتی معلومات
اپنے کو انسٹال اور چلاتے وقت ہمیشہ درج ذیل حفاظتی احتیاطی تدابیر پر عمل کریں۔ ampزندہ:
- Disconnect the vehicle's battery negative terminal before making any electrical connections.
- اس بات کو یقینی بنائیں کہ تمام وائرنگ کو صحیح طریقے سے روٹ کیا گیا ہے اور نقصان یا شارٹ سرکٹ کو روکنے کے لیے محفوظ کیا گیا ہے۔
- مناسب گیج پاور اور زمینی تاروں کا استعمال کریں جیسا کہ تنصیب کے حصے میں بیان کیا گیا ہے۔
- نصب کرنے سے بچیں amplifier in locations exposed to excessive heat, moisture, or vibration.
- آپریٹ نہ کریں۔ amplifier if it is damaged or malfunctioning. Refer to the troubleshooting section or contact KICKER support.
- Prolonged exposure to high sound pressure levels can cause permanent hearing loss. Use caution when adjusting volume levels.
پیکیج کے مشمولات
تصدیق کریں کہ تمام اشیاء آپ کے پیکیج میں موجود ہیں:
- KICKER CXA400.1 Mono Class D Car Ampزندگی
- KICKER CXARC Remote Bass Control
- Mounting Hardware (screws, vertical mounting brackets)
- مالک کا دستورالعمل (یہ دستاویز)
سیٹ اپ اور انسٹالیشن
زیادہ سے زیادہ کارکردگی اور حفاظت کے لیے مناسب تنصیب بہت ضروری ہے۔ اگر آپ کو انسٹالیشن کے عمل کے کسی بھی حصے کے بارے میں یقین نہیں ہے تو، کسی پیشہ ور انسٹالر سے مشورہ کریں۔
کو چڑھانا Ampزندگی
The CXA400.1 amplifier features a compact design and includes vertical mounting hardware for flexible installation options. Choose a location that is dry, well-ventilated, and protected from direct sunlight or excessive heat. Ensure there is sufficient space around the ampہوا کی گردش کے لیے لائفائر۔
وائرنگ کنکشنز
All wiring should be done with the vehicle's battery disconnected. Use high-quality power, ground, and speaker wires of appropriate gauge.

تصویر: View of the KICKER CXA400.1 amplifier showing RCA input/output and control panel.
- پاور کنکشن: Connect the main power wire from the battery (with an inline fuse) to the ampلائفائر کا +12V ٹرمینل۔
- زمینی رابطہ: Connect a short, heavy-gauge ground wire from the amplifier's GND terminal to a clean, bare metal point on the vehicle's chassis.
- ریموٹ ٹرن آن: مربوط کریں۔ amplifier's REM terminal to the remote turn-on output of your head unit.
- ان پٹ سگنل: The CXA400.1 accepts both low-level (RCA) and high-level (speaker wire) input signals. It can accept up to 40 volts of speaker-level input, eliminating the need for line-out converters in many cases. Connect your head unit's RCA outputs to the amplifier's INPUT terminals for low-level input, or use the high-level input if your head unit does not have RCA outputs.
- اسپیکر آؤٹ پٹ: اپنے ذیلی ووفر(ز) کو اس سے مربوط کریں۔ amplifier's speaker output terminals. Ensure correct polarity.

تصویر: سائیڈ view of the KICKER CXA400.1 amplifier showing power, ground, remote, and speaker terminals.
ابتدائی ترتیبات
After all connections are made, reconnect the vehicle's battery. Before playing audio, set the amplifier's gain control to its minimum position. Adjust other settings like crossover and bass boost as needed for your specific audio setup.
آپریٹنگ Ampلائفائر اور باس نوب
The KICKER CXA400.1 amplifier offers several adjustable features to fine-tune your audio experience. The CXARC remote bass control provides convenient real-time adjustments.
کنٹرول حاصل کریں۔
حاصل کنٹرول سے میل کھاتا ہے۔ amplifier's input sensitivity to the output level of your head unit. Start with the gain at minimum and slowly increase it until you hear distortion, then back off slightly. This ensures maximum clean signal from your head unit.
کراس اوور کی ترتیبات
دی amplifier features a variable 12dB low-pass crossover (50Hz–200Hz). This filter allows only frequencies below the set point to pass to the subwoofer, preventing higher frequencies from reaching it and improving overall sound clarity. Adjust this to blend smoothly with your main speakers.
سبسونک فلٹر
A 24dB/octave subsonic filter set at 25Hz helps protect your subwoofer by removing extremely low, inaudible frequencies that can cause excessive cone excursion and potential damage. It also improves efficiency by preventing the amplifier from wasting power on these frequencies.
کِک ای کیو باس بوسٹ
The KickEQ offers a variable 0-6dB bass boost centered at 40Hz. Use this feature to enhance low-frequency response. Adjust carefully to avoid distortion and speaker damage.
CXARC Remote Bass Control
The CXARC remote bass control connects to your CXA400.1 amplifier and allows you to adjust the bass level conveniently from the driver's seat. This provides on-the-fly control over your subwoofer's output without needing to access the ampبراہ راست lifier.
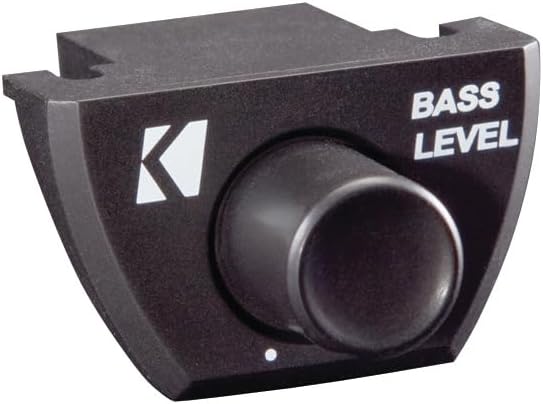
Image: The KICKER CXARC Remote Bass Control knob.
دیکھ بھال
Your KICKER amplifier and bass knob require minimal maintenance to ensure long-lasting performance.
- صفائی: وقتا فوقتا مسح کریں۔ amplifier and remote with a soft, dry cloth to remove dust and dirt. Do not use harsh chemicals or abrasive cleaners.
- رابطے: کبھی کبھار تمام وائرنگ کنکشن چیک کریں تاکہ یہ یقینی بنایا جا سکے کہ وہ محفوظ اور سنکنرن سے پاک ہیں۔ ڈھیلا کنکشن خراب کارکردگی یا نقصان کا باعث بن سکتا ہے۔
- وینٹیلیشن: اس بات کو یقینی بنائیں کہ ampلائفائر کے کولنگ پنوں کو گرمی کی مناسب کھپت کی اجازت دینے میں رکاوٹ نہیں ہے۔
خرابی کا سراغ لگانا
If you experience issues with your KICKER amplifier، درج ذیل عام مسائل اور حل کی طرف رجوع کریں:
- کوئی طاقت نہیں: Check the inline fuse on the power wire, ensure the ground connection is solid, and verify the remote turn-on wire is receiving 12V when the head unit is on.
- کوئی آواز نہیں: Check all input and output connections. Ensure the gain is not set to minimum. Verify the head unit is sending an audio signal. Check speaker wires for shorts or open circuits.
- مسخ شدہ آواز: Reduce the gain setting. Check for proper crossover and bass boost settings. Ensure the input signal is not overdriven.
- Ampزیادہ گرم کرنے والا: کے ارد گرد مناسب وینٹیلیشن کو یقینی بنائیں amplifier. Check the impedance of your speakers; ensure it matches the ampلیفائر کی صلاحیتیں.
- Remote Bass Knob Not Working: Check the connection cable between the CXARC and the ampزیادہ زندہ کو یقینی بنائیں۔ ampلائفائر آن ہے۔
If problems persist after checking these points, contact KICKER customer support.
وضاحتیں
| فیچر | تفصیلات |
|---|---|
| پاور آؤٹ پٹ (آر ایم ایس) | 150x1 watts/ch at 4 Ohms, 300x1 watts/ch at 2 Ohms, 400x1 watts/ch at 1 Ohm |
| تعدد رسپانس | 25-200Hz |
| ان پٹ حساسیت | 250mV-10V (Low Level), 1V-40V (High Level) |
| سگنل ٹو شور کا تناسب | >95dB |
| ایکٹو کراس اوور | متغیر Lo-pass 50Hz–200Hz، 12dB/octave |
| سبسونک فلٹر | 25Hz @24dB/octave |
| KickEQ Boost | Variable 0-6dB @40Hz |
| طول و عرض | 8-1/8" x 5.9" x 17" (20.6cm x 15cm x 43cm) |
| شے کا وزن | 5.3 پاؤنڈ |
| ماڈل نمبر | KickerBDL240611-01 (Bundle) |
وارنٹی
The KICKER CXA400.1 Amplifier and CXARC Bass Knob are covered by a 1 سالہ مینوفیکچرر وارنٹی۔. This warranty covers defects in materials and workmanship under normal use. Please retain your proof of purchase for warranty claims. For specific warranty terms and conditions, refer to the documentation included with your product or visit the official KICKER webسائٹ
حمایت
For technical assistance, troubleshooting, or warranty inquiries, please contact KICKER customer support. You can find contact information and additional resources on the official KICKER website. When contacting support, please have your product model number (CXA400.1, CXARC) and proof of purchase readily available.
کا دورہ کریں۔ KICKER Store on Amazon مزید مصنوعات اور معلومات کے لیے۔