1. تعارف
Thank you for choosing the MYPIN Portable Cordless Pressure Washer, Model CE0413. This device is designed for efficient and convenient cleaning of various surfaces, including vehicles, floors, walls, and fences. Its cordless design and adjustable pressure settings provide versatility for different cleaning tasks. Please read this manual thoroughly before operation to ensure safe and effective use.
2. حفاظتی ہدایات
- Always wear appropriate safety gear, including eye protection, when operating the pressure washer.
- Keep hands, face, and body parts away from the spray nozzle during operation. The high-pressure water stream can cause injury.
- Do not direct the water stream at people, pets, or electrical equipment.
- Ensure the battery is fully charged before use and properly inserted into the device.
- Disconnect the battery when the pressure washer is not in use or during maintenance.
- Use only clean water with the pressure washer. Do not use corrosive liquids or solvents.
- ڈیوائس کو بچوں کی پہنچ سے دور رکھیں۔
- Inspect the hose, nozzle, and connections for damage before each use. Do not operate if any components are damaged.
3. پیکیج کے مشمولات
تصدیق کریں کہ نیچے دی گئی تمام اشیاء آپ کے پیکیج میں شامل ہیں:
- 1 x Cordless High-Pressure Washer
- 2 x Lithium-Ion Batteries (3.0Ah)
- 1 x Charging Plug
- 1 x Suitcase for storage
- 1 x 5-meter (196-inch) PVC Hose
- 1 x 6-in-1 Nozzle
- 1 ایکس فوم کی بوتل
- 1 x Towel
- 1 x Bottle Connector
- 1 ایکس کوئیک کنیکٹر
- 1 ایکس واٹر فلٹر
- 1 ایکس صارف دستی

تصویر: ختمview of all included accessories and the pressure washer unit.
4. سیٹ اپ ہدایات
پہلے استعمال کے لیے اپنے پریشر واشر کو ترتیب دینے کے لیے ان اقدامات پر عمل کریں:
- بیٹریاں چارج کریں: Connect the charging plug to the battery and a power outlet. The indicator light will be red during charging and turn green when fully charged.
- پانی کے فلٹر کو جوڑیں: Insert the water filter into one end of the PVC hose. This filter prevents impurities from entering the pump.
- Install Quick Connector: Attach the quick connector to the other end of the PVC hose.
- Attach Hose to Sprayer Gun: Connect the quick connector on the hose to the inlet on the sprayer gun.
- نوزل انسٹال کریں: Press and twist the desired 6-in-1 nozzle onto the sprayer gun.
- بیٹری داخل کریں: Slide a fully charged battery into the battery slot on the pressure washer handle until it clicks into place.
- پانی کا ذریعہ تیار کریں: Place the end of the PVC hose with the water filter into a bucket of water or a water pool. Ensure the filter is fully submerged.

Image: Visual guide for connecting the water filter, hose, quick connector, nozzle, and battery.

Image: Illustration of the battery charger with red light indicating charging and green light indicating full charge.

Image: Demonstrates using a water bucket or a water pool as a source for the pressure washer.
5. آپریٹنگ ہدایات
ایک بار جمع اور پانی کے ذریعہ سے منسلک ہونے کے بعد، آپ کام شروع کر سکتے ہیں:
- پاور آن: Press the power button on the handle. The LCD display will illuminate.
- Adjust Pressure Mode: Use the touch screen on the LCD display to adjust the pressure mode from 1 to 10. Press '+' to increase pressure and '-' to decrease pressure. The display also shows battery percentage.
- Select Nozzle Spray Pattern: Rotate the head of the 6-in-1 nozzle to select the desired spray pattern: 0° (direct stream for stubborn stains), 15°, 25°, 40° (wider spray for general cleaning), Upward (for hard-to-reach areas like undercarriages), or Shower (for gentle rinsing or watering plants).
- صفائی شروع کریں: Aim the nozzle at the surface to be cleaned and press the trigger to start the water flow. Release the trigger to stop.
- Using the Foam Bottle: For foam cleaning, fill the foam bottle with detergent and attach it to the sprayer gun. The pressure washer will mix the detergent with water to create foam.
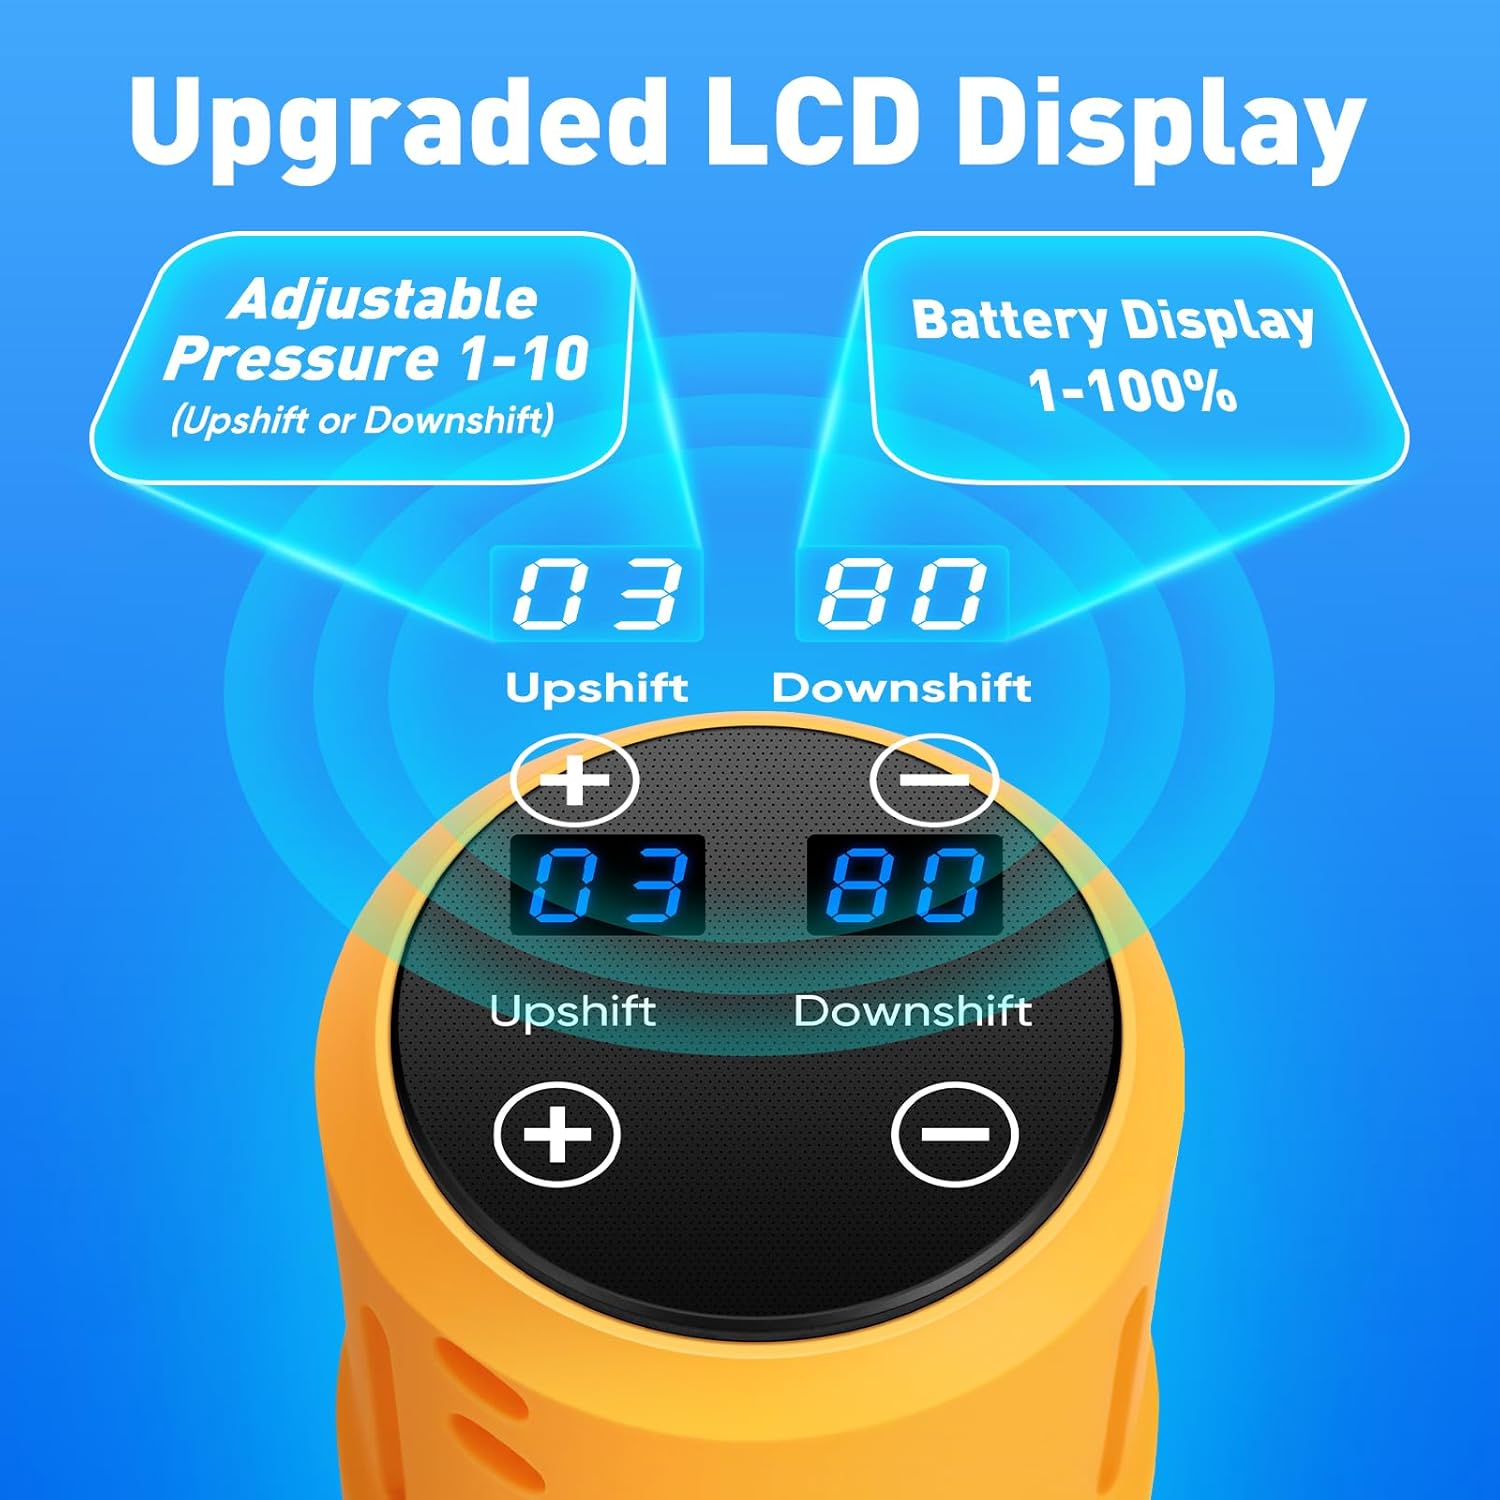
Image: The LCD display allows for easy adjustment of pressure modes (1-10) and shows battery percentage.
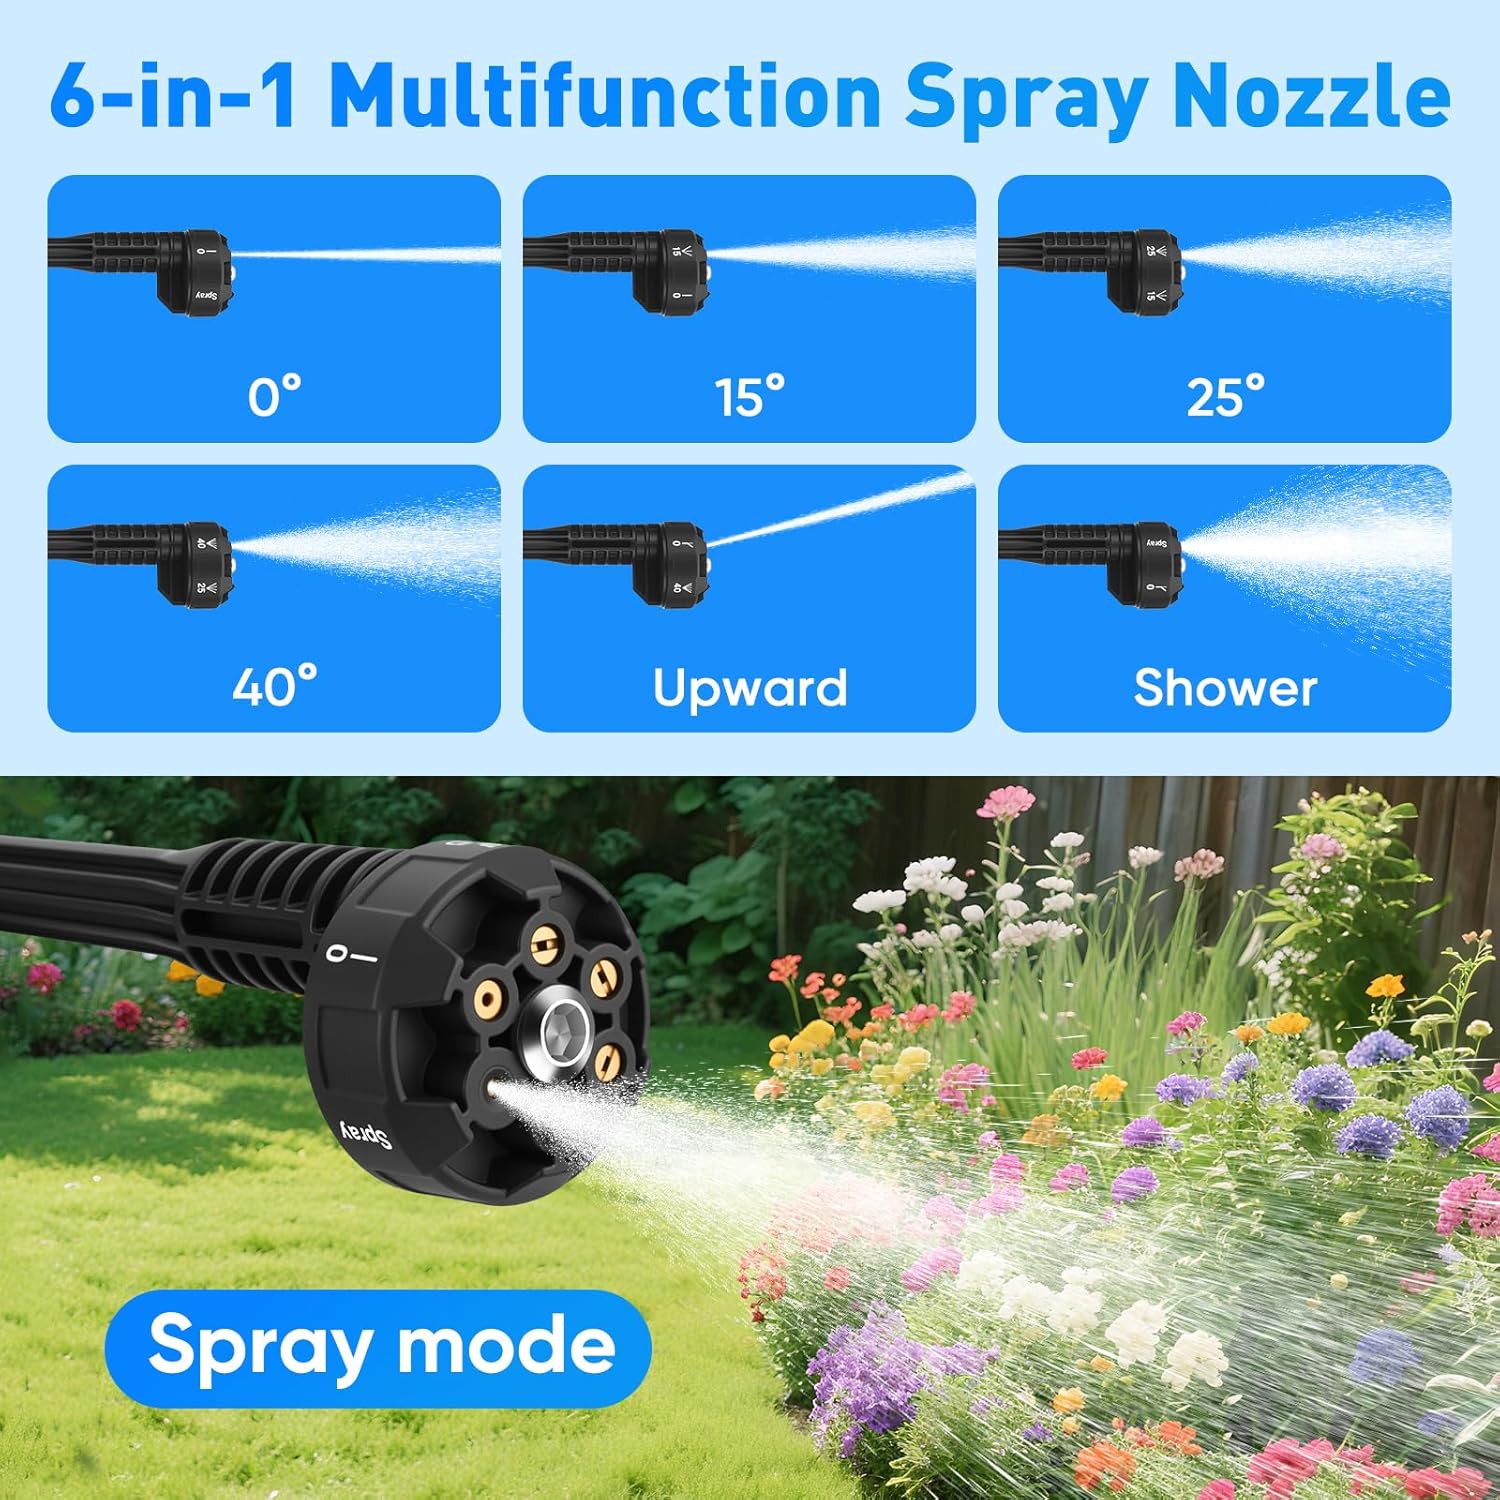
Image: The 6-in-1 nozzle offers various spray modes including 0°, 15°, 25°, 40°, upward, and shower for diverse cleaning needs.
Image: The foam bottle can be used to apply detergent for deeper cleaning, drawing water from a bucket or pool.
6 دیکھ بھال
باقاعدگی سے دیکھ بھال بہترین کارکردگی کو یقینی بناتی ہے اور آپ کے پریشر واشر کی زندگی کو بڑھاتی ہے:
- صاف پانی کا فلٹر: Regularly remove and clean the water filter to prevent clogging and protect the pump from impurities.
- استعمال کے بعد دھولیں: After using detergents or chemicals, run clean water through the pressure washer for a few minutes to flush out any residue.
- مناسب طریقے سے ذخیرہ کریں: Store the pressure washer and its accessories in the provided suitcase in a dry, cool place, away from direct sunlight and freezing temperatures.
- بیٹری کی دیکھ بھال: Store batteries in a cool, dry place. Do not expose them to extreme temperatures. Charge them periodically if not used for extended periods.

Image: The water filter effectively removes leaves, sediment, and other impurities to protect the pressure washer.
7 خرابیوں کا سراغ لگانا
اگر آپ کو مسائل درپیش ہیں تو درج ذیل عام مسائل اور حل کا حوالہ دیں:
- پانی کا بہاؤ نہیں:
- Ensure the water filter is submerged and not clogged.
- Check that all hose connections are secure.
- Verify the battery is charged and properly inserted.
- کم دباو:
- Check the selected pressure mode on the LCD display; increase if necessary.
- Ensure the water filter is clean and not restricting water flow.
- Verify the water source has sufficient volume.
- ڈیوائس آن نہیں ہو رہی ہے:
- تصدیق کریں کہ بیٹری پوری طرح سے چارج ہے۔
- Ensure the battery is correctly inserted and locked into place.
8. وضاحتیں
| فیچر | تفصیلات |
|---|---|
| ماڈل نمبر | CE0413 |
| زیادہ سے زیادہ دباؤ | 790 پی ایس آئی |
| بیٹری والیومtage | 21V |
| بیٹری کی صلاحیت | 2 x 3.0Ah Lithium Ion |
| نلی کی لمبائی | 196 Inches (5 meters) |
| مصنوعات کے طول و عرض | 2.96"L x 15.35"W x 17.3"H |
| شے کا وزن | 5.7 پاؤنڈز |
| نوزل کی قسم | 6-in-1 Multifunction |
| پریشر موڈز | 10 Adjustable Modes (via LCD) |
9. وارنٹی اور سپورٹ
For warranty information, technical support, or service inquiries, please contact the manufacturer or refer to the product's original purchase documentation. Specific warranty terms and conditions may vary.