1. تعارف
This manual provides essential information for setting up, operating, maintaining, and troubleshooting your NIMO 15.6-inch FHD Business Laptop. Please read this guide thoroughly to ensure optimal performance and longevity of your device. Keep this manual for future reference.
2. باکس میں کیا ہے۔
تصدیق کریں کہ تمام اشیاء پیکیجنگ میں موجود ہیں:
- 1 x Nimo N154 Laptop
- 1 x Type-C 65W PD Fast Charger
- 1 ایکس یوزر مینوئل (یہ دستاویز)
- Windows 11 Home (pre-installed)
3. پروڈکٹ ختمview
Familiarize yourself with the components and ports of your NIMO laptop.
تصویر: سامنے view of the NIMO 15.6-inch FHD Business Laptop, showcasinجی ڈسپلے اور کی بورڈ۔
3.1 بندرگاہیں اور کنیکٹر
The NIMO N154 laptop features a variety of ports for connecting peripherals and external devices.

Image: Diagram illustrating the various ports on the left and right sides of the NIMO laptop, including USB, HDMI, Type-C, and audio jack.
- بائیں طرف:
- Kensington Lock: For securing your laptop.
- Headphone Combo Jack: For audio output and microphone input.
- USB 3.0 Port (x2): For high-speed data transfer.
- USB 2.0 Port (x1): For connecting standard USB devices.
- Micro SD Card Reader: For expanding storage or transferring files میموری کارڈز سے۔
- دائیں طرف:
- Type-C Port (Charge Only): For connecting the 65W PD charger.
- USB 3.0 Port (x1): For high-speed data transfer.
- HDMI Port: For connecting to external displays.
- Type-C Port (Multifunction): Supports data transfer and display output.
- Charge LED Indicator: Shows charging status.
4. سیٹ اپ
4.1 ابتدائی پاور آن اور چارجنگ
- پیک کھولیں: پیکیجنگ سے لیپ ٹاپ اور تمام لوازمات کو احتیاط سے ہٹا دیں۔
- پاور سے رابطہ کریں: Plug the 65W Type-C PD Fast Charger into a power outlet and then connect the Type-C connector to the designated "Charge Only" Type-C port on the laptop.
- بیٹری چارج کریں: Allow the laptop to charge for at least 30 minutes before initial use, or until the charge LED indicates a full charge.
- پاور آن: لیپ ٹاپ کا ڈھکن کھولیں اور پاور بٹن دبائیں، جو عام طور پر کی بورڈ یا سائیڈ کے اوپری دائیں جانب واقع ہوتا ہے۔

Image: The 65W Type-C PD Fast Charger, illustrating its compact design and universal compatibility.
4.2 ونڈوز 11 سیٹ اپ
Follow the on-screen instructions to complete the Windows 11 initial setup:
- اپنا علاقہ اور کی بورڈ لے آؤٹ منتخب کریں۔
- Wi-Fi نیٹ ورک سے جڑیں۔
- اپنے Microsoft اکاؤنٹ کے ساتھ سائن ان کریں یا نیا بنائیں۔
- فوری لاگ ان کے لیے ایک پن سیٹ کریں۔
- Review اور رازداری کی ترتیبات کو قبول کریں۔
5. آپریٹنگ ہدایات
5.1. فنگر پرنٹ ریڈر
The integrated fingerprint sensor allows for secure and quick login without passwords.
- سیٹ اپ: Navigate to Windows Settings > Accounts > Sign-in options > Fingerprint recognition (Windows Hello).
- اندراج فنگر پرنٹ: Follow the on-screen prompts to register your fingerprint. You may need to scan your finger multiple times from different angles.
- استعمال: To log in, simply place your registered finger on the fingerprint sensor when prompted.

Image: Close-up of the laptop's touchpad area showing the fingerprint reader, and a separate image of the webcam with a privacy shield.
5.2. Backlit Keyboard
The backlit keyboard enhances visibility in low-light conditions.
- بیک لائٹ ٹوگل کریں: Use the dedicated function key (often Fn + Fx, where Fx is a key with a keyboard backlight icon) to cycle through backlight brightness levels or turn it off. Refer to your keyboard for the specific key combination.
5.3. Webcam Privacy Shield
The laptop includes a physical webcam privacy shield for enhanced security.
- فعال/غیر فعال کریں: Slide the physical switch located next to the webcam to cover or uncover the camera lens.
5.4. Connecting External Displays
You can extend your workspace by connecting an external monitor or projector.
- کیبل جڑیں: Use an HDMI cable to connect your external display to the laptop's HDMI port, or a compatible Type-C to DisplayPort/HDMI adapter for the multifunction Type-C port.
- Configure Display: دبائیں ونڈوز کی + پی to open the Project menu. Select your preferred display mode (e.g., Duplicate, Extend, Second screen only).
6 دیکھ بھال
6.1. اپنے لیپ ٹاپ کی صفائی
- سکرین: ہلکے سے نرم، لنٹ سے پاک کپڑا استعمال کریں۔ampپانی یا اسکرین کلینر کے ساتھ ختم کریں۔ مائع کو براہ راست اسکرین پر نہ چھڑکیں۔
- کی بورڈ اور چیسس: نرم، خشک کپڑا استعمال کریں۔ ضدی گندگی کے لیے، تھوڑا سا ڈیamp ہلکے صابن کے محلول کے ساتھ کپڑا استعمال کیا جا سکتا ہے، اس بات کو یقینی بناتے ہوئے کہ کوئی مائع سوراخوں میں داخل نہ ہو۔
- بندرگاہیں: بندرگاہوں سے دھول کو آہستہ سے صاف کرنے کے لیے کمپریسڈ ہوا کا استعمال کریں۔
6.2. بیٹری کی دیکھ بھال
- بیٹری کو بار بار مکمل طور پر خارج کرنے سے گریز کریں۔
- لیپ ٹاپ کو ٹھنڈی، خشک جگہ پر ذخیرہ کریں اگر طویل مدت تک استعمال نہ کیا جائے۔
- لیپ ٹاپ کو انتہائی درجہ حرارت کے سامنے نہ رکھیں۔
6.3. سافٹ ویئر اپڈیٹس
- سسٹم کے استحکام اور سلامتی کو یقینی بنانے کے لیے ونڈوز اپ ڈیٹس کو باقاعدگی سے چیک کریں اور انسٹال کریں۔ ترتیبات > ونڈوز اپ ڈیٹ پر جائیں۔
- بہترین کارکردگی کے لیے ڈیوائس ڈرائیورز کو اپ ڈیٹ رکھیں۔
7 خرابیوں کا سراغ لگانا
یہ سیکشن عام مسائل کو حل کرتا ہے جن کا آپ کو سامنا ہو سکتا ہے۔
7.1 لیپ ٹاپ آن نہیں ہوتا ہے۔
- Ensure the charger is securely connected to both the laptop and a working power outlet.
- دوسرے آلے میں پلگ لگا کر تصدیق کریں کہ پاور آؤٹ لیٹ فعال ہے۔
- Allow the laptop to charge for at least 30 minutes if the battery is completely drained.
- Try a hard reset by holding the power button for 15-20 seconds.
7.2. ڈسپلے کے مسائل (کوئی تصویر نہیں، ٹمٹماہٹ)
- If an external monitor is connected, disconnect it to see if the laptop's screen works.
- Adjust screen brightness using the function keys (e.g., Fn+F5/F6).
- لیپ ٹاپ کو دوبارہ شروع کریں۔
- If connected to an external display, ensure the cable is properly seated and try a different cable or port.
7.3 وائی فائی کنیکٹیویٹی کے مسائل
- Ensure Wi-Fi is enabled in Windows Settings > Network & Internet > Wi-Fi.
- اپنا روٹر اور موڈیم دوبارہ شروع کریں۔
- نیٹ ورک کو بھول جائیں اور دوبارہ جڑیں۔
- Update your Wi-Fi drivers.
7.4 سست کارکردگی
- پس منظر میں چلنے والی غیر ضروری ایپلی کیشنز کو بند کریں۔
- Check Task Manager (Ctrl+Shift+Esc) for processes consuming high CPU, RAM, or disk usage.
- اپنے SSD پر کافی خالی جگہ کو یقینی بنائیں۔
- Run a disk cleanup and defragmentation (for HDD, though this is SSD).
- میلویئر یا وائرس کے لیے اسکین کریں۔
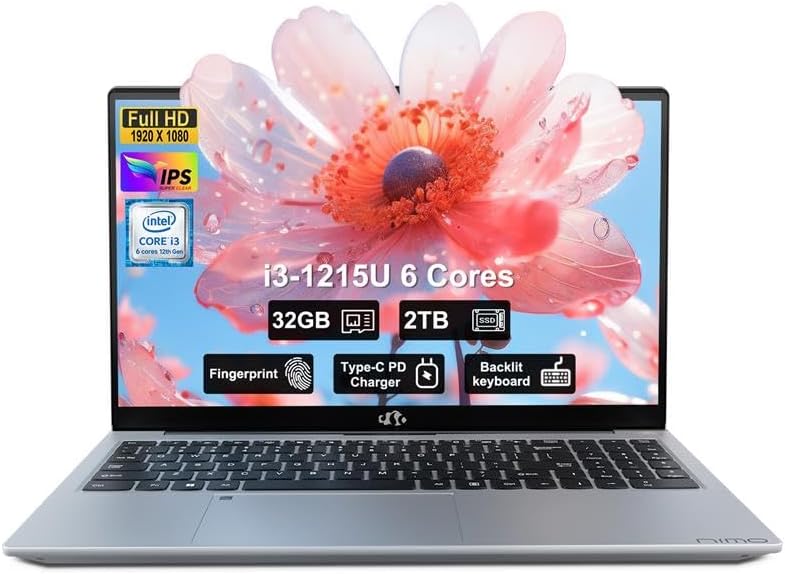
8. وضاحتیں
Detailed technical specifications for the NIMO N154 Laptop.

Image: Diagram illustrating the Intel Core i3-1215U processor with details on cores, threads, power consumption, and Turbo Boost frequency.

Image: Visual representation of 32GB DDR4 RAM and 2TB PCIe 4.0 SSD, highlighting dual RAM channel capability.
| فیچر | تفصیلات |
|---|---|
| ماڈل کا نام | NIMO N154 |
| اسکرین کا سائز | 15.6 انچ |
| اسکرین ریزولوشن | 1920 x 1080 پکسلز (FHD IPS) |
| پروسیسر | Intel Core i3-1215U (6-core, 8-thread, up to 4.4GHz) |
| رام | 32 GB DDR4 (3200 MHz) |
| ذخیرہ | 2 ٹی بی PCIe SSD |
| گرافکس کا پروسیسر | انٹیگریٹڈ انٹیل گرافکس۔ |
| آپریٹنگ سسٹم | ونڈوز 11 ہوم |
| وائرلیس قسم | 802.11a/b/g/n/ac (Wi-Fi 6) |
| USB پورٹس | 2x USB 3.0, 1x USB 2.0, 2x Type-C (1x Charge Only, 1x Multifunction) |
| HDMI پورٹ | 1x HDMI 2.1 |
| خصوصی خصوصیات | Backlit Keyboard, Fingerprint Reader, HD Audio, Memory Card Slot, Numeric Keypad, Webcam Privacy Shield |
| بیٹری کی زندگی (اوسط) | 5 گھنٹے |
| شے کا وزن | 3.8 پاؤنڈ |
| پروڈکٹ کے طول و عرض (LxWxH) | 14.07 x 8.98 x 0.76 انچ |
| رنگ | چاندی |
9. وارنٹی اور سپورٹ
Nimo Direct Inc. is committed to customer satisfaction.
- مینوفیکچرر کی وارنٹی: Your NIMO laptop is covered by a comprehensive 2-Year Manufacturer's Warranty. This warranty covers defects in materials and workmanship under normal use.
- واپسی کی پالیسی: We offer 90-Day Hassle-Free Returns. If you are not satisfied with your purchase, you may return it within 90 days of receipt.
- کسٹمر سپورٹ: Our dedicated US support team is available to provide swift issue resolution or immediate replacements. For assistance, please refer to the contact information provided on the NIMO official webسائٹ یا آپ کی خریداری کی دستاویزات۔

Image: Illustration of NIMO's after-sales support, including partial US assembly, 90-day free returns, 2-year after-sales support, and 24/7 customer service.