1. تعارف
Thank you for choosing the KEENSTAR 20Bar Espresso Machine. This manual provides essential information for the safe operation, maintenance, and troubleshooting of your new espresso machine. Please read it thoroughly before first use and keep it for future reference.
2. اہم حفاظتی ہدایات
- آلے کو استعمال کرنے سے پہلے تمام ہدایات پڑھیں۔
- گرم سطحوں کو مت چھونا۔ ہینڈل یا نوبس کا استعمال کریں۔
- آگ، بجلی کے جھٹکے، اور لوگوں کو چوٹ لگنے سے بچانے کے لیے، ڈوری، پلگ، یا آلات کو پانی یا دیگر مائع میں نہ ڈبویں۔
- جب کوئی بھی آلات بچوں کے ذریعہ یا اس کے قریب استعمال ہوتا ہے تو قریبی نگرانی ضروری ہے۔
- استعمال میں نہ ہونے پر اور صفائی سے پہلے آؤٹ لیٹ سے ان پلگ کریں۔ پرزے لگانے یا اتارنے سے پہلے، اور آلات کو صاف کرنے سے پہلے ٹھنڈا ہونے دیں۔
- کسی بھی آلے کو خراب شدہ ڈوری یا پلگ سے یا آلات کی خرابی کے بعد، یا کسی بھی طرح سے نقصان پہنچانے کے بعد نہ چلائیں۔
- آلات کے مینوفیکچرر کی طرف سے تجویز کردہ آلات کے اٹیچمنٹ کے استعمال کے نتیجے میں آگ لگ سکتی ہے، بجلی کا جھٹکا لگ سکتا ہے یا لوگوں کو چوٹ لگ سکتی ہے۔
- باہر استعمال نہ کریں۔
- ڈوری کو میز یا کاؤنٹر کے کنارے پر لٹکنے نہ دیں، یا گرم سطحوں کو چھونے نہ دیں۔
- گرم گیس یا الیکٹرک برنر پر یا اس کے قریب یا گرم تندور میں نہ رکھیں۔
- ہمیشہ پلگ کو پہلے آلات سے جوڑیں، پھر دیوار کے آؤٹ لیٹ میں کورڈ لگائیں۔ منقطع کرنے کے لیے، کسی بھی کنٹرول کو "آف" کریں، پھر وال آؤٹ لیٹ سے پلگ ہٹا دیں۔
- مطلوبہ استعمال کے علاوہ آلات کا استعمال نہ کریں۔
- گرم بھاپ کو ضائع کرتے وقت انتہائی احتیاط برتیں۔
- یہ آلہ صرف گھریلو استعمال کے لیے ہے۔
3. پیکیج کے مشمولات
براہ کرم ان باکسنگ پر پیکیج کے مواد کو چیک کریں تاکہ یہ یقینی بنایا جا سکے کہ تمام اشیاء موجود ہیں اور بغیر کسی نقصان کے۔
تصویر: All components included in the KEENSTAR 20Bar Espresso Machine package. This includes the main unit, portafilter with handle, single and double shot filters, coffee spoon with tamper, and a removable drip tray. The water tank and steam nozzle are also visible.
- KEENSTAR 20Bar Espresso Machine Main Unit
- پورٹافلٹر ہینڈل
- 1-Shot Filter Basket
- 2-Shot Filter Basket
- Coffee Spoon with Tamper
- ہٹنے والی ڈرپ ٹرے
- صارف دستی
4. پروڈکٹ ختمview
Familiarize yourself with the various parts of your espresso machine.

تصویر: سامنے والا view of the KEENSTAR 20Bar Espresso Machine, showcasing its sleek stainless steel design and key operational areas.
- پانی کا ٹینک: Detachable, 1.1 Liter capacity. Located at the back of the machine.
- کنٹرول پینل: Intuitive touch screen for selecting brew options (Espresso, Americano, Espresso Cool, Steam, ON/OFF, 2X Espresso).
- پورٹ فلٹر: پکنے کے لیے گراؤنڈ کافی رکھتا ہے۔
- بھاپ کی چھڑی: For frothing milk for lattes and cappuccinos. Features a 360-degree rotation.
- ڈرپ ٹرے: آسان صفائی کے لیے ہٹنے والا۔
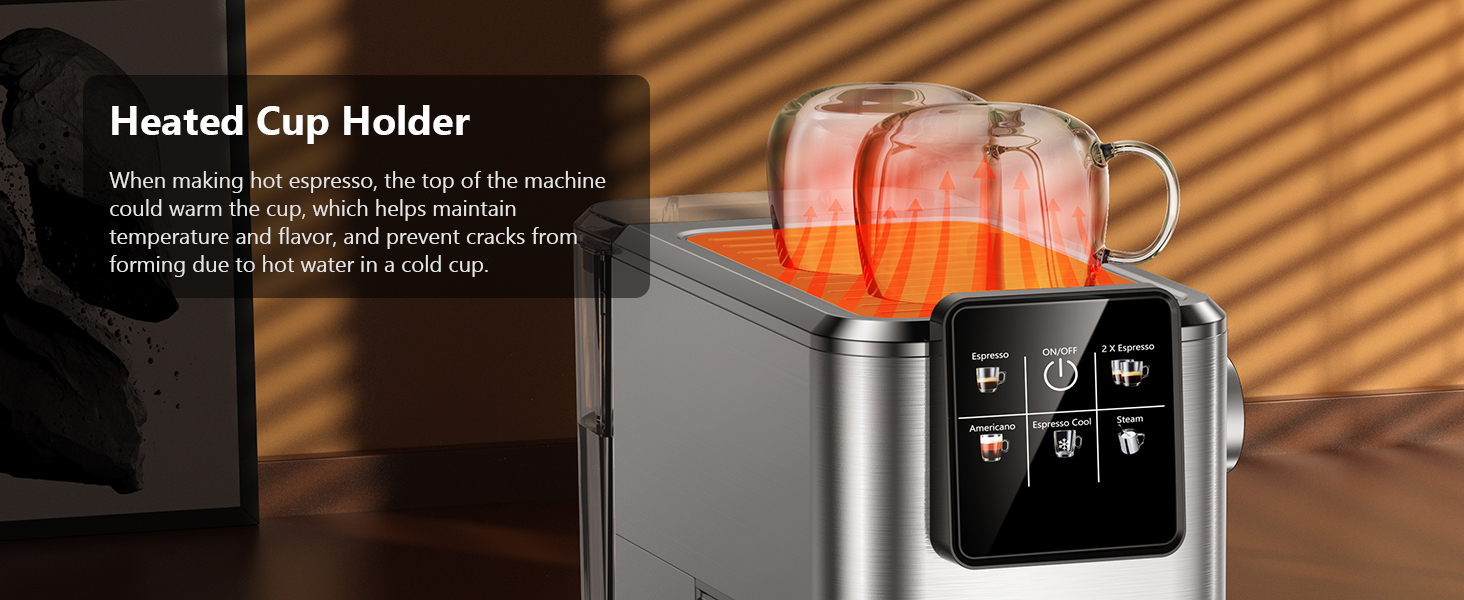
- Heated Cup Holder: Located on top of the machine to warm cups, maintaining coffee temperature.
5. سیٹ اپ
5.1 Initial Use and Priming
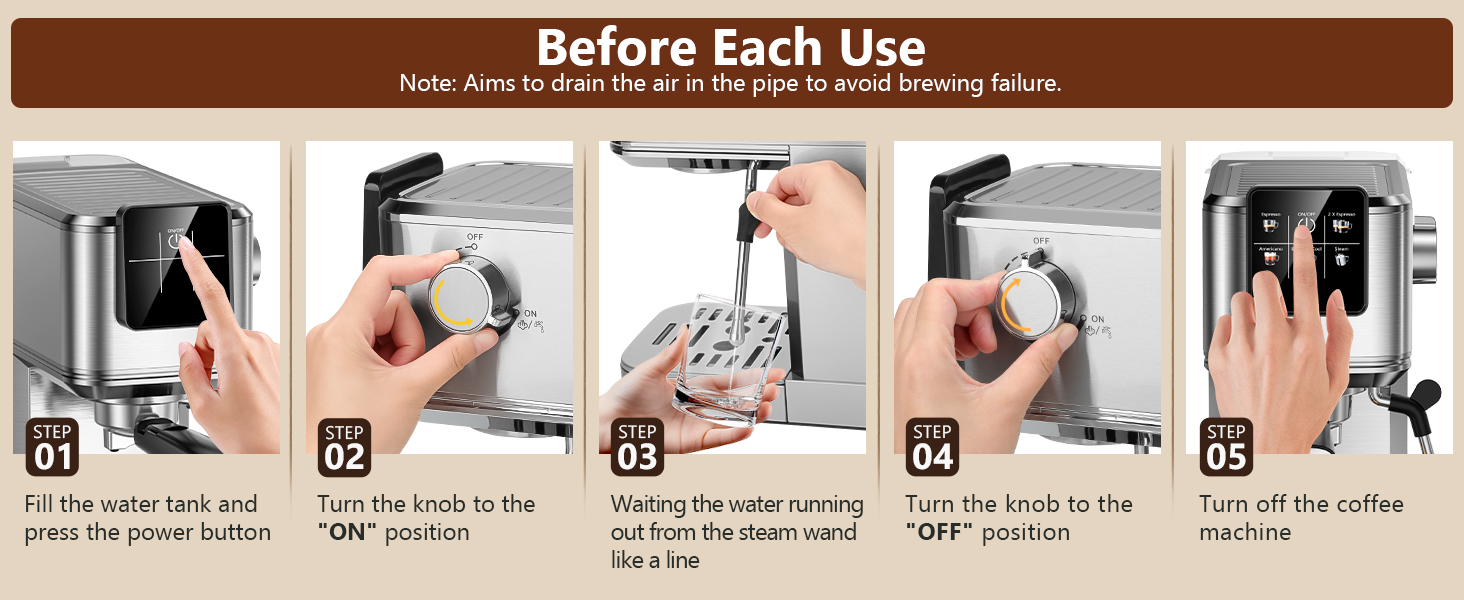
Before first use, or if the machine has not been used for a long time, it is essential to prime the system to ensure proper operation and remove any air from the pipes.
- Fill the water tank with fresh water and place it back into the machine. Ensure the tank cover is properly closed.
- Plug the machine into a power outlet. The ON/OFF button on the touch screen will illuminate.
- Press the ON/OFF button to turn on the machine. The indicator lights will blink as the machine preheats.
- Once the indicator lights are steady, the machine is ready.
- بھاپ کی چھڑی کے نیچے ایک خالی کپ رکھیں۔
- Turn the steam knob to the "ON" position. Water will run out from the steam wand like a line. Let it run for about 10-15 seconds to purge air.
- Turn the steam knob to the "OFF" position.
- Press the ON/OFF button to turn off the machine. The machine is now primed and ready for use.

تصویر: Visual steps for priming the espresso machine before its first use or after a period of inactivity. This process drains air from the internal pipes.
5.2 واٹر ٹینک بھرنا
The water tank has a maximum capacity of 1200ml. Do not exceed the maximum fill line to prevent overflow.
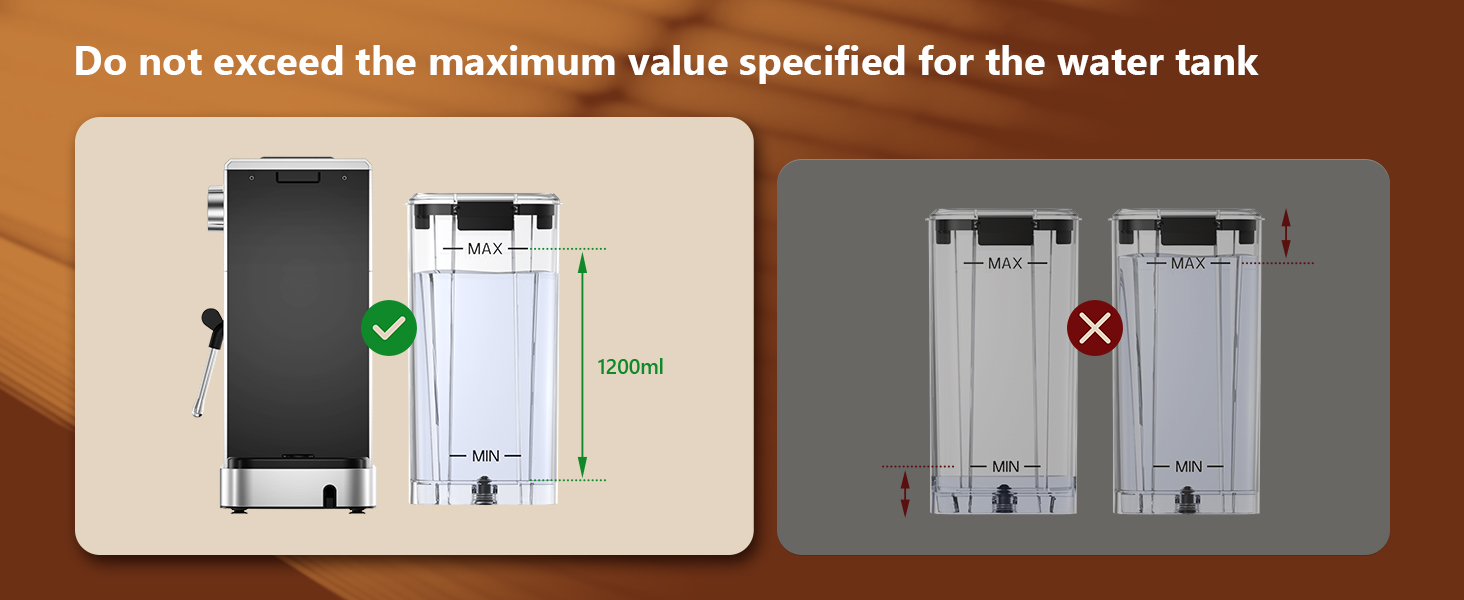
تصویر: Guidance on filling the water tank, indicating the 1200ml maximum fill level to avoid overfilling.
6. آپریٹنگ ہدایات
6.1 بریونگ ایسپریسو
The machine features a 20-bar pressure system and pre-soak technology for rich espresso extraction.
- Ensure the steam knob is set to the "OFF" position before brewing coffee.
- Fill the water tank with fresh water and press the ON/OFF button to power on. Wait for the indicator to become steady, signifying preheating is complete.
- Select the appropriate filter basket (1-shot or 2-shot) and place it into the portafilter.
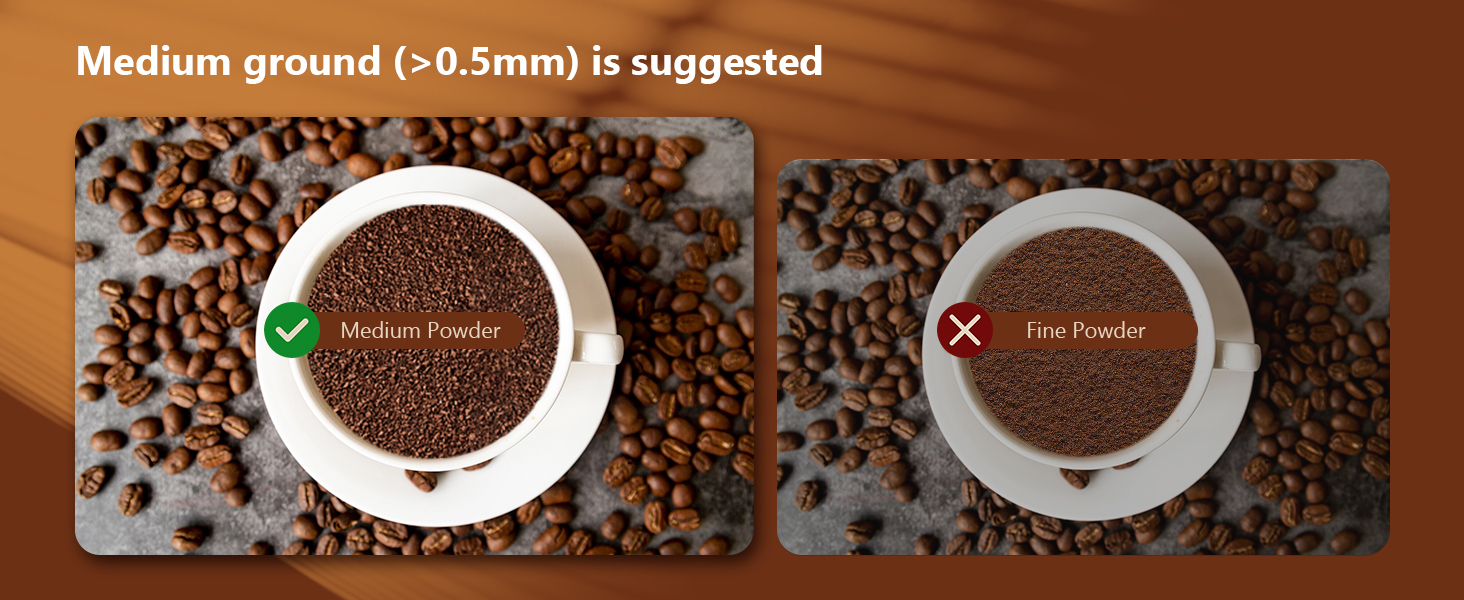
- Add ground coffee to the filter basket. Use medium ground coffee (greater than 0.5mm) for optimal results.
- Tamp the ground coffee firmly and evenly using the coffee tamper
- Attach the portafilter to the machine, ensuring it is fully locked into place.
- اپنے کپ کو پورٹ فلٹر کے نیچے ڈرپ ٹرے پر رکھیں۔
- Select "Espresso" for a single shot or "2 X Espresso" for a double shot on the touch screen. The machine will begin brewing.
- پکنے کا عمل مکمل ہونے کے بعد، مشین خود بخود بند ہو جائے گی۔

تصویر: Step-by-step visual instructions for brewing espresso, from preparing the machine to the final extraction.
تصویر: Illustration demonstrating the correct way to lock the portafilter before brewing to prevent leaks and ensure proper extraction.

تصویر: Recommended coffee grind size (medium, >0.5mm) for optimal espresso extraction, contrasting it with fine ground coffee.
6.2 Making Cold Brew Espresso
This machine offers a rapid cold brew function, producing smooth cold brew in as little as 10 minutes.
- Ensure the water tank is filled with iced water for the cold brew function.
- Prepare the portafilter with ground coffee as described in Section 6.1.
- Attach the portafilter to the machine and place a cup underneath.
- Select "Espresso Cool" on the touch screen. The machine will begin the cold brew process.
- Enjoy your rapid cold brew espresso.

تصویر: The espresso machine preparing cold brew, emphasizing the requirement for iced water in the tank.
6.3 فروتھنگ دودھ
The powerful steam wand allows you to create creamy microfoam for lattes and cappuccinos.
- Fill the water tank with fresh water and press the ON/OFF button to power on.
- Press the "Steam" button on the touch screen to preheat the steam function. The indicator will blink during preheating and become steady when ready.
- After preheating, turn the steam knob to the "ON" position to release any remaining water in the pipe before frothing.
- Insert the steam nozzle approximately 1 inch into the surface of your milk.
- Gradually turn the steam knob to increase steam until the desired foam consistency is achieved.
- Once finished, turn the steam knob to the "OFF" position and clean the steam wand immediately.
تصویر: Visual instructions for frothing milk, detailing the steps from preheating to creating microfoam.
7. دیکھ بھال اور صفائی
باقاعدگی سے صفائی آپ کی یسپریسو مشین کی لمبی عمر اور بہترین کارکردگی کو یقینی بناتی ہے۔
- عمومی صفائی: اشتہار کے ساتھ مشین کے بیرونی حصے کو صاف کریں۔amp کپڑا کھرچنے والے کلینر یا اسکورر استعمال نہ کریں۔
- ڈرپ ٹرے: The removable drip tray should be emptied and cleaned regularly.
- پورٹ فلٹر اور فلٹر ٹوکریاں: ہر استعمال کے بعد، پورٹ فلٹر کو ہٹا دیں اور استعمال شدہ کافی گراؤنڈز کو ضائع کر دیں۔ پورٹ فلٹر اور فلٹر کی ٹوکری کو بہتے ہوئے پانی کے نیچے کللا کریں۔
- بھاپ کی چھڑی: دودھ کو جھاگ لگانے کے فوراً بعد، بھاپ کی چھڑی کو اشتہار سے صاف کریں۔amp cloth to prevent milk residue from drying. Purge steam briefly to clear any internal blockages.
- پانی کا ٹینک: پانی کے ٹینک کو وقتاً فوقتاً ہلکے صابن سے صاف کریں اور اچھی طرح کللا کریں۔
- ڈیسکلنگ: Depending on water hardness, descale the machine every 2-3 months. Follow the instructions provided with a suitable descaling solution.

تصویر: Important cleaning instruction: All accessories must be washed by hand and are not dishwasher safe.
8 خرابیوں کا سراغ لگانا
عام مسائل اور ان کے حل کے لیے اس سیکشن کو دیکھیں۔
| مسئلہ | ممکنہ وجہ | حل |
|---|---|---|
| کوئی کافی ڈسپنس نہیں / سست بہاؤ |
|
|
| Water leaks from portafilter edge |
|
|
| بھاپ کی چھڑی بھاپ پیدا نہیں کرتی ہے۔ |
|
|
| کافی کافی گرم نہیں ہے۔ |
|
|
9. وضاحتیں
- برانڈ: کینسٹار
- ماڈل کا نام: JH-C5210
- پریشر سسٹم: 20 بار
- طاقت: 1350W
- پانی کے ٹینک کی صلاحیت: 1.1 لیٹر (37oz)
- مصنوعات کے طول و عرض: 11.8"D x 12.6"W x 5.5"H
- آئٹم کا وزن: 4.6 پاؤنڈز
- مواد: سٹینلیس سٹیل
- خصوصی خصوصیت: Programmable, Touch Screen, Milk Frother, Hot & Rapid Cold Brew
- کافی ان پٹ کی قسم: گراؤنڈ کافی
- فلٹر کی قسم: دوبارہ قابل استعمال
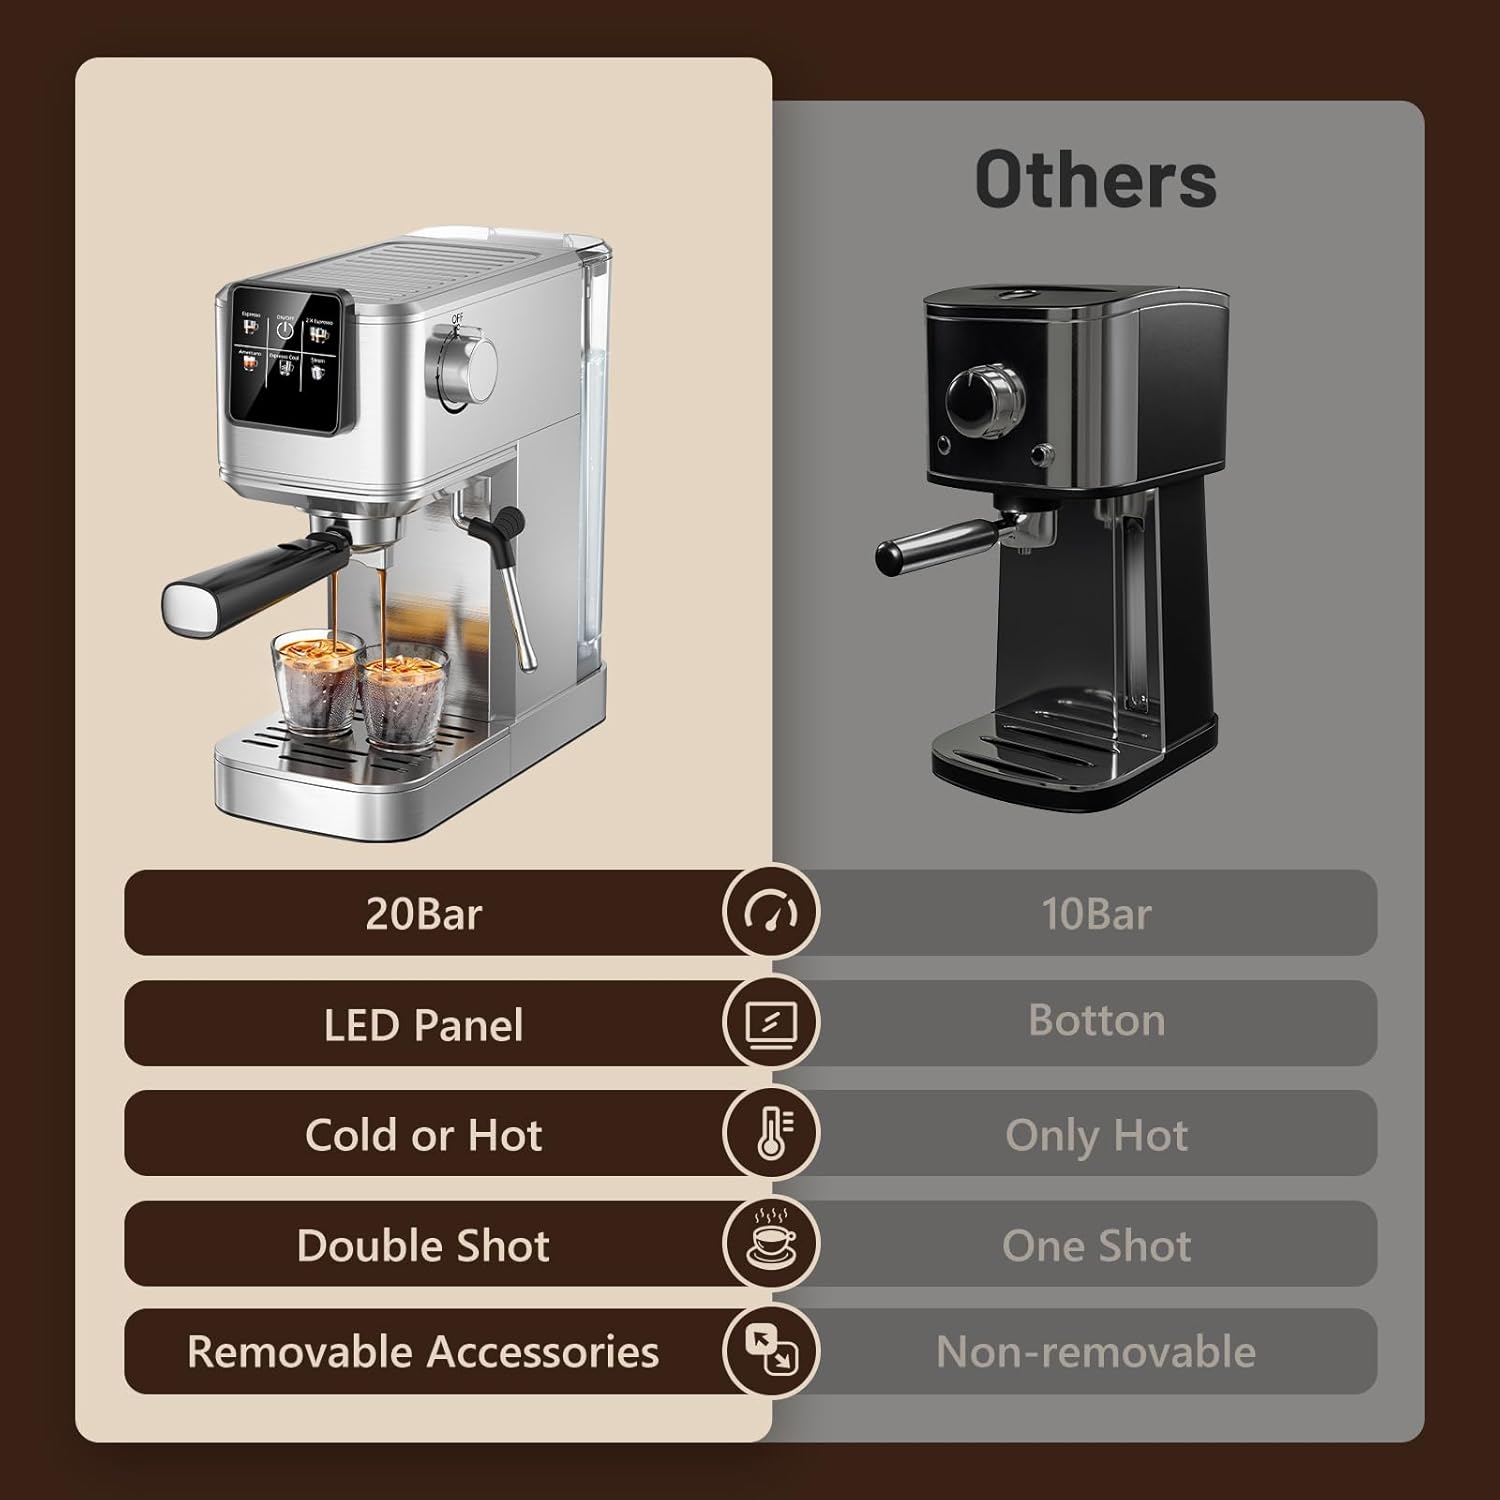
تصویر: Feature comparison of the KEENSTAR machine, emphasizing its 20Bar pressure, LED panel, and versatility for hot and cold beverages.

تصویر: Dimensions of the KEENSTAR espresso machine, indicating its compact size.
10. وارنٹی اور سپورٹ
For warranty information or technical support, please refer to the contact details provided on the product packaging or visit the official KEENSTAR webسائٹ کسی بھی وارنٹی دعووں کے لیے اپنی خریداری کا ثبوت رکھیں۔