1. تعارف اور اوورview
This manual provides essential instructions for the setup, operation, and maintenance of your Prechen HD-173 16.2-inch 2K Touchscreen Portable Monitor. Please read this manual thoroughly before using the device to ensure proper functionality and longevity.
اہم خصوصیات:
- 16.2" 2K QHD IPS Panel: Features an 800 nits brightness, 178° viewing angle, and 1000:1 contrast ratio for vivid colors and sharp details.
- 10 پوائنٹ ملٹی ٹچ: Responsive touch functionality, optimized for interactive monitoring with Aida64 on Windows. (Note: iOS devices support single touch only).
- Dedicated Aida64 Monitoring: Designed as a secondary display for real-time CPU/GPU usage, temperatures, fan speeds, and custom sensor panels.
- دوہری رابطہ: Equipped with HDMI and USB-C ports for easy connection to laptops, PCs, and gaming consoles.
- پریمیم دھاتی تعمیر: Durable full-metal casing suitable for PC case integration, portability, or DIY projects.
Important Note on Power and Touchscreen Configuration:
Due to its higher power consumption, always connect the monitor to a power source before plugging in the HDMI or USB-C signal cable. This ensures full touchscreen functionality and stable operation, especially with high brightness settings.

Image 1.1: The Prechen HD-173 16.2-inch 2K Touchscreen Portable Monitor, showcasing اس کا چیکنا ڈیزائن اور متحرک ڈسپلے۔

Image 1.2: Multiple Prechen monitors arranged to display vibrant graphics, highlighting the visual quality.
2. سیٹ اپ
Follow these steps to connect your Prechen HD-173 monitor to your device.
2.1 پورٹ اوورview
Familiarize yourself with the available ports on your monitor:
- آڈیو جیک: بیرونی ہیڈ فون یا اسپیکر کو جوڑنے کے لیے۔
- Type-C (Full-featured USB-C): Supports power, video, and touch signal transmission.
- HDMI: For video signal input.
- ڈی سی پاور: بیرونی بجلی کی فراہمی کے لیے۔
- USB 2.0: For connecting peripherals or additional power.
- Luminance + / Volume - / Menu / ON / OFF buttons: For monitor control.

تصویر 2.1: تفصیلی view of the monitor's ports and control buttons.
2.2 کنکشن کے طریقے
Always connect the power adapter to the monitor first to ensure stable power before connecting any signal cables.
Method 1: Full-featured USB-C Connection (USB-C 3.1 or higher)
This method requires a single USB-C to USB-C cable and a power adapter (required).
- Connect the power adapter to the monitor's DC Power or Type-C port.
- Connect one end of the USB-C to USB-C cable to the monitor's Type-C port.
- Connect the other end of the USB-C to USB-C cable to your device's full-featured USB-C port.
This connection provides video, touch, and power (if your device supports power delivery through USB-C).
Method 2: HDMI and USB Connection
This method requires an HDMI cable, a USB-A to USB-C cable (for touch functionality), and a power adapter (required).
- Connect the power adapter to the monitor's DC Power or Type-C port.
- Connect one end of the HDMI cable to the monitor's HDMI port.
- Connect the other end of the HDMI cable to your device's HDMI port.
- Connect one end of the USB-A to USB-C cable to the monitor's Type-C port.
- Connect the USB-A end of the cable to your device's USB-A port for touch signal.
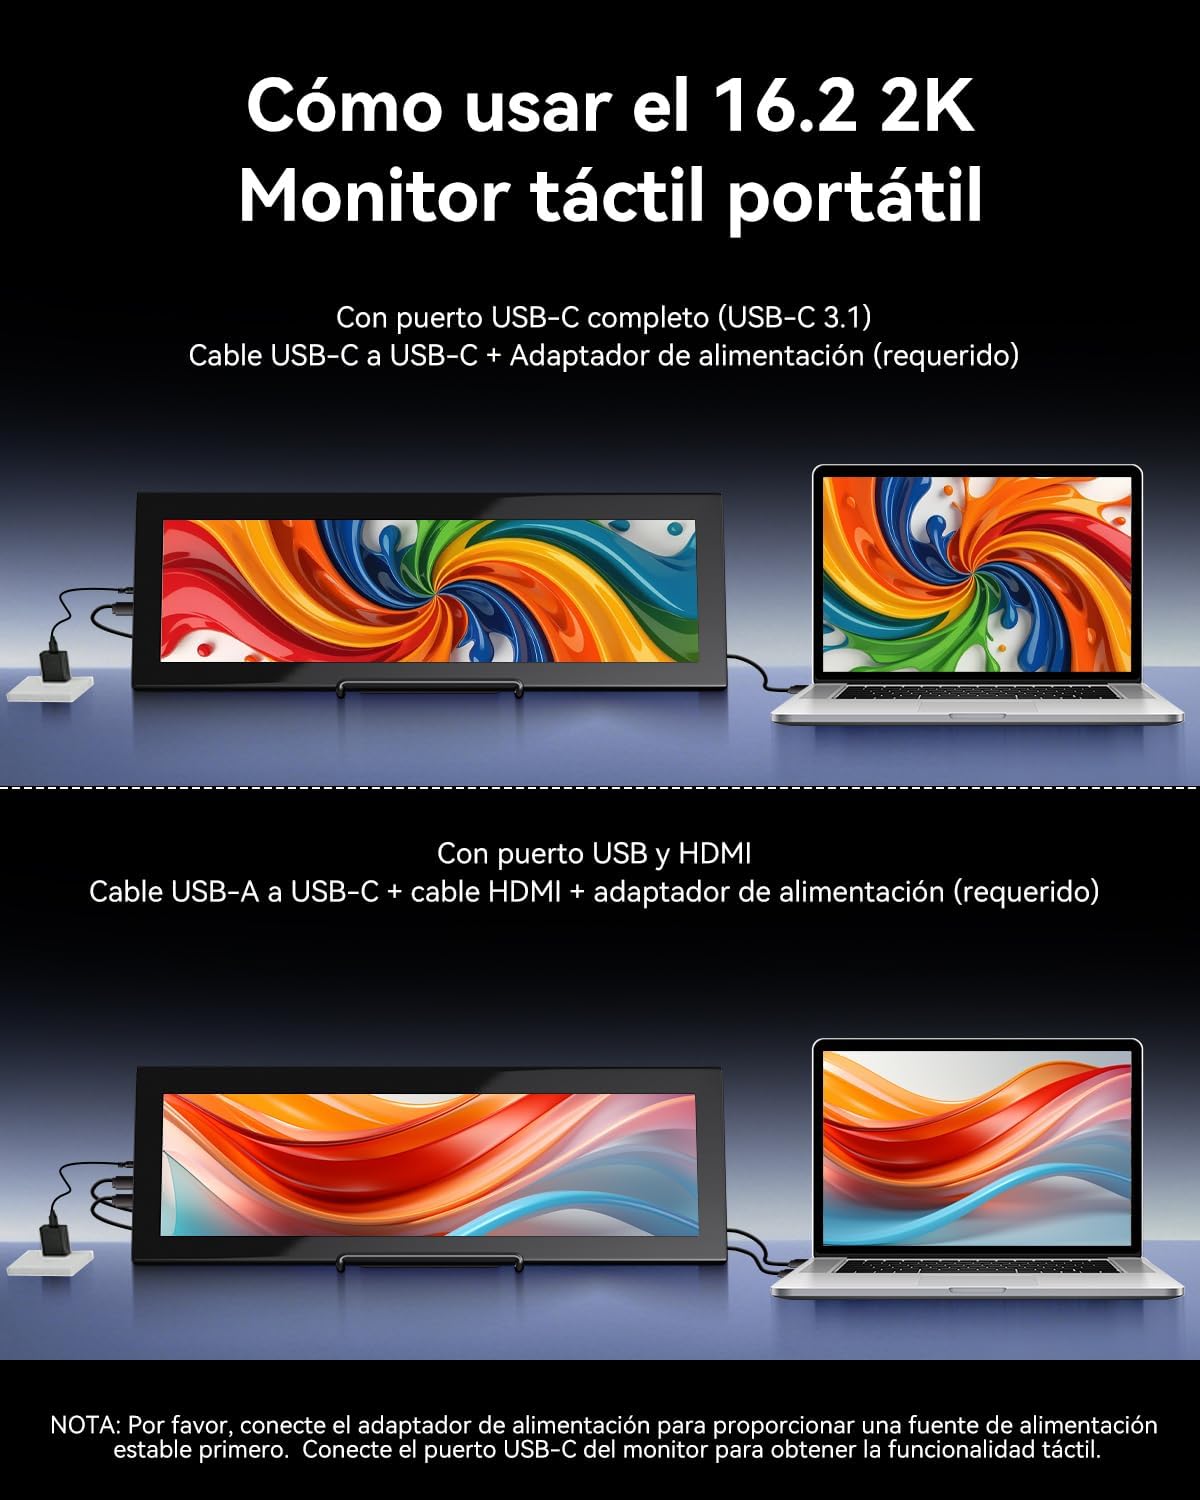
Image 2.2: Visual guide for connecting the monitor using either a single USB-C cable or HDMI with a USB-A cable for touch.

Image 2.3: Illustration of the monitor's broad compatibility with devices like cameras, PCs, Xbox, PS4/5 via HDMI, and Switch, MacBooks, phones, tablets via USB-C.
3. آپریٹنگ ہدایات
3.1 پاور آن/آف اور بنیادی کنٹرولز
Use the buttons on the side of the monitor to control its functions:
- آن/آف: مانیٹر کو آن یا آف کرنے کے لیے دبائیں اور تھامیں۔
- مینو: Press to access the On-Screen Display (OSD) menu.
- Luminance +: Increases brightness. Also used for navigation in the OSD menu.
- حجم -: Decreases volume. Also used for navigation in the OSD menu.
3.2 ٹچ اسکرین کی فعالیت
The monitor supports 10-point multi-touch for interactive use.
- ونڈوز ڈیوائسز: Fully plug-and-play; no drivers required for touch functionality.
- Apple Devices (iOS/macOS): Only supports single-touch input. Multi-touch gestures are not supported.
- Linux Devices: Not compatible with touch functionality.

Image 3.1: Illustration of various 10-point multi-touch gestures supported by the monitor.

Image 3.2: A compatibility chart indicating which devices support multi-touch, single-touch, or no touch functionality.
3.3 Aida64 Monitoring
This monitor is specifically designed as a secondary display for Aida64 on Windows. It allows you to view real-time hardware statistics without cluttering your primary screen.
- Connect the monitor to your Windows PC as described in the Setup section.
- Install and configure Aida64 software on your PC.
- Utilize Aida64's sensor panel feature to display CPU/GPU usage, temperatures, fan speeds, and other custom data on the Prechen monitor.

Image 3.3: The monitor displaying Aida64 hardware monitoring data, showing CPU and GPU statistics.

Image 3.4: The monitor seamlessly integrated into a PC case, demonstrating its use for Aida64 hardware monitoring.
4 دیکھ بھال
مناسب دیکھ بھال اور دیکھ بھال آپ کے مانیٹر کی زندگی کو بڑھا دے گی۔
4.1 اسکرین کی صفائی
- صفائی سے پہلے ہمیشہ پاور آف کریں اور مانیٹر کو ان پلگ کریں۔
- نرم، لنٹ فری کپڑا استعمال کریں (مائیکرو فائبر کی سفارش کی جاتی ہے)۔
- ضدی نشانات کے لیے، ہلکے سے ڈیampur کپڑے میں پانی یا سکرین سے محفوظ صفائی کا محلول۔ مائع کو براہ راست اسکرین پر نہ چھڑکیں۔
- Avoid using harsh chemicals, alcohol, or abrasive cleaners, as these can damage the screen coating.
4.2 عمومی نگہداشت
- Keep the monitor away from direct sunlight, excessive heat, and humidity.
- مانیٹر پر بھاری اشیاء رکھنے سے گریز کریں۔
- وینٹیلیشن کے آغاز کو روکیں نہ۔
- If transporting the monitor, use appropriate protective packaging.
5 خرابیوں کا سراغ لگانا
اگر آپ کو اپنے مانیٹر کے ساتھ مسائل کا سامنا کرنا پڑتا ہے، تو درج ذیل عام مسائل اور حل دیکھیں:
| مسئلہ | ممکنہ وجہ | حل |
|---|---|---|
| Screen flickering or unstable display | بجلی کی ناکافی فراہمی۔ | Ensure the monitor is connected to a dedicated power adapter (PD20W or higher recommended). Always connect power before signal cables. Use a high-quality Type-C to Type-C cable if using USB-C for power. |
| ٹچ اسکرین جواب نہیں دے رہی ہے۔ | Incorrect connection order or insufficient power. Incompatible device. | 1. Ensure the power adapter is connected to the monitor first, then the signal cable (HDMI or USB-C). 2. Verify your device's USB-C port supports video and touch (full-featured USB 3.1). 3. If using HDMI, ensure the USB-A to USB-C cable is connected for touch. 4. Note: iOS devices only support single touch. Linux devices are not supported for touch. |
| کوئی سگنل نہیں ملا | Incorrect cable connection or input source. | 1. Check all cable connections (HDMI, USB-C) are secure. 2. Ensure the correct input source is selected on the monitor (if applicable via OSD menu). 3. Test with another device or cable if possible. |
| مانیٹر آن نہیں ہوتا ہے۔ | No power or faulty power adapter. | 1. Ensure the power adapter is securely connected to a working power outlet and the monitor. 2. Try a different power adapter if available. |
| Apple device touch is single-point only | This is a known compatibility limitation. | Apple devices (iOS/macOS) are designed to support only single-touch input with this monitor. Multi-touch gestures are not available. |
| No support for Linux devices | Operating system incompatibility. | This monitor is not compatible with Linux-based devices or consoles. |
6. وضاحتیں
Detailed technical specifications for the Prechen HD-173 monitor:
| فیچر | تفصیلات |
|---|---|
| برانڈ | پریچین |
| ماڈل نمبر | HD-173 |
| اسکرین کا سائز | 16.2 انچ |
| زیادہ سے زیادہ ریزولوشن | 2608x720 Pixels (2K QHD) |
| پینل کی قسم | آئی پی ایس |
| ڈسپلے ٹیکنالوجی | ایل ای ڈی |
| ریفریش ریٹ | 60 Hz |
| رسپانس ٹائم | 3 ملی سیکنڈز |
| کنٹراسٹ ریشو | 1000:1 |
| اسکرین کی سطح کی تفصیل | چمکدار |
| کنیکٹوٹی ٹیکنالوجی | USB Type-C, HDMI, USB |
| ہارڈ ویئر انٹرفیس | HDMI |
| رنگ | سیاہ |
| آئٹم کے طول و عرض (D x W x H) | 3 x 15 x 44.3 سینٹی میٹر |
| شے کا وزن | 2.3 کلوگرام |
| کارخانہ دار | Shenzhen Kenowa Electronics Co., LTD |
| اصل ملک | چین |
| یو پی سی | 753018887476 |

Image 6.1: Visual comparison highlighting the superior detail of 2K (2608x720) resolution compared to 1080P.

تصویر 6.2: مانیٹر شوکasing its 800 nits brightness for clear and brilliant images.
7. وارنٹی اور سپورٹ
7.1 پروڈکٹ وارنٹی
This product comes with a 1-year limited warranty from the date of purchase. Please retain your proof of purchase for warranty claims. The warranty covers manufacturing defects but does not cover damage caused by misuse, accidents, unauthorized modifications, or normal wear and tear.
7.2 کسٹمر سپورٹ
For technical assistance, warranty claims, or any questions regarding your Prechen HD-173 monitor, please contact the seller or manufacturer through the platform where you purchased the product. Provide your model number (HD-173) and a detailed description of the issue for faster service.