1. تعارف
This instruction manual provides detailed guidance for the assembly, integration, and maintenance of your Piko 62059 G Scale Saint Ursula Chapel model kit. Designed for enthusiasts aged 14 and up, this highly detailed miniature is an excellent addition to any G scale model railway or diorama. Please read all instructions carefully before beginning assembly to ensure a successful and enjoyable building experience.
2. پروڈکٹ ختمview
The Piko 62059 Saint Ursula Chapel is a meticulously crafted G scale model, known for its realistic detail and robust construction. This kit allows you to recreate a charming chapel scene, enhancing the authenticity and visual appeal of your model landscape. The model is supplied in original manufacturer packaging, ensuring all components are protected.
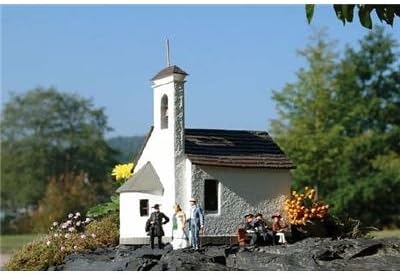
تصویر 1: An assembled Piko 62059 G Scale Saint Ursula Chapel, showcasing its detailed architecture and integration into a miniature landscape with small figures. The chapel features a white facade, a bell tower, and a dark roof, set against a backdrop of green trees and a blue sky.
اہم خصوصیات میں شامل ہیں:
- Realistic Detail: Intricate architectural elements and textures for an authentic appearance.
- مضبوط مواد: Constructed from durable materials suitable for model railway environments.
- Scale Miniature: Perfectly scaled for G gauge model trains and dioramas.
3. اسمبلی کی ہدایات
Before starting, ensure you have a clean, well-lit workspace and the necessary tools. Recommended tools include a hobby knife, plastic cement (suitable for polystyrene), small files, tweezers, and possibly paints for detailing.
3.1. Unpacking and Part Verification
- Carefully unpack all components from the manufacturer packaging.
- Refer to the included parts list (if provided) to verify that all pieces are present and undamaged. Contact Piko customer support immediately if any parts are missing or broken.
- Remove any excess plastic (flash) from the molded parts using a hobby knife or small file. Exercise caution to avoid damaging the details.
3.2. مرحلہ وار اسمبلی
Follow the numbered steps below. It is advisable to dry-fit parts before applying adhesive to ensure proper alignment.
- بیس اسمبلی: Begin by assembling the base plate and any foundational elements. Ensure it is level and stable.
- Wall Sections: Attach the main wall sections to the base. Use plastic cement sparingly and hold parts firmly until the adhesive sets. Pay attention to corner alignment.
- Window and Door Frames: Insert window and door frames into their respective openings. If clear window glazing is included, install it at this stage or after painting, as per preference.
- چھت کی ساخت: Assemble the roof sections. This may involve attaching individual roof tiles or pre-molded roof panels. Ensure a tight fit to prevent gaps.
- Bell Tower: Construct the bell tower components, including the spire and any bell details. Attach the completed tower to the main chapel structure.
- تفصیل: Add smaller details such as gutters, downspouts, decorative elements, and any included miniature figures or landscaping features.
3.3. Painting and Finishing (Optional)
While the model may come in pre-colored plastic, you can enhance its appearance with paint and weathering techniques. Use acrylic or enamel model paints. Always work in a well-ventilated area.
- تیاری: Clean the assembled model to remove any dust or grease.
- پرائمنگ: Apply a thin coat of primer suitable for plastic models.
- Base Coats: Apply base colors to the walls, roof, and trim.
- Detail Painting: Paint smaller details such as windows, doors, and decorative elements.
- Weathering: Apply washes, dry-brushing, or powders to simulate age, dirt, and wear, if desired.
- سگ ماہی: Apply a clear matte or satin coat to protect the paintwork.
4. آپریٹنگ اور انضمام
Once assembled and finished, the Saint Ursula Chapel is ready for integration into your G scale layout.
- جگہ کا تعین: Choose a suitable location on your diorama or railway layout. Consider how the chapel will interact with other buildings, roads, and natural scenery.
- محفوظ کرنا: The model can be secured to your layout base using a small amount of adhesive or screws through the base plate, if applicable, to prevent accidental movement.
- زمین کی تزئین کی: Enhance the surrounding area with miniature trees, bushes, grass, and figures to create a cohesive and realistic scene.
5 دیکھ بھال
Proper maintenance will ensure the longevity and appearance of your model chapel.
- صفائی: Regularly dust the model using a soft brush or compressed air. For stubborn dirt, a slightly damp cloth can be used, but avoid excessive moisture, especially on painted or weathered surfaces.
- ذخیرہ: If storing the model, place it in a protective box away from direct sunlight, extreme temperatures, and high humidity to prevent warping or fading.
- ہینڈلنگ: Always handle the model carefully, grasping it by the base to avoid damaging delicate details.
6 خرابیوں کا سراغ لگانا
While the Piko 62059 model kit is designed for straightforward assembly, issues may occasionally arise.
- غائب یا خراب حصے: If you discover any missing or damaged components upon unpacking, please contact Piko customer support with your proof of purchase and the specific part numbers.
- پرزے فٹ نہیں ہوتے: Ensure you have removed all flash from the parts. Dry-fit components before gluing. If a part still does not fit, gently file or sand the edges until a snug fit is achieved. Do not force parts together.
- Adhesive Issues: Use plastic cement specifically designed for polystyrene models. Ensure surfaces are clean and dry before application. Allow adequate curing time.
7. وضاحتیں
| وصف | تفصیل |
|---|---|
| برانڈ | پیکو |
| ماڈل نمبر | 62059 |
| مصنوعات کے طول و عرض | 15.94 x 12.01 x 3.94 انچ |
| شے کا وزن | 4.95 پاؤنڈ |
| تجویز کردہ عمر | 14 سال اور اس سے اوپر |
| پیمانہ | G Scale |
8. وارنٹی اور سپورٹ
Piko products are manufactured to high-quality standards. For information regarding warranty coverage, product support, or to order replacement parts, please refer to the official Piko webسائٹ یا ان کے کسٹمر سروس ڈیپارٹمنٹ سے براہ راست رابطہ کریں۔ وارنٹی کے دعووں کے لیے اپنی خریداری کا ثبوت رکھیں۔
مزید مدد کے لیے، براہ کرم ملاحظہ کریں: Piko Official Webسائٹ


