1. پروڈکٹ ختمview
The Claber Rainjet 91217 is an adjustable in-line dripper designed for precise and efficient watering of plants. This device allows users to regulate the water flow from 0 to 6 liters per hour, adapting to the specific needs of different plants and soil types. It is ideal for use in drip irrigation systems, particularly in greenhouses, hanging baskets, and planters, ensuring calibrated watering.

Image 1.1: The Claber Rainjet 91217 adjustable in-line dripper. This image shows the main component of the dripper, featuring its black body and orange adjustment mechanism.
2. حفاظتی معلومات
- Always ensure water supply is turned off before installing or performing maintenance on the drippers.
- Do not use the drippers with water temperatures exceeding 40°C (104°F).
- دم گھٹنے کے خطرات سے بچنے کے لیے چھوٹے اجزاء کو بچوں سے دور رکھیں۔
- اس بات کو یقینی بنائیں کہ لیک اور پانی کو روکنے کے لیے تمام کنکشن محفوظ ہیں۔tage.
- Avoid using harsh chemicals or abrasive materials for cleaning, as this may damage the plastic components.
3. پیکیج کے مشمولات
Each package of Claber Rainjet 91217 drippers typically contains:
- Adjustable In-Line Drippers (quantity may vary by pack, commonly 10 units)

Image 3.1: Packaging of Claber Rainjet 91217 drippers. This image displays a blister pack containing multiple drippers, indicating they are sold in sets.
4. سیٹ اپ اور انسٹالیشن
The Claber Rainjet 91217 drippers are designed for easy integration into a 1/4" (4-6mm) drip irrigation line. Follow these steps for proper installation:
- Prepare the Tubing: Cut your 1/4" (4-6mm) irrigation tubing at the desired location where you want to install the dripper. Ensure the cut is clean and straight.
- Insert the Dripper (Step 1): Take one end of the cut tubing and firmly push it onto the inlet barb of the dripper (the side with the orange adjustment mechanism). Ensure it is fully seated to prevent leaks.
- Insert the Dripper (Step 2): Take the other end of the cut tubing and firmly push it onto the outlet barb of the dripper (the side opposite the orange mechanism). Again, ensure a tight fit.
- Multiple Drippers: For longer lines or multiple plants, you can install several drippers in series along the same 1/4" tubing. Space them according to your plant layout and watering needs.
- محفوظ جگہ کا تعین: Position the dripper near the base of the plant or in the desired watering zone. You may use support stakes (not included) to hold the tubing and dripper in place if necessary.
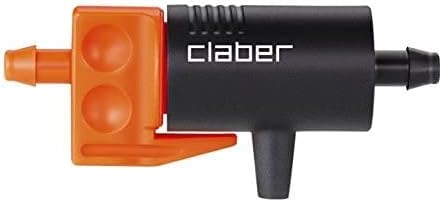
Image 4.1: First step of installation. This diagram illustrates pushing the 1/4" tubing onto one side of the dripper.

Image 4.2: Second step of installation. This diagram shows the dripper fully integrated into the 1/4" tubing line.

Image 4.3: Multiple drippers in an irrigation line. This illustration demonstrates how several drippers can be connected sequentially along a single tubing run, with water dripping from each.
5. آپریٹنگ ہدایات
The Claber Rainjet 91217 dripper features an adjustable flow rate to customize watering for individual plants. The flow can be adjusted from 0 to 6 liters per hour.
- پانی کی فراہمی کو چالو کریں: Once all drippers are installed, slowly turn on the main water supply to your irrigation system.
- بہاؤ کی شرح کو ایڈجسٹ کریں: Locate the orange adjustment mechanism on the dripper. Gently rotate this part to increase or decrease the water flow.
- Rotate clockwise to decrease flow or shut off.
- Rotate counter-clockwise to increase flow.
- Monitor and Fine-Tune: After initial adjustment, monitor your plants and soil moisture levels over a few days. Re-adjust the drippers as needed to ensure optimal watering, especially considering plant growth, weather conditions, and soil type.
Note: The optimal operating pressure for these drippers is typically around 1 BAR (14.5 PSI) to achieve the specified flow rates.
6 دیکھ بھال
Regular maintenance ensures the longevity and efficient operation of your Claber Rainjet 91217 drippers.
- Clogs کے لیے چیک کریں: Periodically inspect drippers for any blockages caused by sediment, mineral deposits (calcium), or debris. If a dripper is not emitting water or has reduced flow, it may be clogged.
- صفائی: To clean a clogged dripper, turn off the water supply. Gently remove the dripper from the tubing. You can try flushing it with clean water or carefully disassembling the adjustable orange part to clear any obstructions. Reassemble carefully.
- نلیاں کا معائنہ کریں: Check the 1/4" tubing for kinks, damage, or leaks. Repair or replace damaged sections as needed.
- سرمائی کاری: In regions with freezing temperatures, it is recommended to drain your irrigation system and remove drippers to prevent damage from freezing water. Store them in a dry, protected area.
7 خرابیوں کا سراغ لگانا
| مسئلہ | ممکنہ وجہ | حل |
|---|---|---|
| No water or very low flow from dripper. |
|
|
| کنکشن سے پانی کا اخراج۔ |
|
|
| Inconsistent flow rate between drippers. |
|
|
8. وضاحتیں
| ماڈل | 91217 |
| برانڈ | Claber |
| مواد | پلاسٹک |
| رنگ | Black (with orange adjustment) |
| Tubing Compatibility | 1/4" (4-6 mm) |
| سایڈست بہاؤ کی شرح | 0 to 6 Liters per Hour |
| آئٹم کے طول و عرض (L x W x H) | Approximately 3.94 x 3.94 x 3.94 inches (individual dripper dimensions may vary slightly) |
| شے کا وزن | 0.08 Kilograms (for a pack, individual dripper is lighter) |
9. وارنٹی اور سپورٹ
For specific warranty information and customer support, please refer to the documentation included with your purchase or visit the official Claber webسائٹ وارنٹی کے دعووں کے لیے اپنی خریداری کا ثبوت رکھیں۔
مینوفیکچرر: Claber