1. تعارف
The EnGenius ENS202EXT is a high-powered, long-range 2.4 GHz Wireless N300 Outdoor Access Point designed to provide robust wireless connectivity in outdoor environments. It supports data rates up to 300Mbps and is suitable for extending network access to areas such as restaurant patios, educational campuses, or corporate venues. Its IP55-rated weatherproof housing ensures reliable operation in various outdoor conditions.
2. کلیدی خصوصیات
- 802.11n Speeds up to 300Mbps on 2.4 GHz.
- Weatherproof IP55-Rated Housing Resists Harsh Climates.
- Robust 26dBm Transmit Power Supports Wireless to Yards & Patios.
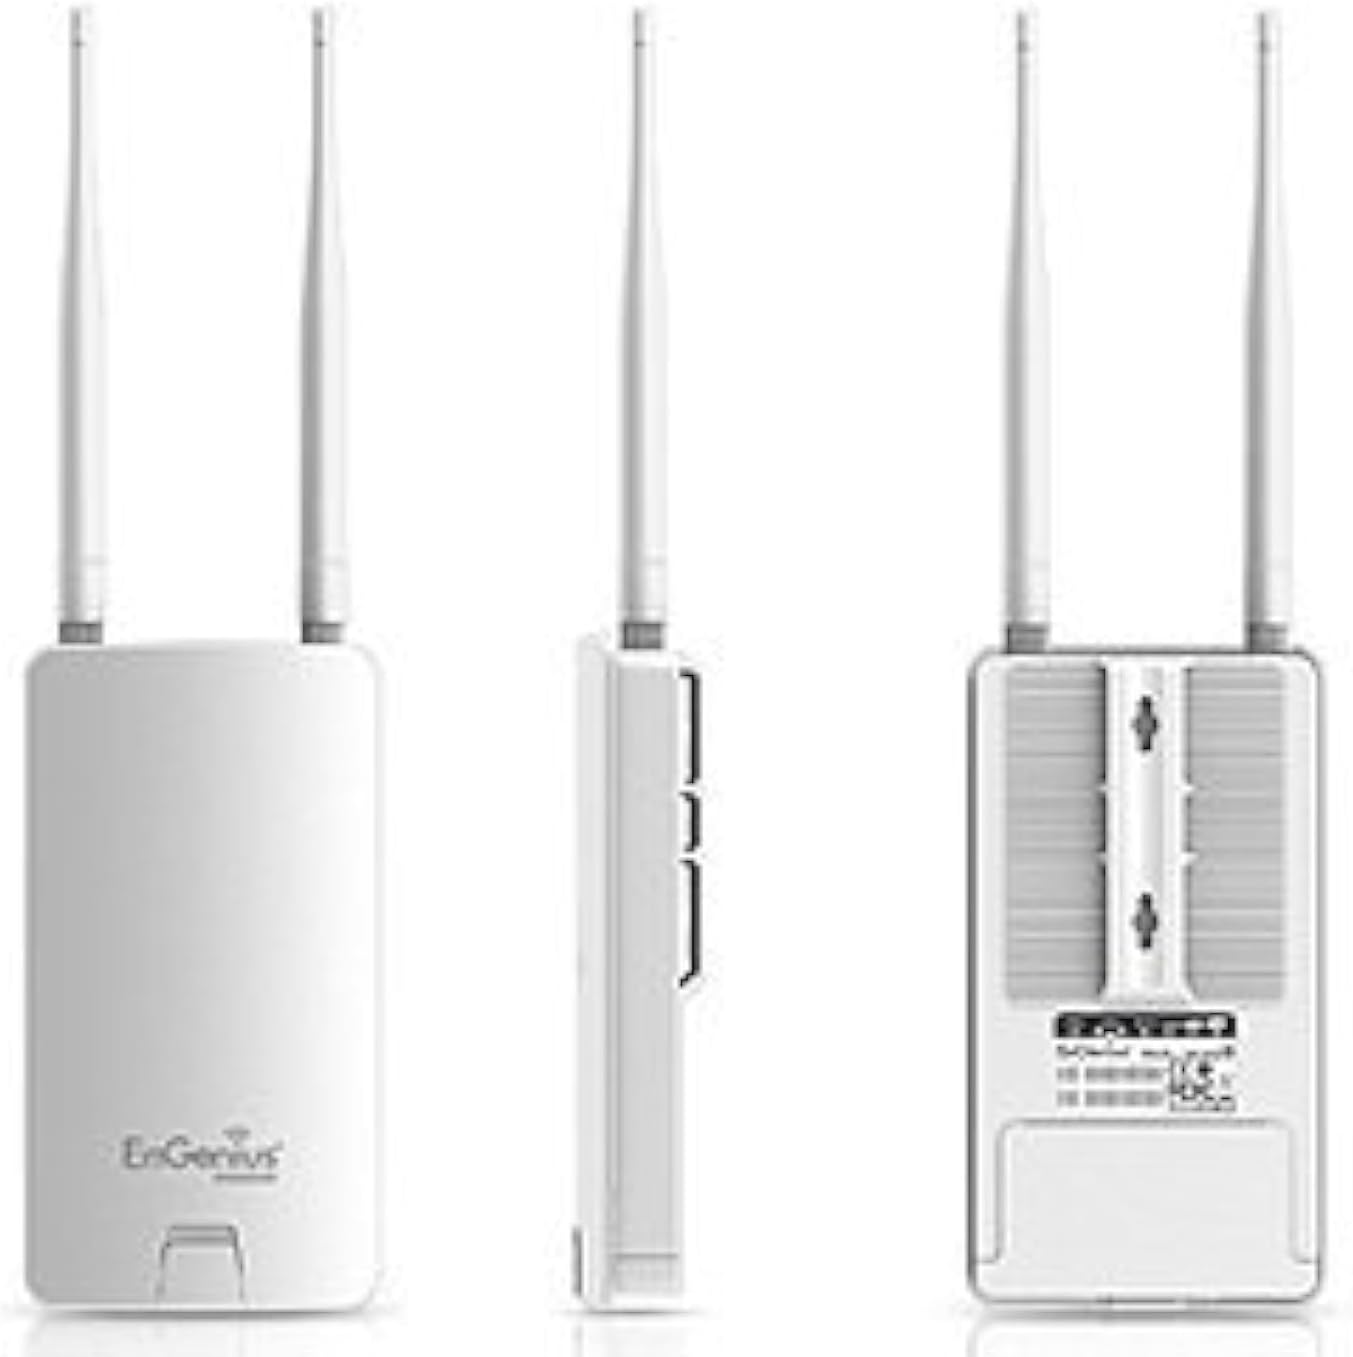
- Two Detachable 5dBi, MIMO Antennas Maximize 360 Degree Coverage.
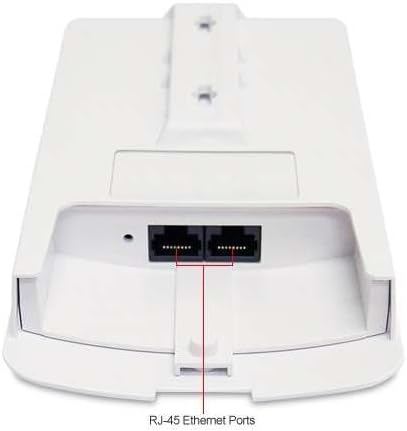
- PoE (Power over Ethernet) Extends Power to Unwired Areas; Connect Remote IP Cameras or APs via 2nd Port.
- High 400mW power delivers long-range coverage.
- Signal strength LED indicators, pole mount kit, and PoE kit provide easy installation.
- Can be monitored after deployment with EnGenius EZ Controller software for Windows.
3. پیکیج کے مشمولات
تصدیق کریں کہ تمام اشیاء آپ کے پیکیج میں موجود ہیں:
- ENS202EXT Wireless Access Point
- PoE Injector (EPE1212)
- پاور اڈاپٹر
- پول ماؤنٹ کٹ
- سکرو کٹ
- کوئیک اسٹارٹ گائیڈ
4. پروڈکٹ ختمview
The ENS202EXT features a compact, weatherproof design with external antennas for enhanced signal coverage.


5. سیٹ اپ اور انسٹالیشن
5.1 جسمانی تنصیب
- چڑھنا: Use the provided pole mount kit and screw kit to securely attach the ENS202EXT to a pole or wall in your desired outdoor location. Ensure the device is positioned for optimal signal coverage.
- Antenna Attachment: Screw the two detachable 5dBi omni-directional antennas onto the connectors on the top of the unit.
- PoE کنکشن: Connect an Ethernet cable from the LAN port of the ENS202EXT to the 'PoE' port on the included PoE Injector (EPE1212).
- نیٹ ورک کنکشن: Connect another Ethernet cable from the 'LAN' port of the PoE Injector to your network switch or router.
- طاقت: Plug the power adapter into the PoE Injector's 'DC IN' port and then into a power outlet. The device will power on.
5.2 ابتدائی کنفیگریشن
The ENS202EXT is factory-set with a static IP address of 192.168.1.1. تک رسائی حاصل کرنے کے لیے web-based management interface for initial setup, follow these steps:
- براہ راست کنکشن: Connect your computer directly to the ENS202EXT (or via the PoE injector) using an Ethernet cable. Disconnect your computer from any other network (Wi-Fi or other Ethernet connections).
- Configure Computer's IP: Manually set your computer's Ethernet adapter to a static IP address within the same subnet as the ENS202EXT, for exampلی، 192.168.1.10 کے سب نیٹ ماسک کے ساتھ۔ 255.255.255.0.
- رسائی Web انٹرفیس: کھولنا a web براؤزر اور درج کریں۔ http://192.168.1.1 ایڈریس بار میں
- لاگ ان: Enter the default username and password (refer to the Quick Start Guide for default credentials, typically 'admin'/'admin' or similar).
- آئی پی ایڈریس تبدیل کریں: Navigate to the network settings and change the ENS202EXT's IP address to one compatible with your existing network, or configure it to obtain an IP address via DHCP if your network supports it.
- ترتیبات کو محفوظ کریں: After making changes, ensure you click the 'Accept' button and then locate and click the 'Save/Reload' link (often in the upper left corner) to apply and save the new configuration. Failure to do so may result in lost settings upon reboot.
- Restore Computer's IP: Revert your computer's Ethernet adapter settings back to DHCP or its original configuration.
- Reconnect to Network: Connect the ENS202EXT back to your main network. You should now be able to access it at its new IP address.
6۔ آپریٹنگ موڈ
The ENS202EXT supports various operating modes to suit different network requirements:
- رسائی پوائنٹ (AP) موڈ: Functions as a central hub for wireless clients, allowing them to connect to your wired network.
- Client Bridge Mode: Connects a wired device (e.g., a printer or PC) to a wireless network, acting as a wireless client.
- WDS Bridge Mode: Connects two or more access points wirelessly to extend the network over a larger area without requiring wired connections between them.
- WDS AP Mode: An access point that also participates in a Wireless Distribution System (WDS) bridge.
- WDS Station Mode: A client device that participates in a WDS bridge.
- Client Router Mode: Acts as a wireless client to an existing network and provides NAT routing services for connected wired devices.
Refer to the device's web interface for detailed configuration options for each mode.
7. ترتیب اور انتظام
The ENS202EXT is primarily managed through its web-based interface. Additionally, EnGenius offers management software for larger deployments.
7.1 Web انٹرفیس
After initial setup, you can access the web interface by entering the device's configured IP address in a web براؤزر یہ انٹرفیس آپ کو اجازت دیتا ہے:
- Configure wireless settings (SSID, security, channels).
- Manage network settings (IP address, DHCP server/client).
- Set up operating modes.
- Monitor device status and connected clients.
- فرم ویئر اپ گریڈ انجام دیں۔
Important: Always click 'Accept' for changes and then 'Save/Reload' to ensure your settings are permanently applied.
7.2 EnGenius EZ Controller Software
For managing multiple EnGenius devices, the EnGenius EZ Controller software for Windows provides a centralized platform for monitoring and configuration. This software can simplify the management of your wireless network after deployment.
8 دیکھ بھال
8.1 فرم ویئر اپڈیٹس
Regularly check the EnGenius website for the latest firmware updates. Firmware updates can provide new features, performance improvements, and security enhancements. Follow the instructions provided with the firmware download for the update process.
8.2 Environmental Care
The ENS202EXT features an IP55-rated weatherproof housing. While designed for outdoor use, ensure that all cable glands and covers are properly sealed to maintain its weather resistance. Periodically inspect the unit for any physical damage or signs of wear.
8.3 آٹو ریبوٹ
Consider enabling the 'Auto Reboot' option in the device's settings. This can help maintain device stability and prevent potential issues that may arise from continuous operation over long periods.
9 خرابیوں کا سراغ لگانا
This section addresses common issues you might encounter with the ENS202EXT.
9.1 رسائی نہیں کر سکتے Web Interface (Default IP Conflict)
مسئلہ: After connecting the device, you cannot access the web interface at 192.168.1.1, or your network experiences an IP conflict.
حل: The ENS202EXT uses 192.168.1.1 as its default static IP, which is common for many home routers. To resolve this:
- Disconnect your computer from your main network.
- Connect your computer directly to the ENS202EXT (via the PoE injector).
- Manually configure your computer's Ethernet adapter with a static IP address like 192.168.1.10 (subnet mask 255.255.255.0).
- Access 192.168.1.1 in your browser.
- Change the ENS202EXT's IP address to one that is unique on your network or enable DHCP client mode.
- Remember to 'Accept' and 'Save/Reload' the settings.
- Revert your computer's IP settings and reconnect the ENS202EXT to your network.
9.2 Wireless Signal Drops or SSID Not Broadcasting
مسئلہ: The wireless signal becomes unstable, or the SSID disappears periodically.
حل:
- فرم ویئر اپ ڈیٹ: Ensure the device is running the latest firmware version. Outdated firmware can sometimes lead to instability.
- آٹو ریبوٹ: Enable the 'Auto Reboot' feature in the device settings to schedule periodic reboots, which can help maintain stability.
- مداخلت: Check for potential sources of 2.4GHz interference in the area. Try changing the wireless channel in the device's settings.
- پاور سائیکل: Perform a power cycle by unplugging the PoE injector for 30 seconds and then plugging it back in.
- از سرے نو ترتیب: If issues persist, consider performing a factory reset. This will revert all settings to default, requiring reconfiguration. Refer to the Quick Start Guide for factory reset instructions.
9.3 Internet Access Issues in Repeater/WDS Mode
مسئلہ: Devices connect to the ENS202EXT in repeater or WDS mode and obtain an IP address, but cannot access the internet.
حل:
- Gateway/DNS Settings: Verify that the ENS202EXT is correctly configured to use the gateway and DNS servers of your main network.
- فائروال کے اصول: Check if any firewall rules on the ENS202EXT or your main router are blocking internet traffic.
- WDS Compatibility: Ensure that the other access point in the WDS setup is compatible and correctly configured for WDS bridging.
- سگنل کی طاقت: Confirm that the ENS202EXT has a strong and stable wireless connection to the main access point it is extending.
10. وضاحتیں
| فیچر | تفصیلات |
|---|---|
| ماڈل کا نام | ENS202EXT |
| وائرلیس معیار | 802.11b/g/n |
| فریکوئنسی بینڈ | 2.4 GHz |
| زیادہ سے زیادہ رفتار | 300 Mbps تک |
| RF پاور (dBm) | 26 ڈی بی ایم |
| آر ایف پاور (میگاواٹ) | 400 میگاواٹ |
| اینٹینا کی قسم | Two 5 dBi External Omni-Directional MIMO Antennas |
| LAN انٹرفیس | 2 x 10/100 Mbps Ethernet Ports |
| خفیہ کاری | WEP / WPA / WPA2 |
| پو پاور | 24V (Proprietary PoE Injector Included) |
| آئی پی کی درجہ بندی | آئی پی 55 |
| رام | 64 MB |
| فلیش میموری کا سائز | 16 MB |
| شے کا وزن | 10.6 اونس (تقریباً 300 گرام) |
| پروڈکٹ کے طول و عرض (LxWxH) | 12.2 x 9.2 x 2.8 انچ (تقریباً 31 x 23.4 x 7.1 سینٹی میٹر) |
| ہارڈ ویئر پلیٹ فارم | PC |
| خصوصی خصوصیت | رسائی پوائنٹ موڈ، ڈبلیو پی ایس |
| ہم آہنگ آلات | پرسنل کمپیوٹر |
| تجویز کردہ استعمال | کاروبار |
11. وارنٹی اور سپورٹ
For warranty information, please refer to the documentation included with your product or visit the official EnGenius website. For technical support, product inquiries, or to download the latest drivers and firmware, please contact EnGenius customer support through their official channels.
EnGenius ٹیکنالوجیز: www.engeniustech.com


