1. تعارف
This manual provides instructions for the safe and efficient use of your KitchenAid KSM1JA Masticating Juicer & Sauce Attachment. This attachment is designed to work with all household KitchenAid Stand Mixers, transforming them into a versatile juicer and sauce maker. It features a slow (masticating) juicing process that first slices and then processes soft, hard, or leafy fruits and vegetables for nutrient-rich extraction. With three included pulp screens, you can create low pulp or high pulp juices, sauces, and jams.
Please read all instructions carefully before using the attachment to ensure proper operation and to prevent injury or damage.
2. اہم حفاظتی تدابیر
برقی آلات استعمال کرتے وقت، بنیادی حفاظتی احتیاطی تدابیر پر عمل کرنا چاہیے، بشمول درج ذیل:
- تمام ہدایات پڑھیں۔
- بجلی کے جھٹکے کے خطرے سے بچانے کے لیے، مکسر بیس کو پانی یا دیگر مائع میں نہ ڈوبیں۔
- جب کوئی بھی آلات بچوں کے ذریعہ یا اس کے قریب استعمال ہوتا ہے تو قریبی نگرانی ضروری ہے۔
- استعمال میں نہ ہونے پر، پرزے لگانے یا اتارنے سے پہلے، اور صفائی سے پہلے آؤٹ لیٹ سے ان پلگ کریں۔
- حرکت پذیر حصوں کے ساتھ رابطے سے گریز کریں۔
- کسی بھی آلات کو خراب شدہ ڈوری یا پلگ سے یا آلات کی خرابی کے بعد، یا کسی بھی طریقے سے گرا یا خراب ہونے کے بعد نہ چلائیں۔ جانچ، مرمت، یا برقی یا مکینیکل ایڈجسٹمنٹ کے لیے آلات کو قریب ترین مجاز سروس سہولت پر واپس کریں۔
- KitchenAid کی طرف سے تجویز کردہ یا فروخت کیے جانے والے اٹیچمنٹ کا استعمال آگ، برقی جھٹکا، یا چوٹ کا سبب بن سکتا ہے۔
- آلات کو باہر استعمال نہ کریں۔
- ڈوری کو میز یا کاؤنٹر کے کنارے پر لٹکنے نہ دیں۔
- ڈوری کو چولہے سمیت گرم سطح سے رابطہ نہ ہونے دیں۔
- Always ensure the attachment is properly assembled and securely attached to the stand mixer before operation.
- Do not feed fingers or other utensils into the feed chute while the appliance is operating. Use only the provided food pusher.
- Do not process frozen fruits or vegetables.
- منسلکہ کو اس کے مطلوبہ استعمال کے علاوہ دیگر مقاصد کے لیے استعمال نہ کریں۔
3. حصے اور خصوصیات
Your KitchenAid KSM1JA Masticating Juicer & Sauce Attachment includes the following components:
- ڈرائیو اسمبلی: The main body of the attachment that connects to the stand mixer.
- جوسنگ باؤل: The transparent bowl where juicing occurs.
- Wiper Basket: Helps to keep the strainer clean during operation.
- Pulp Screens (3):
- Low Pulp Screen
- High Pulp Screen
- Sauce/Jam Screen
- Auger/Blade Assembly: The component that slices and processes fruits and vegetables.
- ڈھکن: Covers the juicing bowl and includes the feed chute.
- ہوپر: Sits on top of the feed chute to hold ingredients.
- فوڈ پشر: فیڈ چیٹ میں اجزاء کی رہنمائی کے لیے استعمال کیا جاتا ہے۔
- گودا کنٹینر: ضائع شدہ گودا جمع کرتا ہے۔
- رس کنٹینر: نکالا ہوا رس جمع کرتا ہے۔
- صفائی برش: For easy cleaning of the strainer and other parts.

Image: The three interchangeable pulp screens for varying pulp levels and sauce making.
4. سیٹ اپ
- Prepare the Attachment:
- Place the drive assembly on a clean, flat countertop.
- Ensure the rubber gasket is securely placed behind the pulp chute of the juicing bowl.
- Attach the juicing bowl to the drive assembly, ensuring the pulp chute aligns with the shoot slot.
- Insert the wiper basket into the juicing bowl.
- Select the desired pulp screen (low pulp, high pulp, or sauce/jam) and align its red position arrow with the red position arrow on the juicing bowl.
- Firmly place the auger/blade assembly into the selected pulp screen.
- Align the unlock icon on the lid with the red position arrow on the juicing bowl, press the lid down, and twist clockwise until the locked icon aligns with the red position arrow, securing the lid.
- Attach to Stand Mixer:
- Turn off and unplug your KitchenAid Stand Mixer.
- Remove the hub cover from the power hub on the front of your stand mixer.
- Insert the attachment shaft into the power hub, ensuring the shaft fits into the square hub socket.
- Tighten the hub knob clockwise until the attachment is firmly secured to the stand mixer.
- پوزیشن کنٹینرز:
- Place the pulp container directly under the pulp chute.
- Place the juice container directly under the juice spout.
- Insert Hopper and Pusher:
- Insert the hopper into the top of the feed chute.
- Keep the food pusher nearby for use during operation.

Image: The juicer attachment securely mounted on a KitchenAid stand mixer.
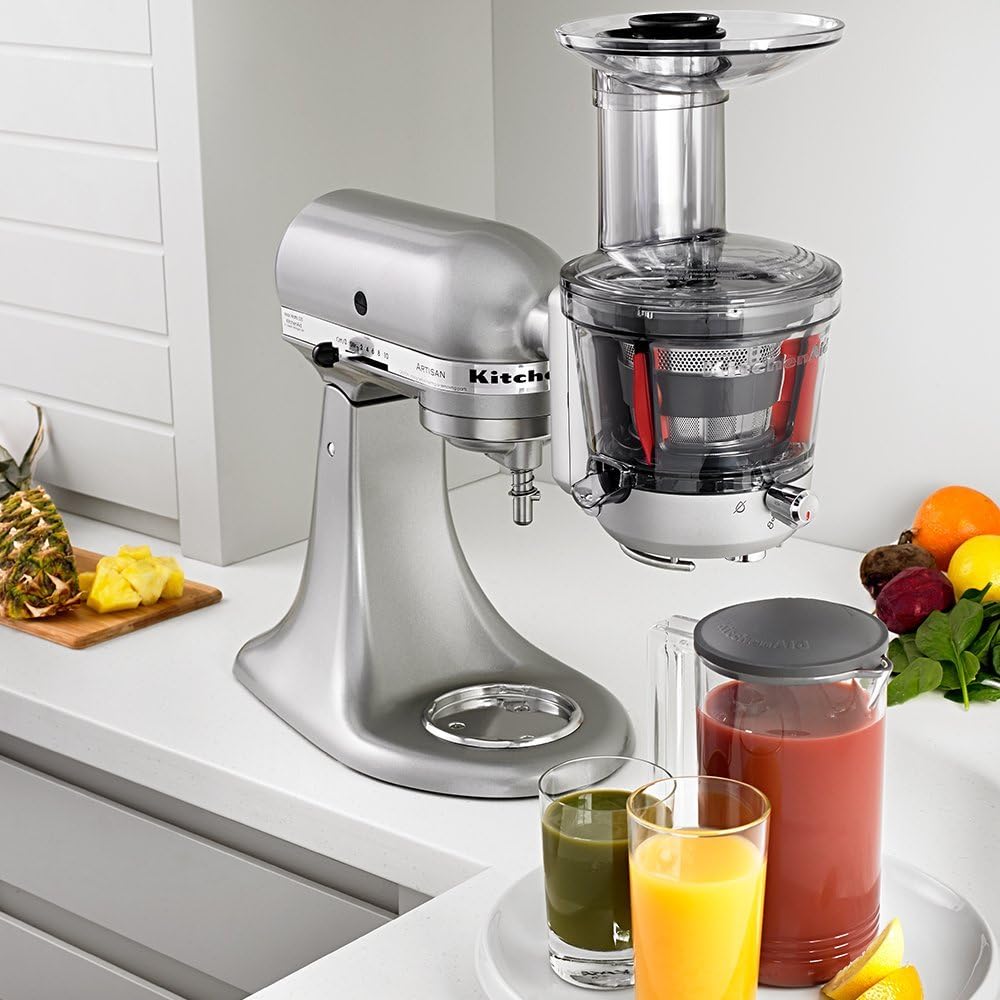
Image: The juicer attachment in use, demonstrating juice collection.
5. آپریشن
تیاری کے اجزاء:
- تمام پھل اور سبزیاں اچھی طرح دھو لیں۔
- Remove any pits, large seeds, or hard cores.
- Cut ingredients into pieces small enough to fit comfortably into the feed chute. The extra-wide feed tube accommodates a variety of sizes.
- For best results, process ingredients that are at room temperature.
رس نکالنے کا عمل:
- Ensure the juicer attachment is properly assembled and attached to your stand mixer.
- Position the pulp and juice containers.
- For Juicing: Open the pulp chute by pressing it towards the juicing bowl. This allows pulp to be ejected into the pulp container and juice to flow into the juice container.
- For Sauces/Jams: Close the pulp chute by pulling it away from the juicing bowl. This allows pulp and juice to flow together into the juicing container.
- Plug in your KitchenAid Stand Mixer.
- Turn the stand mixer to رفتار 10.
- Gradually feed prepared fruits or vegetables into the hopper. Use the food pusher to gently guide ingredients down the feed chute. Do not force ingredients.
- Continue feeding ingredients until all desired produce is processed.
- Once finished, turn off the stand mixer and unplug it.
بہترین نتائج کے لیے تجاویز:
- Process softer ingredients alternately with harder ingredients to maintain optimal performance.
- For leafy greens, roll them into a tight ball before feeding them into the chute.
- ہاپر کو زیادہ نہ بھریں۔
- If the attachment jams, turn off the mixer, unplug it, and disassemble to clear the obstruction.
Video: Official KitchenAid demonstration of assembling and using the KSM1JA Masticating Juicer and Sauce Attachment.
6. دیکھ بھال اور صفائی
Proper cleaning of your juicer attachment is essential for hygiene and longevity. All parts, except the drive assembly, are dishwasher-safe (top rack recommended) or can be hand-washed.
- بے ترکیبی:
- Turn off and unplug the stand mixer.
- Remove the juicer attachment from the power hub.
- Twist the lid counter-clockwise to unlock and remove it.
- Remove the auger/blade assembly, pulp screen, wiper basket, and juicing bowl from the drive assembly.
- Remove the rubber gasket from the pulp chute for thorough cleaning.
- صفائی:
- ہاتھ دھونا: Wash all disassembled parts (except the drive assembly) in warm, soapy water. Use the provided cleaning brush to remove any pulp residue from the screens and other intricate areas. Rinse thoroughly and dry completely before reassembling or storing.
- ڈش واشر: All parts except the drive assembly are dishwasher-safe (top rack only).
- ڈرائیو اسمبلی: Wipe the drive assembly with a damp کپڑا اسے پانی یا دیگر مائعات میں نہ ڈوبیں۔
- ذخیرہ:
- اس بات کو یقینی بنائیں کہ ذخیرہ کرنے سے پہلے تمام حصے مکمل طور پر خشک ہوں۔
- Store the attachment in a clean, dry place.
7 خرابیوں کا سراغ لگانا
| مسئلہ | ممکنہ وجہ | حل |
|---|---|---|
| منسلکہ کام نہیں کر رہا ہے۔ | Stand mixer not plugged in or turned on. Attachment not properly secured. | Ensure stand mixer is plugged in and turned to Speed 10. Re-attach the juicer securely to the power hub. |
| Pulp chute is clogged. | Too much pulp buildup, or ingredients are too fibrous. | Turn off and unplug the mixer. Disassemble the attachment and clear the clog. Clean the pulp screen thoroughly. |
| Juice flow is slow or stops. | Strainer is clogged with pulp. | Turn off and unplug the mixer. Disassemble and clean the strainer and wiper basket. |
| رس میں ضرورت سے زیادہ جھاگ۔ | Common with certain fruits/vegetables (e.g., apples, leafy greens). | This is normal. Skim off foam if desired. Processing at a slightly lower speed might reduce foam. |
| Attachment detaches during use. | Not securely fastened to the power hub. | Ensure the attachment shaft is fully inserted into the power hub and the hub knob is tightened securely. |
8. وضاحتیں
| فیچر | تفصیل |
|---|---|
| برانڈ | کچن ایڈ |
| ماڈل نمبر | KSM1JA |
| رنگ | چاندی |
| مصنوعات کے طول و عرض | 7"D x 9.65"W x 11.6"H |
| صلاحیت | 1 لیٹر |
| بلیڈ کا مواد | سٹینلیس سٹیل |
| مواد | پلاسٹک (رہائش)، سٹینلیس سٹیل (بلیڈ) |
| مصنوعات کی دیکھ بھال کی ہدایات | Hand Wash Only (for some parts, check manual) / Dishwasher Safe (top rack for most parts) |
| مطابقت | Fits all Household KitchenAid Stand Mixers |
9. وارنٹی اور سپورٹ
وارنٹی کی تفصیلی معلومات اور کسٹمر سپورٹ کے لیے، براہ کرم آفیشل KitchenAid سے رجوع کریں۔ webسائٹ یا ان کی کسٹمر سروس سے براہ راست رابطہ کریں۔ وارنٹی دعووں کے لیے خریداری کے ثبوت کے طور پر اپنی خریداری کی رسید رکھیں۔
KitchenAid Customer Service:
- Webسائٹ: www.kocolateaid.com
- فون: Refer to your region's KitchenAid webمقامی رابطہ نمبروں کے لیے سائٹ۔
This product is designed, engineered, and tested by KitchenAid to meet high-quality standards.


