1. تعارف
This manual provides detailed instructions for the installation, operation, and maintenance of your Zebronics H61 Motherboard. Please read this manual thoroughly before proceeding with installation to ensure proper setup and functionality.
The Zebronics H61 Motherboard is designed to support Intel LGA 1155 socket processors (i7/i5/i3/Pentium/Celeron series) and DDR3 dual-channel memory. It features an Intel H61 chipset, providing a stable and efficient platform for your computing needs.
2. حفاظتی معلومات
- Always disconnect the power supply before installing or removing any components.
- Handle the motherboard by its edges to avoid electrostatic discharge (ESD) damage. Use an anti-static wrist strap if available.
- زیادہ گرمی سے بچنے کے لیے اپنے کمپیوٹر کیس کے اندر مناسب وینٹیلیشن کو یقینی بنائیں۔
- مدر بورڈ کو نمی یا انتہائی درجہ حرارت کے سامنے نہ رکھیں۔
- Refer to the component manufacturer's manuals for specific installation instructions for your CPU, RAM, and other peripherals.
3. پیکیج کے مشمولات
تصدیق کریں کہ تمام اشیاء پیکیج میں موجود ہیں:
- Zebronics H61 Motherboard
- I / O شیلڈ
- SATA Data Cable(s)
- Driver CD (for operating systems that do not automatically install drivers)
- صارف دستی (یہ دستاویز)
4. وضاحتیں
| فیچر | تفصیل |
|---|---|
| ماڈل | H61 |
| چپ سیٹ | انٹیل H61 ایکسپریس |
| سی پی یو ساکٹ | LGA 1155 |
| ہم آہنگ پروسیسرز | Intel i7/i5/i3/Pentium/Celeron processors (2nd and 3rd Generation) |
| میموری سلاٹس | 2 x DDR3 Dual-channel slots |
| میموری سپورٹ | DDR3 1066/1333/1600MHz, up to 16GB |
| گرافکس انٹرفیس | 1 x PCI-Express x16 slot |
| توسیعی سلاٹس | 1 x PCI ایکسپریس x1 سلاٹ |
| ذخیرہ | 4 x SATA II ports |
| LAN | Realtek 8106E 10/100 Mbps Ethernet |
| آڈیو | 6-Channel HD Audio Codec onboard (5.1 surround sound support) |
| ریئر I/O پورٹس | 1 x HDMI, 1 x VGA, 6 x USB 2.0, 1 x RJ45, 1 x 3-in-1 Audio Jacks (Line-in, Line-out, Mic-in), PS/2 (Keyboard/Mouse) |
| فارم فیکٹر | اے ٹی ایکس |
| طول و عرض | 25 x 20 x 3 سینٹی میٹر |
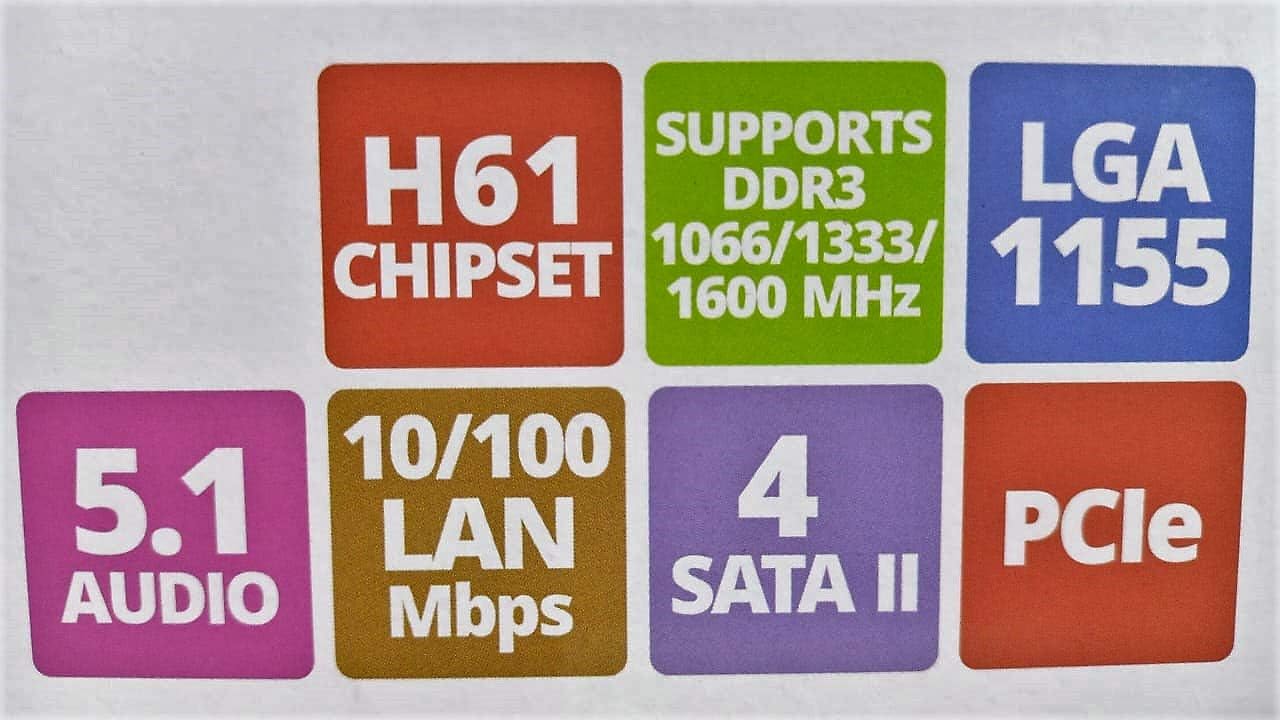
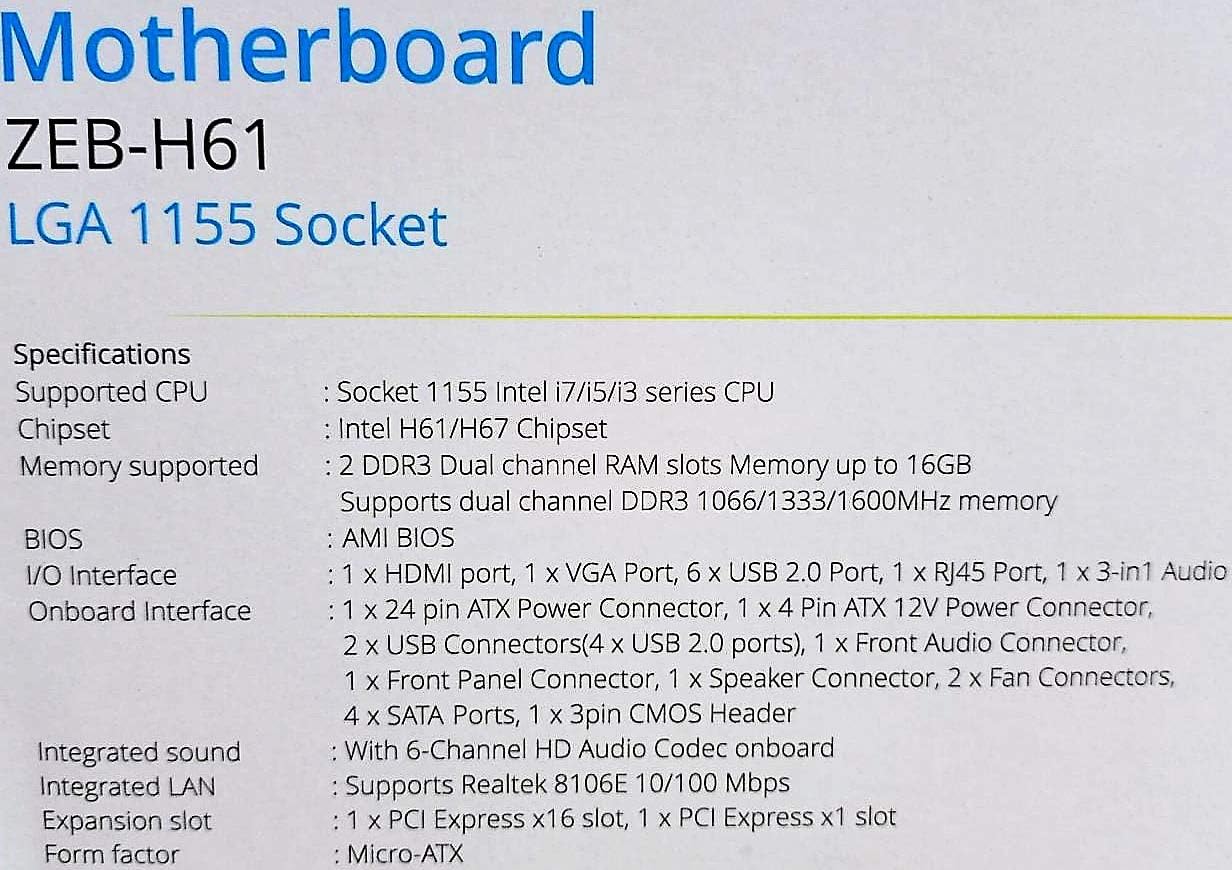
Image: Detailed specifications of the Zebronics H61 Motherboard, including chipset, CPU socket, memory support, and I/O interfaces.

Image: Visual representation of key features such as H61 Chipset, DDR3 support, LGA 1155 socket, 5.1 Audio, 10/100 LAN, 4 SATA II ports, and PCIe.
5. سیٹ اپ اور انسٹالیشن
5.1 مدر بورڈ لے آؤٹ۔

تصویر: اوپر سے نیچے view of the Zebronics H61 Motherboard, showing the CPU socket, RAM slots, PCIe slot, and various headers.

Image: Another top-down perspective of the Zebronics H61 Motherboard, highlighting component placement.
5.2 پیچھے کا I/O پینل

Image: Rear I/O panel of the Zebronics H61 Motherboard, displaying ports for PS/2 keyboard/mouse, VGA, HDMI, USB 2.0, LAN, and audio jacks.
تصویر: ایک قریب view of the rear I/O ports, detailing the VGA, HDMI, USB, LAN, and audio connections.
5.3 اجزاء کی تنصیب کے مراحل
- CPU انسٹال کریں:
- سی پی یو ساکٹ لیور کھولیں۔
- Carefully align the CPU with the socket, ensuring the golden triangle on the CPU matches the mark on the socket.
- سی پی یو کو بغیر مجبور کیے ساکٹ میں آہستہ سے رکھیں۔
- سی پی یو کو محفوظ بنانے کے لیے لیور کو بند کریں۔
- تھرمل پیسٹ لگائیں اور CPU کولر کو اس کے مینوفیکچرر کی ہدایات کے مطابق انسٹال کریں۔
- رام انسٹال کریں:
- DDR3 میموری سلاٹس کے دونوں سروں پر کلپس کھولیں۔
- میموری ماڈیول کو سلاٹ کے ساتھ سیدھ میں کریں، اس بات کو یقینی بناتے ہوئے کہ ماڈیول پر موجود نشان سلاٹ میں موجود کلید سے میل کھاتا ہے۔
- میموری ماڈیول کے دونوں سروں پر مضبوطی سے نیچے دبائیں جب تک کہ کلپس اپنی جگہ پر نہ آجائیں۔
- گرافکس کارڈ انسٹال کریں (اختیاری):
- Locate the PCI-Express x16 slot.
- اپنے پی سی کیس سے متعلقہ توسیعی سلاٹ کور کو ہٹا دیں۔
- Align the graphics card with the slot and press down firmly until it is seated correctly.
- کارڈ کو پی سی کیس میں سکرو سے محفوظ کریں۔
- اسٹوریج ڈیوائسز کو جوڑیں:
- Connect SATA data cables from the motherboard's SATA ports to your hard drives or SSDs.
- Ensure power cables from the power supply are connected to these devices.
- بجلی کی فراہمی کو مربوط کریں:
- 24-پن ATX پاور کنیکٹر کو اپنی پاور سپلائی سے مدر بورڈ سے جوڑیں۔
- Connect the 4-pin ATX 12V power connector (CPU power) to the motherboard.
- فرنٹ پینل ہیڈرز کو جوڑیں:
- Connect the power switch, reset switch, HDD LED, and power LED cables from your PC case to the corresponding pins on the motherboard's front panel header. Refer to the motherboard diagram for pin assignments.
- Connect front USB and audio headers.
6. آپریٹنگ ہدایات
6.1 پہلا بوٹ اور BIOS سیٹ اپ
- تمام اجزاء کو جمع کرنے کے بعد، اپنے مانیٹر، کی بورڈ اور ماؤس کو جوڑیں۔
- اپنے کمپیوٹر پر پاور۔
- نامزد کلید دبائیں (عام طور پر ڈی ای ایل or F2) repeatedly during startup to enter the BIOS/UEFI setup utility.
- BIOS میں، تصدیق کریں کہ نصب شدہ تمام اجزاء (CPU، RAM، سٹوریج) درست طریقے سے دریافت ہوئے ہیں۔
- اپنے آپریٹنگ سسٹم کو USB ڈرائیو یا آپٹیکل ڈرائیو سے انسٹال کرنے کے لیے بوٹ آرڈر کو ترتیب دیں۔
- تبدیلیاں محفوظ کریں اور BIOS سے باہر نکلیں۔ سسٹم دوبارہ شروع ہو جائے گا۔
6.2 ڈرائیور کی تنصیب
After installing your operating system, install the necessary drivers for optimal performance. Drivers can be found on the included driver CD or downloaded from the official Zebronics webسائٹ
- چپ سیٹ ڈرائیورز
- گرافکس ڈرائیور (اگر مربوط گرافکس یا ایک وقف شدہ GPU استعمال کررہے ہیں)
- LAN ڈرائیورز
- آڈیو ڈرائیورز
- USB Drivers (if applicable)
7 دیکھ بھال
- اسے صاف رکھیں: Regularly clean dust from inside your PC case, especially from fans and heatsinks, to ensure proper airflow and prevent overheating. Use compressed air.
- BIOS اپ ڈیٹس: Check the Zebronics website periodically for BIOS updates. BIOS updates can improve system stability, compatibility, and performance. Follow update instructions carefully.
- ڈرائیور اپڈیٹس: اپنے آپریٹنگ سسٹم اور ایپلیکیشنز کے ساتھ مطابقت اور بہترین کارکردگی کو یقینی بنانے کے لیے اپنے ڈرائیوروں کو اپ ڈیٹ رکھیں۔
- CMOS بیٹری: The motherboard uses a CR2032 battery to retain BIOS settings. If your system frequently loses time or BIOS settings, the battery may need replacement.
8 خرابیوں کا سراغ لگانا
- No Power / System Does Not Boot:
- Ensure all power cables (24-pin ATX, 4-pin ATX 12V) are securely connected to the motherboard.
- Check if the power supply unit (PSU) is switched on and functioning.
- فرنٹ پینل پاور سوئچ کنکشن کی تصدیق کریں۔
- رام ماڈیولز اور گرافکس کارڈ کو دوبارہ ترتیب دینے کی کوشش کریں۔
- مانیٹر پر کوئی ڈسپلے نہیں:
- Ensure the monitor is connected to the correct video output (either integrated graphics on the motherboard or dedicated graphics card).
- Check monitor power and input selection.
- Reseat the graphics card (if installed) and RAM modules.
- سسٹم کی عدم استحکام / کریش:
- CPU اور GPU درجہ حرارت چیک کریں۔ زیادہ گرمی عدم استحکام کا سبب بن سکتی ہے۔
- Ensure RAM modules are properly seated and compatible. Test with one RAM stick if multiple are installed.
- Update drivers and BIOS to the latest versions.
- ناقص RAM چیک کرنے کے لیے میموری تشخیصی ٹولز چلائیں۔
- CMOS Battery Issue (Loss of Time/Settings):
- If the system loses time or BIOS settings after being powered off, the CMOS battery (CR2032) may need replacement.
- To reset CMOS: Disconnect power, remove the CMOS battery, short the battery socket's positive and negative terminals for 30 seconds, then reinsert the battery.
9. وارنٹی اور سپورٹ
وارنٹی کی معلومات اور تکنیکی مدد کے لیے، براہ کرم آفیشل زیبرونکس سے رجوع کریں۔ webسائٹ یا ان کے کسٹمر سروس ڈیپارٹمنٹ سے رابطہ کریں۔ وارنٹی دعووں کے لیے خریداری کے ثبوت کے طور پر اپنی خریداری کی رسید رکھیں۔
زیبرونکس آفیشل Webسائٹ: www.zebronics.com


