تعارف
This manual provides instructions for the safe operation and maintenance of the Proster Digital Multimeter 3999 and its accompanying 8-piece test lead set. Please read this manual thoroughly before using the device to ensure proper and safe operation.
حفاظتی معلومات
عام سیفٹی رولز
- ہمیشہ مقامی اور قومی حفاظتی ضابطوں پر عمل کریں۔
- کسی بھی فنکشن کے لیے زیادہ سے زیادہ ان پٹ ویلیوز سے تجاوز نہ کریں۔
- والیوم کے ساتھ کام کرتے وقت احتیاط برتیں۔tag30V AC RMS، 42V چوٹی، یا 60V DC سے اوپر۔ یہ جلدtages ایک جھٹکا خطرہ لاحق ہے۔
- کرنٹ کی پیمائش کرنے سے پہلے، یقینی بنائیں کہ سرکٹ ڈی اینرجائزڈ ہے اور ملٹی میٹر سیریز میں جڑا ہوا ہے۔
- Before measuring resistance or continuity, ensure the circuit is de-energized and all capacitors are discharged.
- کم بیٹری اشارے ظاہر ہونے پر بیٹریاں تبدیل کریں۔
- اگر میٹر خراب نظر آئے یا کیس کھلا ہو تو اسے نہ چلائیں۔
- پیمائش کے دوران انگلیوں کو تحقیقاتی رکاوٹوں کے پیچھے رکھیں۔
- یقینی بنائیں کہ پیمائش کے لیے درست فنکشن اور رینج کا انتخاب کیا گیا ہے۔
- Always use the correct input terminals for the selected function.
پروڈکٹ ختمview
ملٹی میٹر اجزاء
The Proster Digital Multimeter 3999 features an LCD display, function selector dial, and input terminals for various electrical measurements.
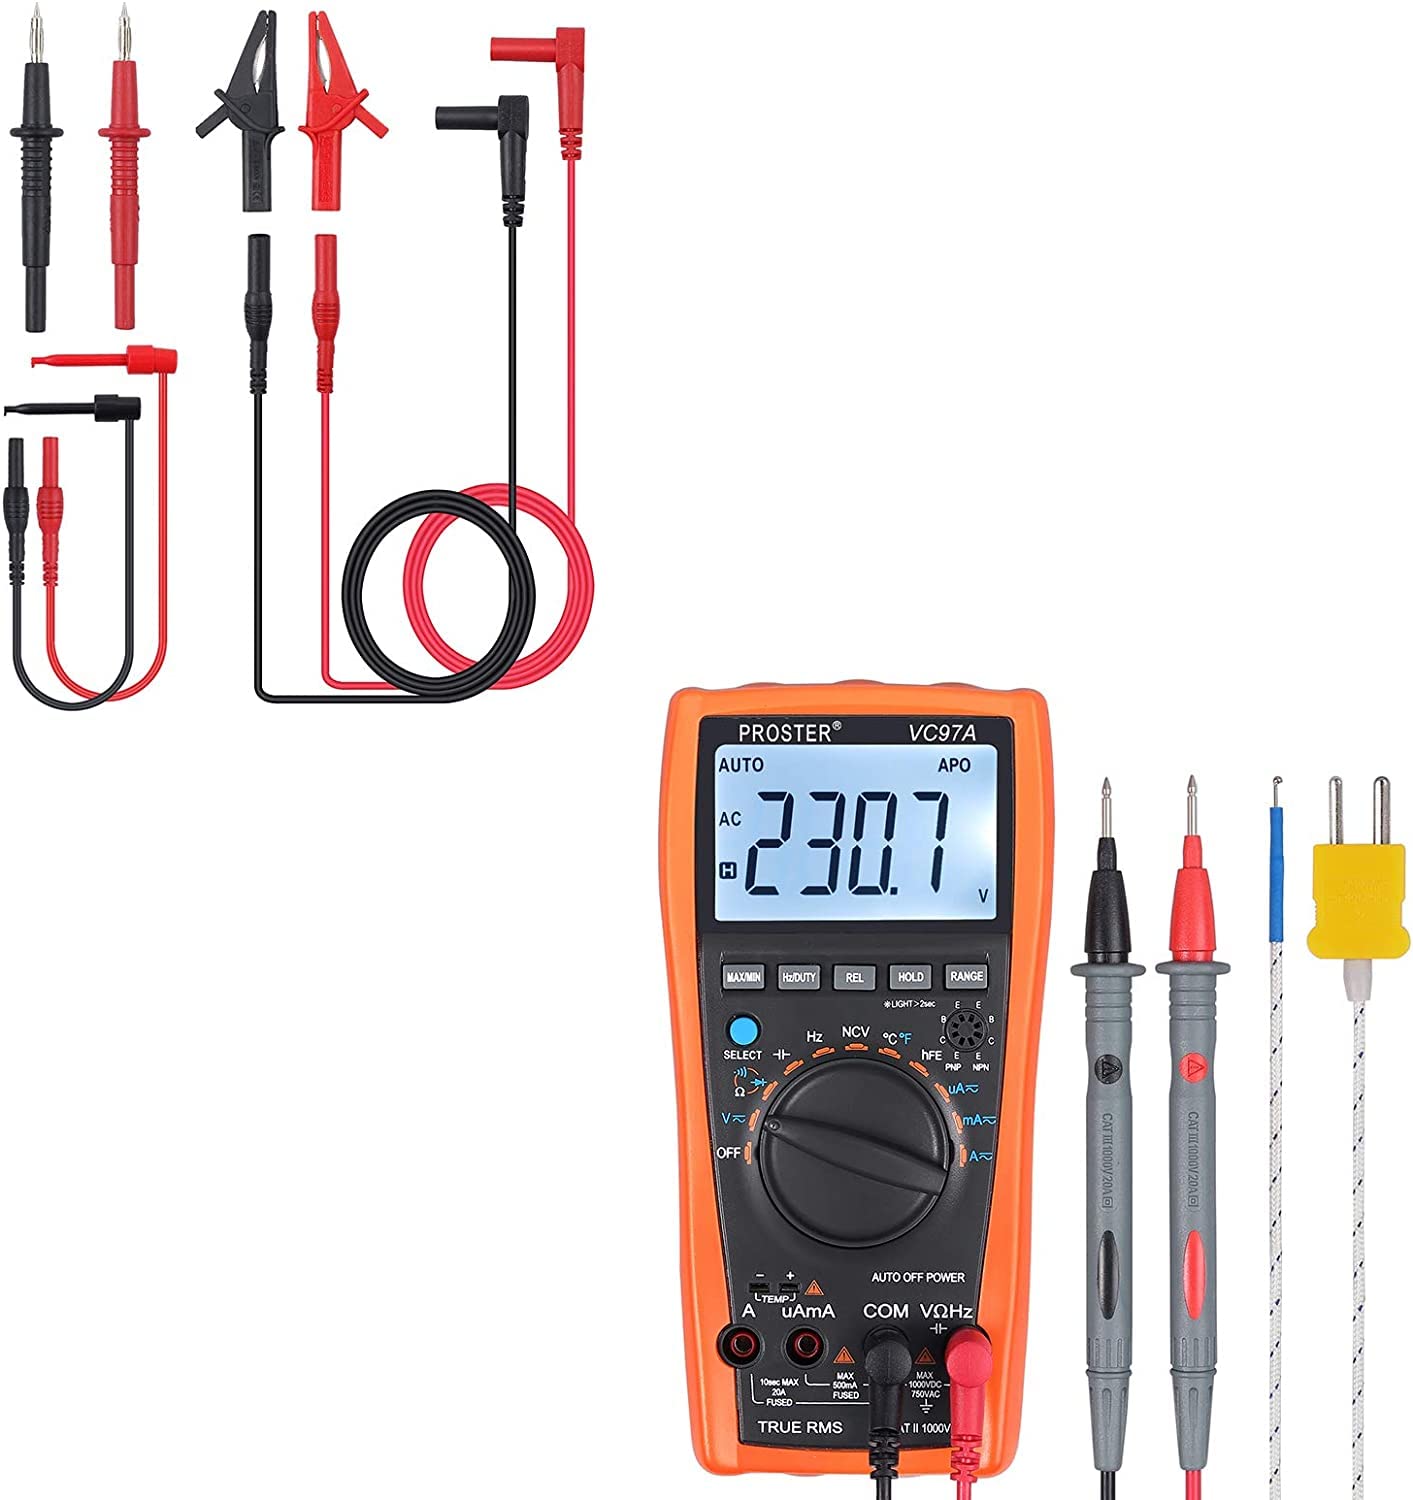
مجموعی طور پر view of the Proster Digital Multimeter 3999, showing its orange casing, LCD display, and rotary switch.
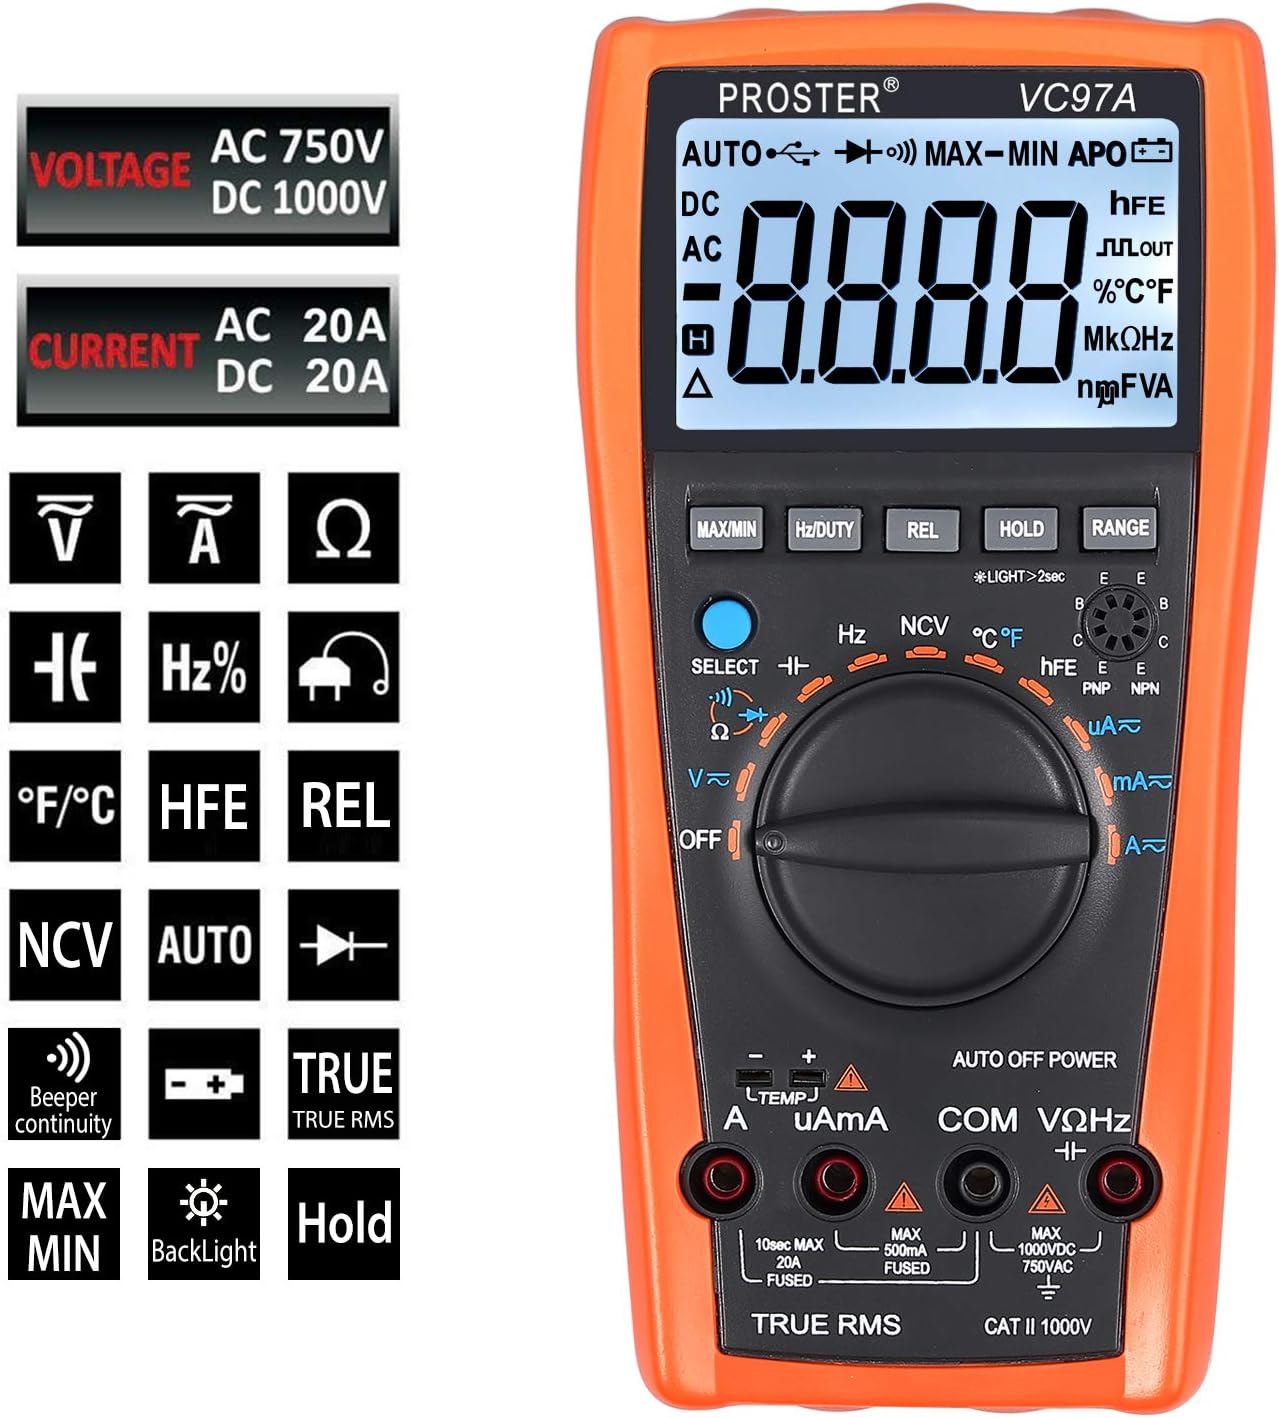
تفصیلی view of the multimeter's LCD display, function buttons (MAX/MIN, HZ/DUTY, REL, HOLD, RANGE), and rotary switch for selecting measurement modes.
Test Leads and Accessories
The included 8-piece test lead set provides versatility for various electrical measurements. All leads feature brass construction for durability and corrosion resistance.
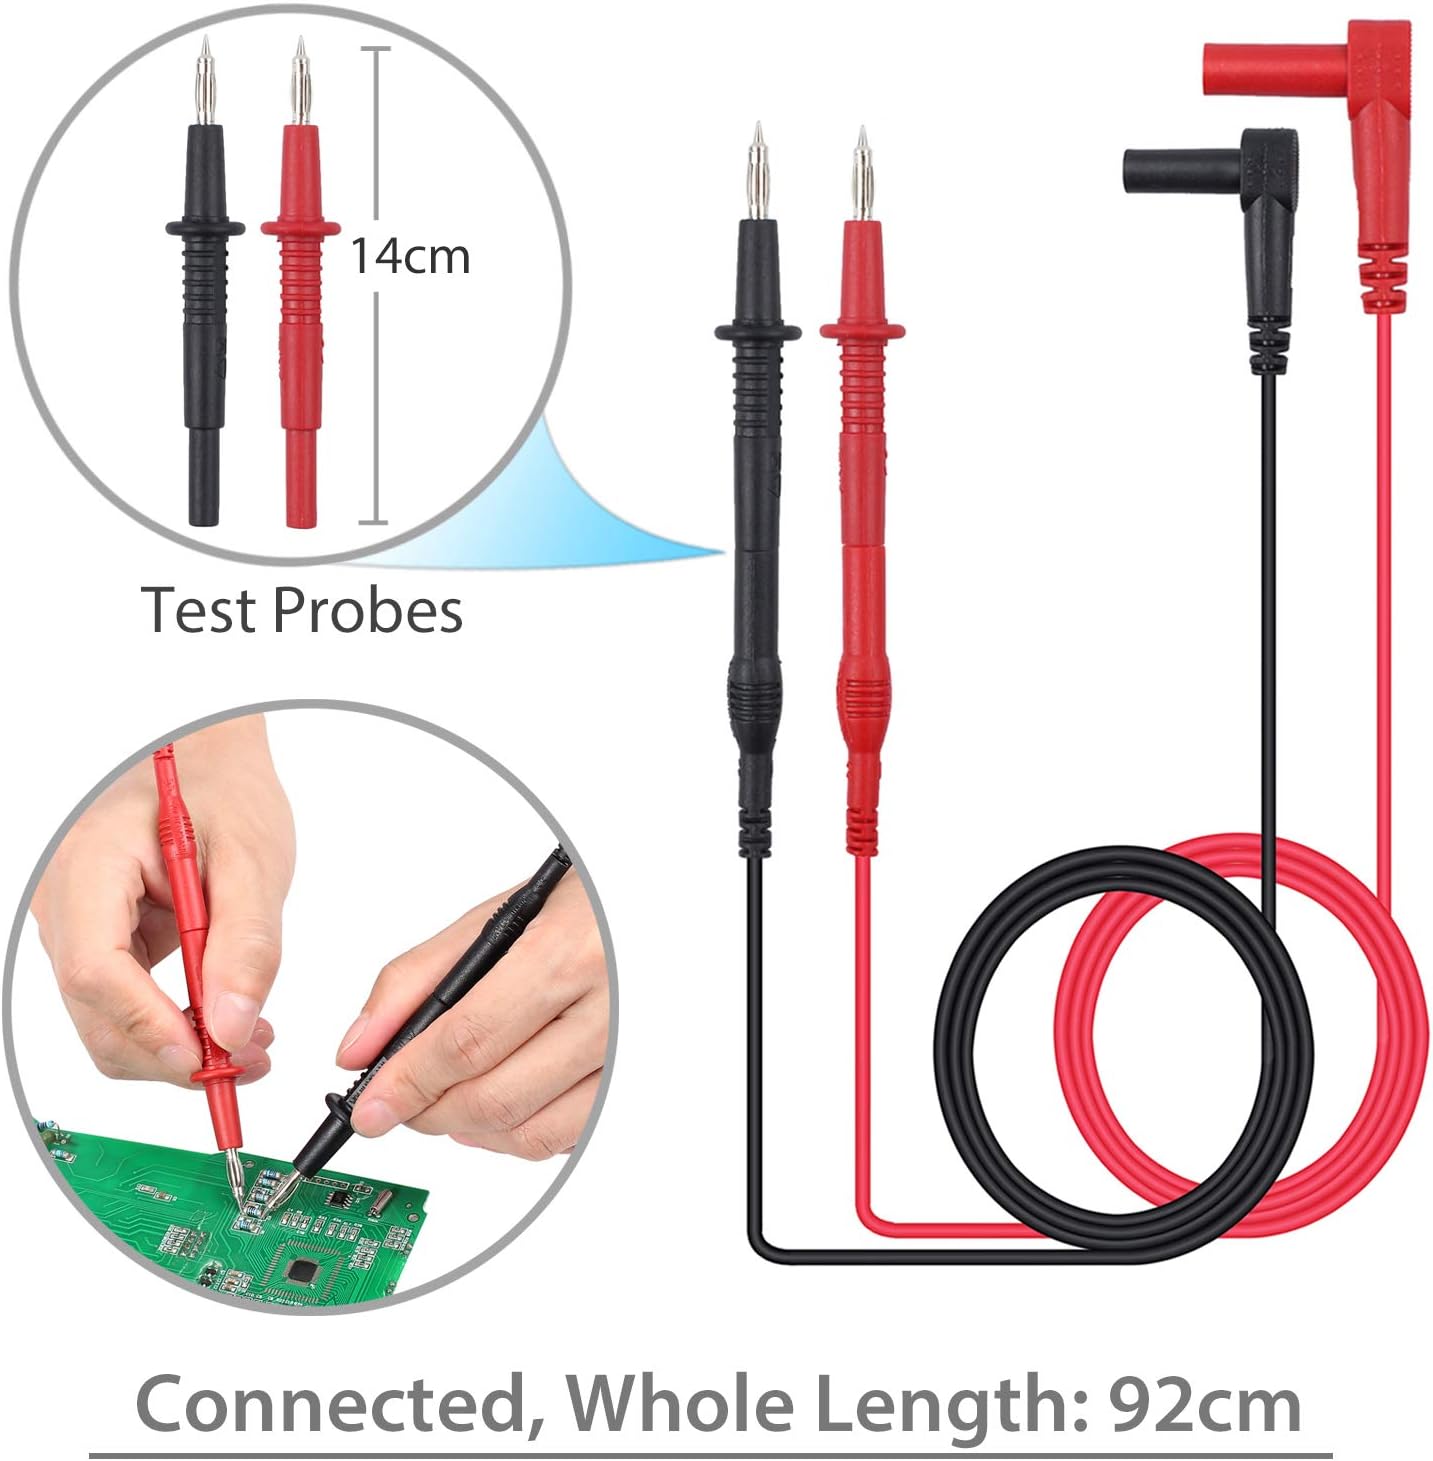
Standard test probes with 14cm length and a total connected length of 92cm. These are suitable for general purpose measurements.

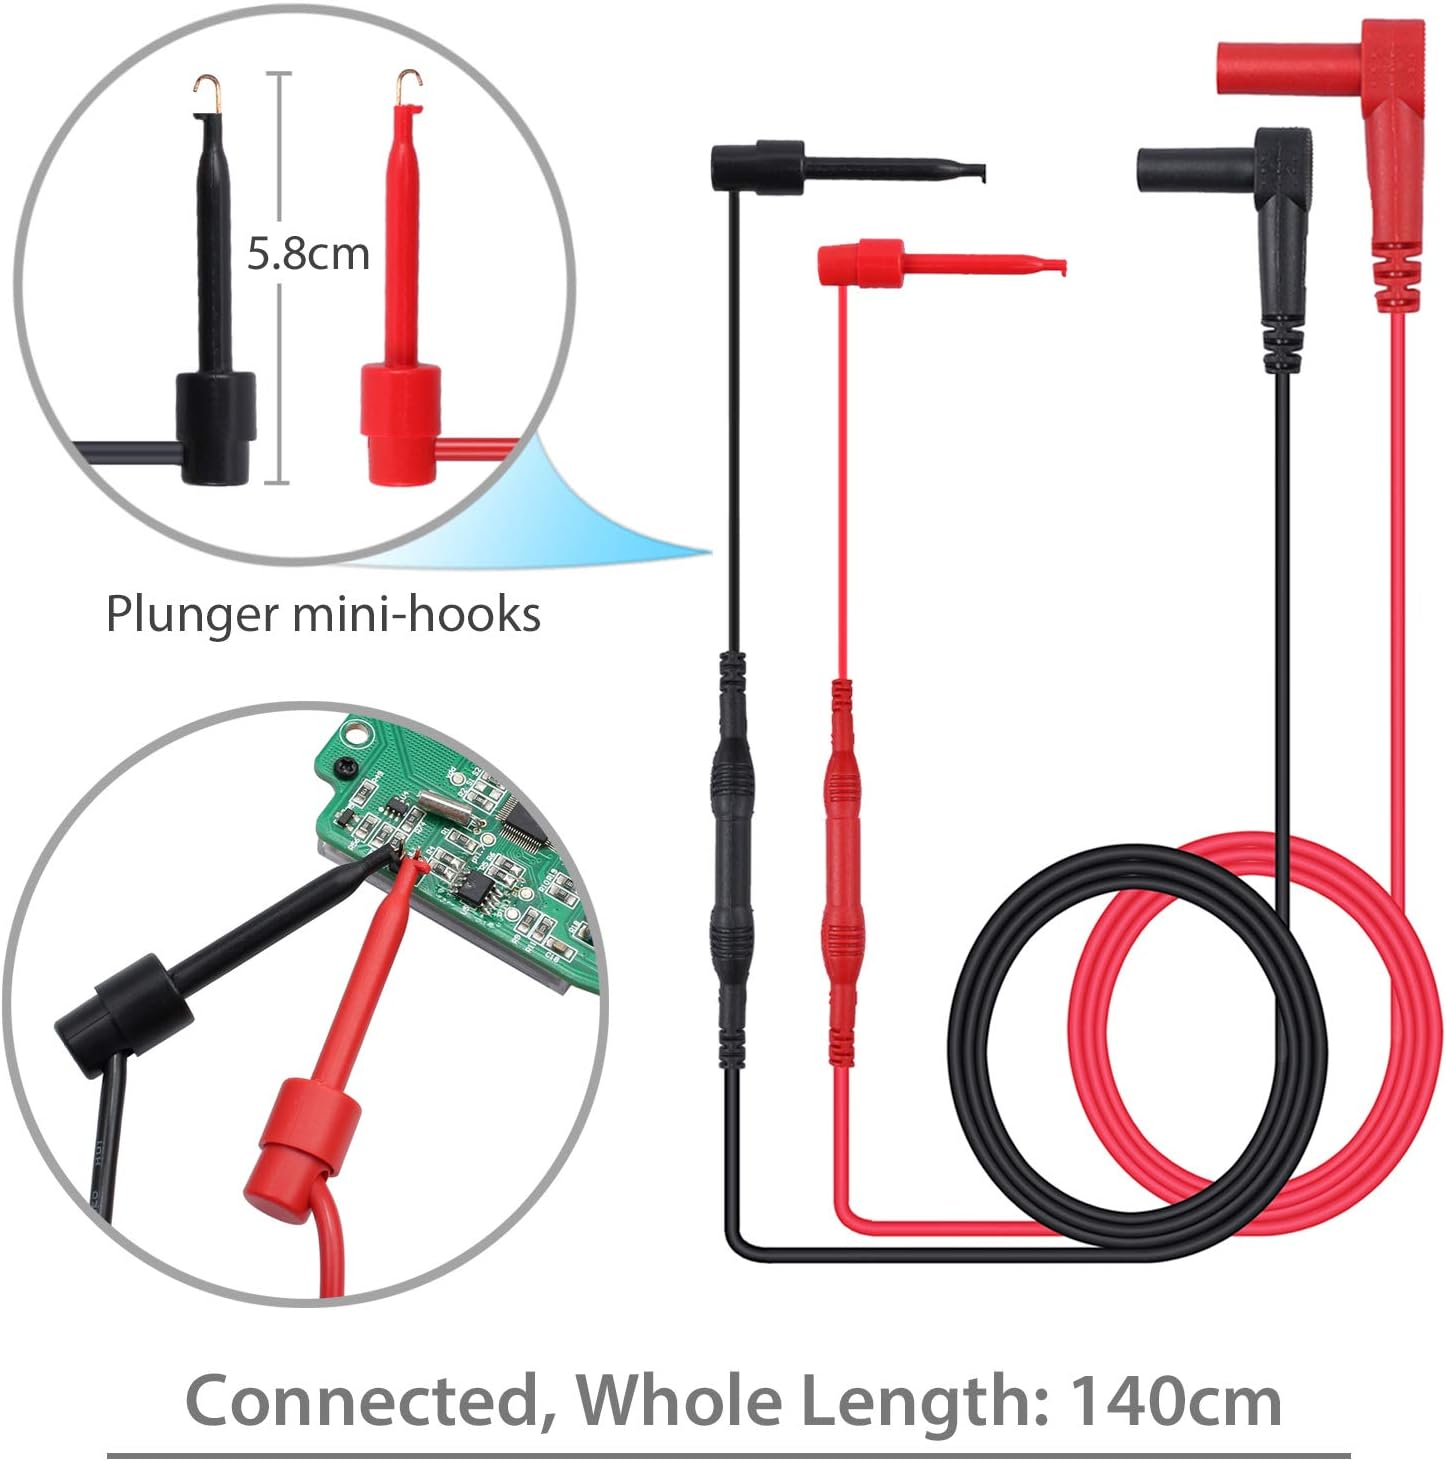
Plunger mini-hooks, 5.8cm in length, with a total connected length of 140cm. Ideal for connecting to small terminals or components.

Alligator clips, 9cm in length, with a total connected length of 90cm. Useful for hands-free connections to larger terminals or wires.
سیٹ اپ
بیٹری کی تنصیب
- The multimeter requires two AAA batteries (included).
- ملٹی میٹر کے پچھلے حصے میں بیٹری کے ڈبے کو تلاش کریں۔
- بیٹری کور کھولنے کے لیے سکریو ڈرایور استعمال کریں۔
- درست قطبیت (+ اور -) کا مشاہدہ کرتے ہوئے بیٹریاں داخل کریں۔
- بیٹری کور کو تبدیل کریں اور اسے سکرو سے محفوظ کریں۔
مربوط ٹیسٹ لیڈز
- زیادہ تر والیم کے لیےtage, resistance, and continuity measurements, connect the red test lead to the "VΩHz" ٹرمینل اور سیاہ ٹیسٹ کی طرف جاتا ہے "COM" ٹرمینل
- For current measurements, connect the red test lead to the "uAmA" terminal (for micro/milli-amps) or the "A" ٹرمینل (کے لیے amps) and the black test lead to the "COM" ٹرمینل
- Ensure test leads are fully inserted into the correct terminals.
آپریٹنگ ہدایات
پاور آن/آف
- Turn the rotary switch from "آف" to any desired function to power on the multimeter.
- To power off, turn the rotary switch back to "آف". The multimeter also features an Auto Power Off (APO) function to conserve battery life.
فنکشن کا انتخاب
- مطلوبہ پیمائش کے فنکشن کو منتخب کرنے کے لیے مرکزی ڈائل کو گھمائیں (جیسے، AC والیوم کے لیے V~tage، V- DC والیوم کے لیےtage, Ω for Resistance, A~ for AC Current, A- for DC Current, Hz for Frequency, °C/°F for Temperature).
- استعمال کریں۔ "SELECT" button to toggle between different modes within a single dial position (e.g., AC/DC voltagای، مزاحمت/تسلسل)۔
پیمائش والیومtage (AC/DC)
- ریڈ ٹیسٹ لیڈ کو کنیکٹ کریں۔ "VΩHz" ٹرمینل اور سیاہ ٹیسٹ کی طرف جاتا ہے "COM" ٹرمینل
- روٹری سوئچ کو V~ (AC والیومtage) یا V- (DC والیومtage). Use the "SELECT" اگر ضرورت ہو تو بٹن.
- Connect the test probes in parallel with the circuit or component to be measured.
- جلد پڑھیںtagLCD ڈسپلے پر ای ویلیو۔
Measuring Current (AC/DC)
- انتباہ: Ensure the circuit is de-energized before connecting the multimeter for current measurement.
- بلیک ٹیسٹ کی برتری کو ربط میں رکھیں "COM" ٹرمینل
- For micro/milli-amps, connect the red test lead to the "uAmA" terminal. For amps, connect the red test lead to the "A" ٹرمینل
- Turn the rotary switch to A~ (AC Current) or A- (DC Current). Use the "SELECT" اگر ضرورت ہو تو بٹن.
- Open the circuit and connect the multimeter in series with the load.
- سرکٹ کو دوبارہ متحرک کریں اور موجودہ قدر پڑھیں۔
مزاحمت کی پیمائش
- انتباہ: اس بات کو یقینی بنائیں کہ مزاحمت کی پیمائش کرنے سے پہلے سرکٹ کو ڈی انرجیائز کیا گیا ہے اور تمام کیپسیٹرز کو خارج کر دیا گیا ہے۔
- ریڈ ٹیسٹ لیڈ کو کنیکٹ کریں۔ "VΩHz" ٹرمینل اور سیاہ ٹیسٹ کی طرف جاتا ہے "COM" ٹرمینل
- Turn the rotary switch to Ω (Resistance).
- ماپا جانے کے لیے ٹیسٹ پروبس کو جزو کے پار جوڑیں۔
- LCD ڈسپلے پر مزاحمتی قدر پڑھیں۔
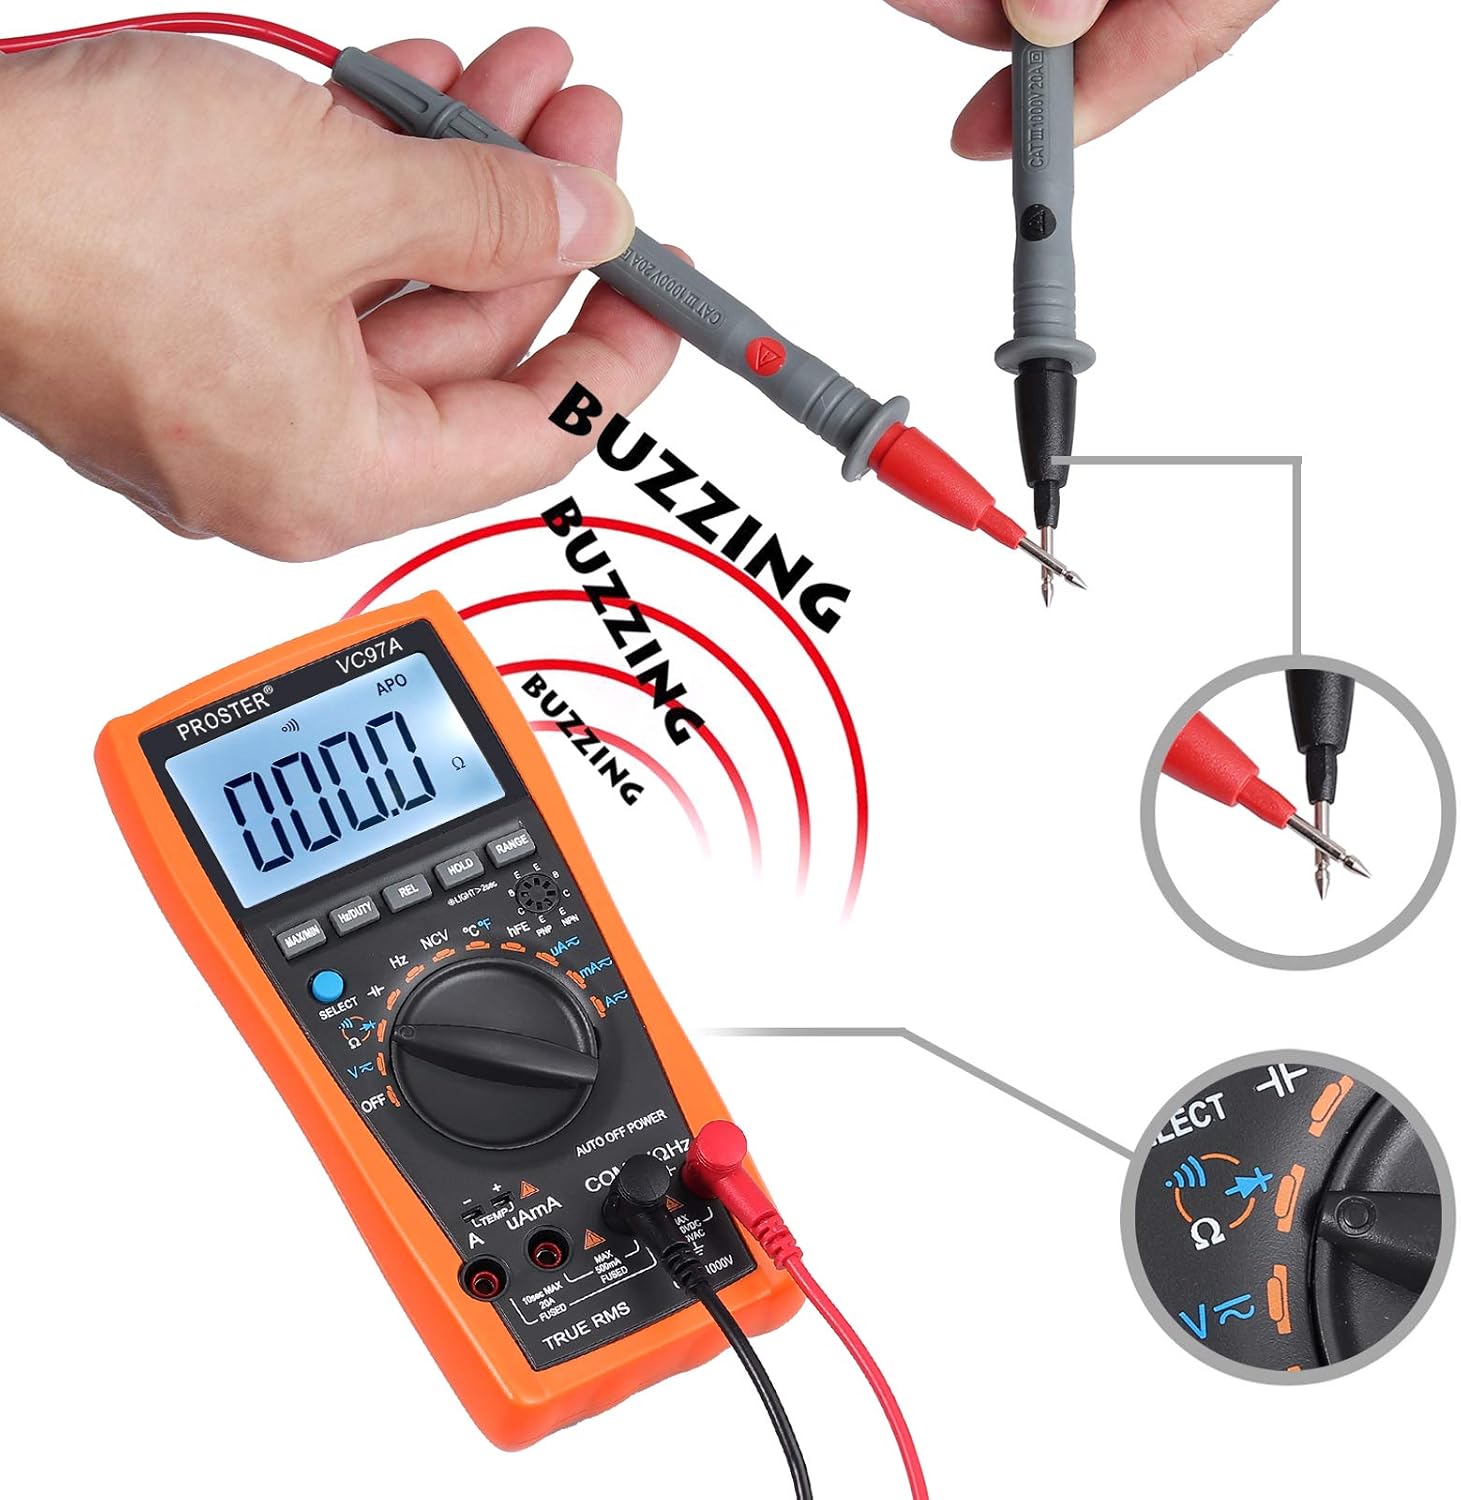
تسلسل ٹیسٹ
- انتباہ: اس بات کو یقینی بنائیں کہ تسلسل ٹیسٹ کرنے سے پہلے سرکٹ ڈی انرجائز ہو گیا ہے۔
- ریڈ ٹیسٹ لیڈ کو کنیکٹ کریں۔ "VΩHz" ٹرمینل اور سیاہ ٹیسٹ کی طرف جاتا ہے "COM" ٹرمینل
- روٹری سوئچ کو تسلسل کی علامت (اسپیکر آئیکن) کی طرف موڑ دیں۔
- ٹیسٹ پروبس کو پورے سرکٹ یا اجزاء میں جوڑیں۔
- A continuous beep indicates a complete circuit (low resistance). The display will show the resistance value.
Performing a continuity test. The multimeter emits a buzzing sound when a continuous circuit is detected, indicating low resistance.
درجہ حرارت کی پیمائش
- Connect the K-type temperature probe (included) to the multimeter's input terminals, observing polarity.
- Turn the rotary switch to °C/°F.
- Place the temperature probe in the environment or on the object to be measured.
- LCD ڈسپلے پر درجہ حرارت کی قدر پڑھیں۔

Measuring the surrounding air temperature using the K-type temperature probe.
Measuring the temperature of a liquid using the K-type temperature probe.
خصوصی افعال
- MAX / MIN: Press to display the maximum or minimum measured value.
- انعقاد: ڈسپلے پر کرنٹ ریڈنگ کو منجمد کرنے کے لیے دبائیں۔
- REL (رشتہ دار پیمائش): Press to store the current reading as a reference and display subsequent measurements as a deviation from this reference.
- رینج: For manual ranging (if auto-ranging is not desired or available for a specific function).
- بیک لائٹ: Press the backlight button (often combined with HOLD or another button) to illuminate the display in low-light conditions.
- این سی وی (غیر رابطہ والی جلدtagای): Allows detection of AC voltage without direct contact. Select NCV mode and bring the top of the multimeter near an AC voltagای ذریعہ
دیکھ بھال
بیٹری کی تبدیلی
When the low battery indicator appears on the display, replace the batteries as described in the "Battery Installation" section.
صفائی
- Wipe the multimeter case with a damp کپڑا اور ہلکا صابن. کھرچنے والے یا سالوینٹس کا استعمال نہ کریں۔
- Ensure the device is powered off and test leads are disconnected before cleaning.
ذخیرہ
- If the multimeter is not used for an extended period, remove the batteries to prevent leakage.
- آلے کو ٹھنڈی، خشک جگہ پر، براہ راست سورج کی روشنی اور انتہائی درجہ حرارت سے دور رکھیں۔
خرابی کا سراغ لگانا
No Display / Power On Issue
- بیٹری کی تنصیب اور قطبیت کو چیک کریں۔
- اگر بیٹریاں کم یا ختم ہو جائیں تو اسے تبدیل کریں۔
- Ensure the rotary switch is turned to an active function, not "آف".
غلط ریڈنگز
- درست فنکشن اور رینج منتخب ہونے کی تصدیق کریں۔
- یقینی بنائیں کہ ٹیسٹ لیڈز صحیح ان پٹ ٹرمینلز سے مناسب طریقے سے جڑے ہوئے ہیں۔
- Check for damaged test leads or probes.
- Ensure the circuit is de-energized for resistance/continuity measurements.
Overload Indication ("OL")
- ناپی گئی قدر منتخب کردہ حد سے زیادہ ہے۔ زیادہ رینج پر جائیں یا سرکٹ کے حالات کی تصدیق کریں۔
No Continuity Beep
- یقینی بنائیں کہ سرکٹ غیر فعال ہے۔
- Check for an open circuit or high resistance.
- Verify test lead connections.
وضاحتیں
- ڈسپلے: LCD، 3999 شمار
- ڈی سی والیومtage: 1000V تک
- AC جلدtage: 750V تک
- ڈی سی موجودہ: 20A تک
- AC موجودہ: 20A تک
- مزاحمت: جی ہاں
- اہلیت: Up to 200uF
- تعدد: جی ہاں
- ڈیوٹی سائیکل: جی ہاں
- درجہ حرارت: Yes (K-type probe included)
- تسلسل: ہاں (بزر کے ساتھ)
- ڈایڈڈ ٹیسٹ: جی ہاں
- این سی وی (غیر رابطہ والی جلدtagای): جی ہاں
- خصوصی خصوصیات: کم بیٹری والیومtage Indication, Overload Protection, Auto Power Off, Data Hold, MAX/MIN, Relative Measurement, Backlight.
- طاقت کا منبع: 2 ایکس اے اے اے بیٹریاں
- حفاظتی درجہ بندی: CAT II 1000V
وارنٹی اور سپورٹ
For warranty information or technical support, please refer to the product packaging or contact Proster customer service directly. Contact details are typically available on the manufacturer's webسائٹ یا شامل دستاویزات۔


