تعارف
This user manual provides detailed instructions for the installation, operation, and maintenance of your CREATE WINDCALM Ceiling Fan. Please read this manual thoroughly before installation and use to ensure safe and efficient operation.
حفاظتی معلومات
Always disconnect power at the main circuit breaker before installing, cleaning, or performing any maintenance on the ceiling fan. Ensure all electrical connections comply with local codes and ordinances. If you are unsure about any part of the installation, consult a qualified electrician.
WARNING: To reduce the risk of electric shock, ensure the electricity has been turned off at the circuit breaker or fuse box before beginning.
پیکیج کے مشمولات
Before beginning installation, check that all components listed below are present and undamaged:
- بڑھتے ہوئے بریکٹ
- ڈرائیور
- ریموٹ کنٹرول
- LED Plate (for models with light)
- موٹر ہاؤسنگ
- پنکھے کے بلیڈ (3x)
- Screws for Mounting Bracket + Motor
- Screws for Decorative Element + Motor
- ٹرمینل بلاک
- بیلنس کٹ۔
- آرائشی کور
- کور کے لئے پیچ
- Coupling for Cover
- Extension Screws (for concrete ceilings)
- Wood Screws (for wooden ceilings)

شکل 1: ختمview پیکیج میں شامل تمام اجزاء کا۔
انسٹالیشن گائیڈ
Follow these steps carefully to install your CREATE WINDCALM Ceiling Fan. For a visual guide, please watch the comprehensive installation video below, followed by detailed step-by-step instructions and images.
Video: Detailed installation steps for the CREATE WINDCALM Ceiling Fan.
مرحلہ 1: بریکٹ کو بڑھانا
Position the mounting bracket against the ceiling and mark the drilling points. Drill holes according to your ceiling type and secure the bracket firmly. Ensure no wires are pinched.
1.1 Wooden Ceiling Installation
- Mark drilling points.
- Drill pilot holes (approx. Ø6 mm).
- Secure the mounting bracket using wood screws.

Figure 2: Securing the mounting bracket to a wooden ceiling.
1.2 Concrete Ceiling Installation
- Mark drilling points.
- Drill holes (approx. Ø8 mm).
- Insert expansion bolts and secure the mounting bracket.

Figure 3: Securing the mounting bracket to a concrete ceiling.
1.3 False Ceiling Installation
- Mark and drill holes for toggle bolts (not included).
- Insert toggle bolts through the bracket and into the ceiling.
- Tighten toggle bolts to secure the mounting bracket.

Figure 4: Securing the mounting bracket to a false ceiling using toggle bolts.
Step 2: Driver and Electrical Connections
Connect the electrical wires from your home to the fan's driver unit. Ensure all connections are secure and insulated. Connect Live (L), Neutral (N), and Ground (Earth) wires from your home to the corresponding wires of the driver and fan support. Then connect the motor wires to the driver wires according to the color coding.
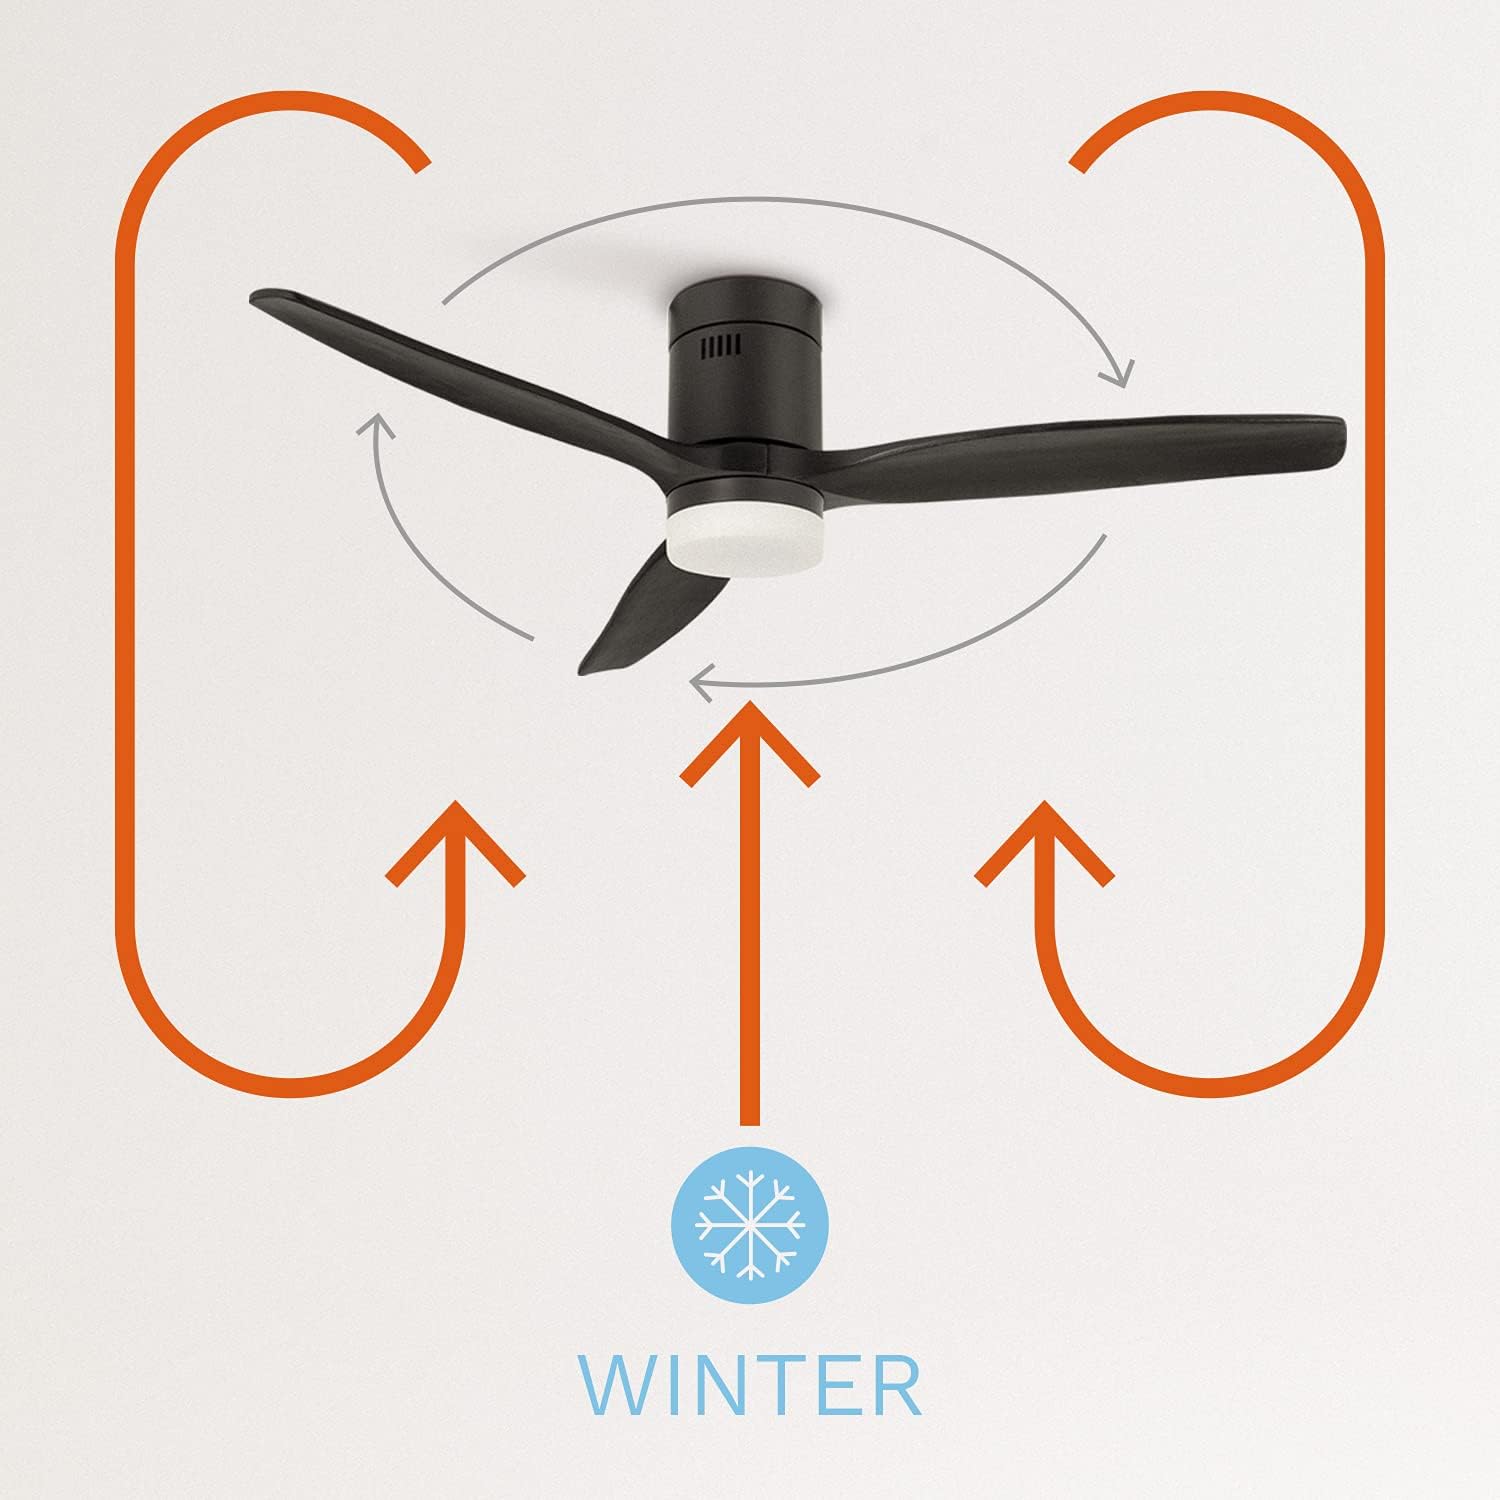
Figure 5: Wiring connections for the fan driver.
Step 3: Anchoring the Motor to the Ceiling
Carefully lift the fan motor assembly and align it with the mounting bracket. Secure the motor to the bracket using the provided screws.

Figure 6: Attaching the fan motor to the ceiling mounting bracket.
Step 4: Assembling the Fan Blades
Attach each fan blade to the motor housing using the provided screws. Do not overtighten the screws to allow for proper blade alignment.

Figure 7: Securing the fan blades to the motor.
Step 5: Placing the Decorative Element
Position the decorative element over the motor and secure it in place. This covers the internal wiring and provides a finished look.

Figure 8: Installing the decorative cover on the fan motor.
Step 6: LED Light Kit Connection (if applicable)
If your fan model includes an LED light kit, connect the LED plate wires to the corresponding wires from the fan motor. Ensure the connections are secure.

Figure 9: Connecting the LED light plate.
مرحلہ 7: ایلampshade Placement (if applicable)
For models with an LED light, carefully attach the lampshade to the fan. Ensure it is securely fastened.

Figure 10: Attaching the lampshade to the fan.
آپریٹنگ ہدایات
Your CREATE WINDCALM Ceiling Fan comes with a remote control and can also be controlled via Wi-Fi (for SMART models).
ریموٹ کنٹرول کے افعال
- پاور آن/آف: پنکھے کو آن یا آف کرنے کے لیے پاور بٹن دبائیں۔
- رفتار کنٹرول: Adjust fan speed through 6 levels using the speed buttons.
- روشنی کنٹرول: For models with light, switch between three color temperatures (warm, neutral, cool) using the light button. Note: Light intensity is not adjustable.
- ٹائمر: Set the fan to turn off automatically after 1 to 4 hours.
- موسم گرما/موسم سرما کا موڈ:
- سمر موڈ: Changes the blade rotation direction to push cool air downwards, cooling the room.
- موسم سرما کا موڈ: Changes the blade rotation direction to distribute warm air accumulated near the ceiling evenly downwards.

Figure 11: Remote control and smartphone app interface for fan operation.

Figure 12: Diagram illustrating the fan's summer mode operation.

Figure 13: Diagram illustrating the fan's winter mode operation.
Wi-Fi / Smart Control (for SMART models)
If you have chosen the Wi-Fi option, you can control and program your fan using the CREATE app on your mobile phone. Refer to the app's instructions for pairing and advanced features.
دیکھ بھال
- صفائی: To clean the fan, wipe it with a soft, damp cloth. Do not use abrasive cleaners or solvents. Ensure the fan is completely dry before operating.
- بلیڈ بیلنسنگ: If the fan wobbles, use the included balancing kit to correct the balance.
- باقاعدہ چیکس: وقتاً فوقتاً تمام پیچ اور کنکشن چیک کریں تاکہ یہ یقینی بنایا جا سکے کہ وہ محفوظ ہیں۔
خرابی کا سراغ لگانا
| مسئلہ | ممکنہ وجہ | حل |
|---|---|---|
| پنکھا شروع نہیں ہوتا | بجلی کی فراہمی نہیں؛ ڈھیلی وائرنگ؛ ریموٹ کنٹرول بیٹری کم ہے۔ | Check circuit breaker; Verify all wire connections; Replace remote control batteries. |
| پنکھا ڈوبتا ہے۔ | Loose blades; Unbalanced blades; Loose mounting bracket. | Tighten blade screws; Use balancing kit; Secure mounting bracket. |
| روشنی کام نہیں کرتی | Loose light kit connection; Faulty LED plate. | Check LED plate wiring; Contact customer support for replacement. |
| ریموٹ کنٹرول کام نہیں کر رہا ہے۔ | بیٹری کم/مردہ؛ ریموٹ جوڑا نہیں ہے۔ | Replace batteries; Refer to remote pairing instructions in the full manual. |
وضاحتیں
| فیچر | قدر |
|---|---|
| برانڈ | تخلیق کریں۔ |
| ماڈل نمبر | 82466_181215 |
| رنگ | سیاہ |
| انداز | روشنی کے ساتھ |
| طاقت کا منبع | کورڈڈ الیکٹرک |
| والیومtage | 240 وولٹ |
| واٹtage | 40 واٹ |
| ہوا کے بہاؤ کی صلاحیت | 2.1E+2 Cubic Feet Per Minute |
| شور کی سطح | 50 ڈی بی |
| بلیڈ کی لمبائی | 66 سینٹی میٹر |
| گردشی رفتار | 223 انقلابات فی منٹ |
| قطر کاٹنا | 132 سینٹی میٹر |
| خصوصی خصوصیت | تیز رفتار |
| مصنوعات کے طول و عرض | 132D x 132W x 31.5H سینٹی میٹر |
| شے کا وزن | 7 کلوگرام |

Figure 14: Energy efficiency label for the fan.

Figure 15: Product data sheet with detailed specifications.
وارنٹی اور سپورٹ
For warranty information, technical support, or any inquiries regarding your CREATE WINDCALM Ceiling Fan, please visit the official CREATE brand store or contact their customer service directly.
Official CREATE Store: Visit CREATE Store on Amazon


