1. تعارف
This manual provides essential information for the safe and efficient use of your AOC U34V5C/BK 34-inch WQHD LED Monitor. Please read this manual thoroughly before operating the device and retain it for future reference. The AOC U34V5C/BK is designed to deliver a high-quality visual experience with its 3440 x 1440 WQHD resolution and 21:9 aspect ratio, suitable for various applications from professional work to entertainment.
2. حفاظتی معلومات
Observe the following safety precautions to prevent damage to the monitor and ensure personal safety:
- آگ یا جھٹکے کے خطرات سے بچنے کے لیے مانیٹر کو بارش یا نمی کے سامنے نہ رکھیں۔
- مانیٹر نہ کھولیں casinجی اندر کوئی صارف کے قابل خدمت حصے نہیں ہیں۔ تمام سروسنگ کو اہل سروس اہلکاروں سے رجوع کریں۔
- مانیٹر کو ایک مستحکم، چپٹی سطح پر رکھیں تاکہ اسے گرنے سے روکا جا سکے۔
- مانیٹر کے ارد گرد مناسب وینٹیلیشن کو یقینی بنائیں۔ وینٹیلیشن کے سوراخوں کو مسدود نہ کریں۔
- مانیٹر کے ساتھ فراہم کردہ پاور کورڈ اور اڈاپٹر ہی استعمال کریں۔
- بجلی کے طوفان کے دوران یا طویل عرصے تک غیر استعمال ہونے پر مانیٹر کو پاور آؤٹ لیٹ سے ان پلگ کریں۔
3. پیکیج کے مشمولات
تصدیق کریں کہ تمام اشیاء پیکیج میں موجود ہیں:
- AOC U34V5C/BK Monitor
- مانیٹر اسٹینڈ (بیس اور گردن)
- پاور کیبل
- HDMI کیبل
- ڈسپلے پورٹ کیبل
- USB-C کیبل
- صارف دستی (یہ دستاویز)
4. پروڈکٹ ختمview
The AOC U34V5C/BK monitor features a 34-inch VA panel with WQHD resolution, USB-C connectivity with 65W Power Delivery, and a 100Hz refresh rate with AMD FreeSync support.
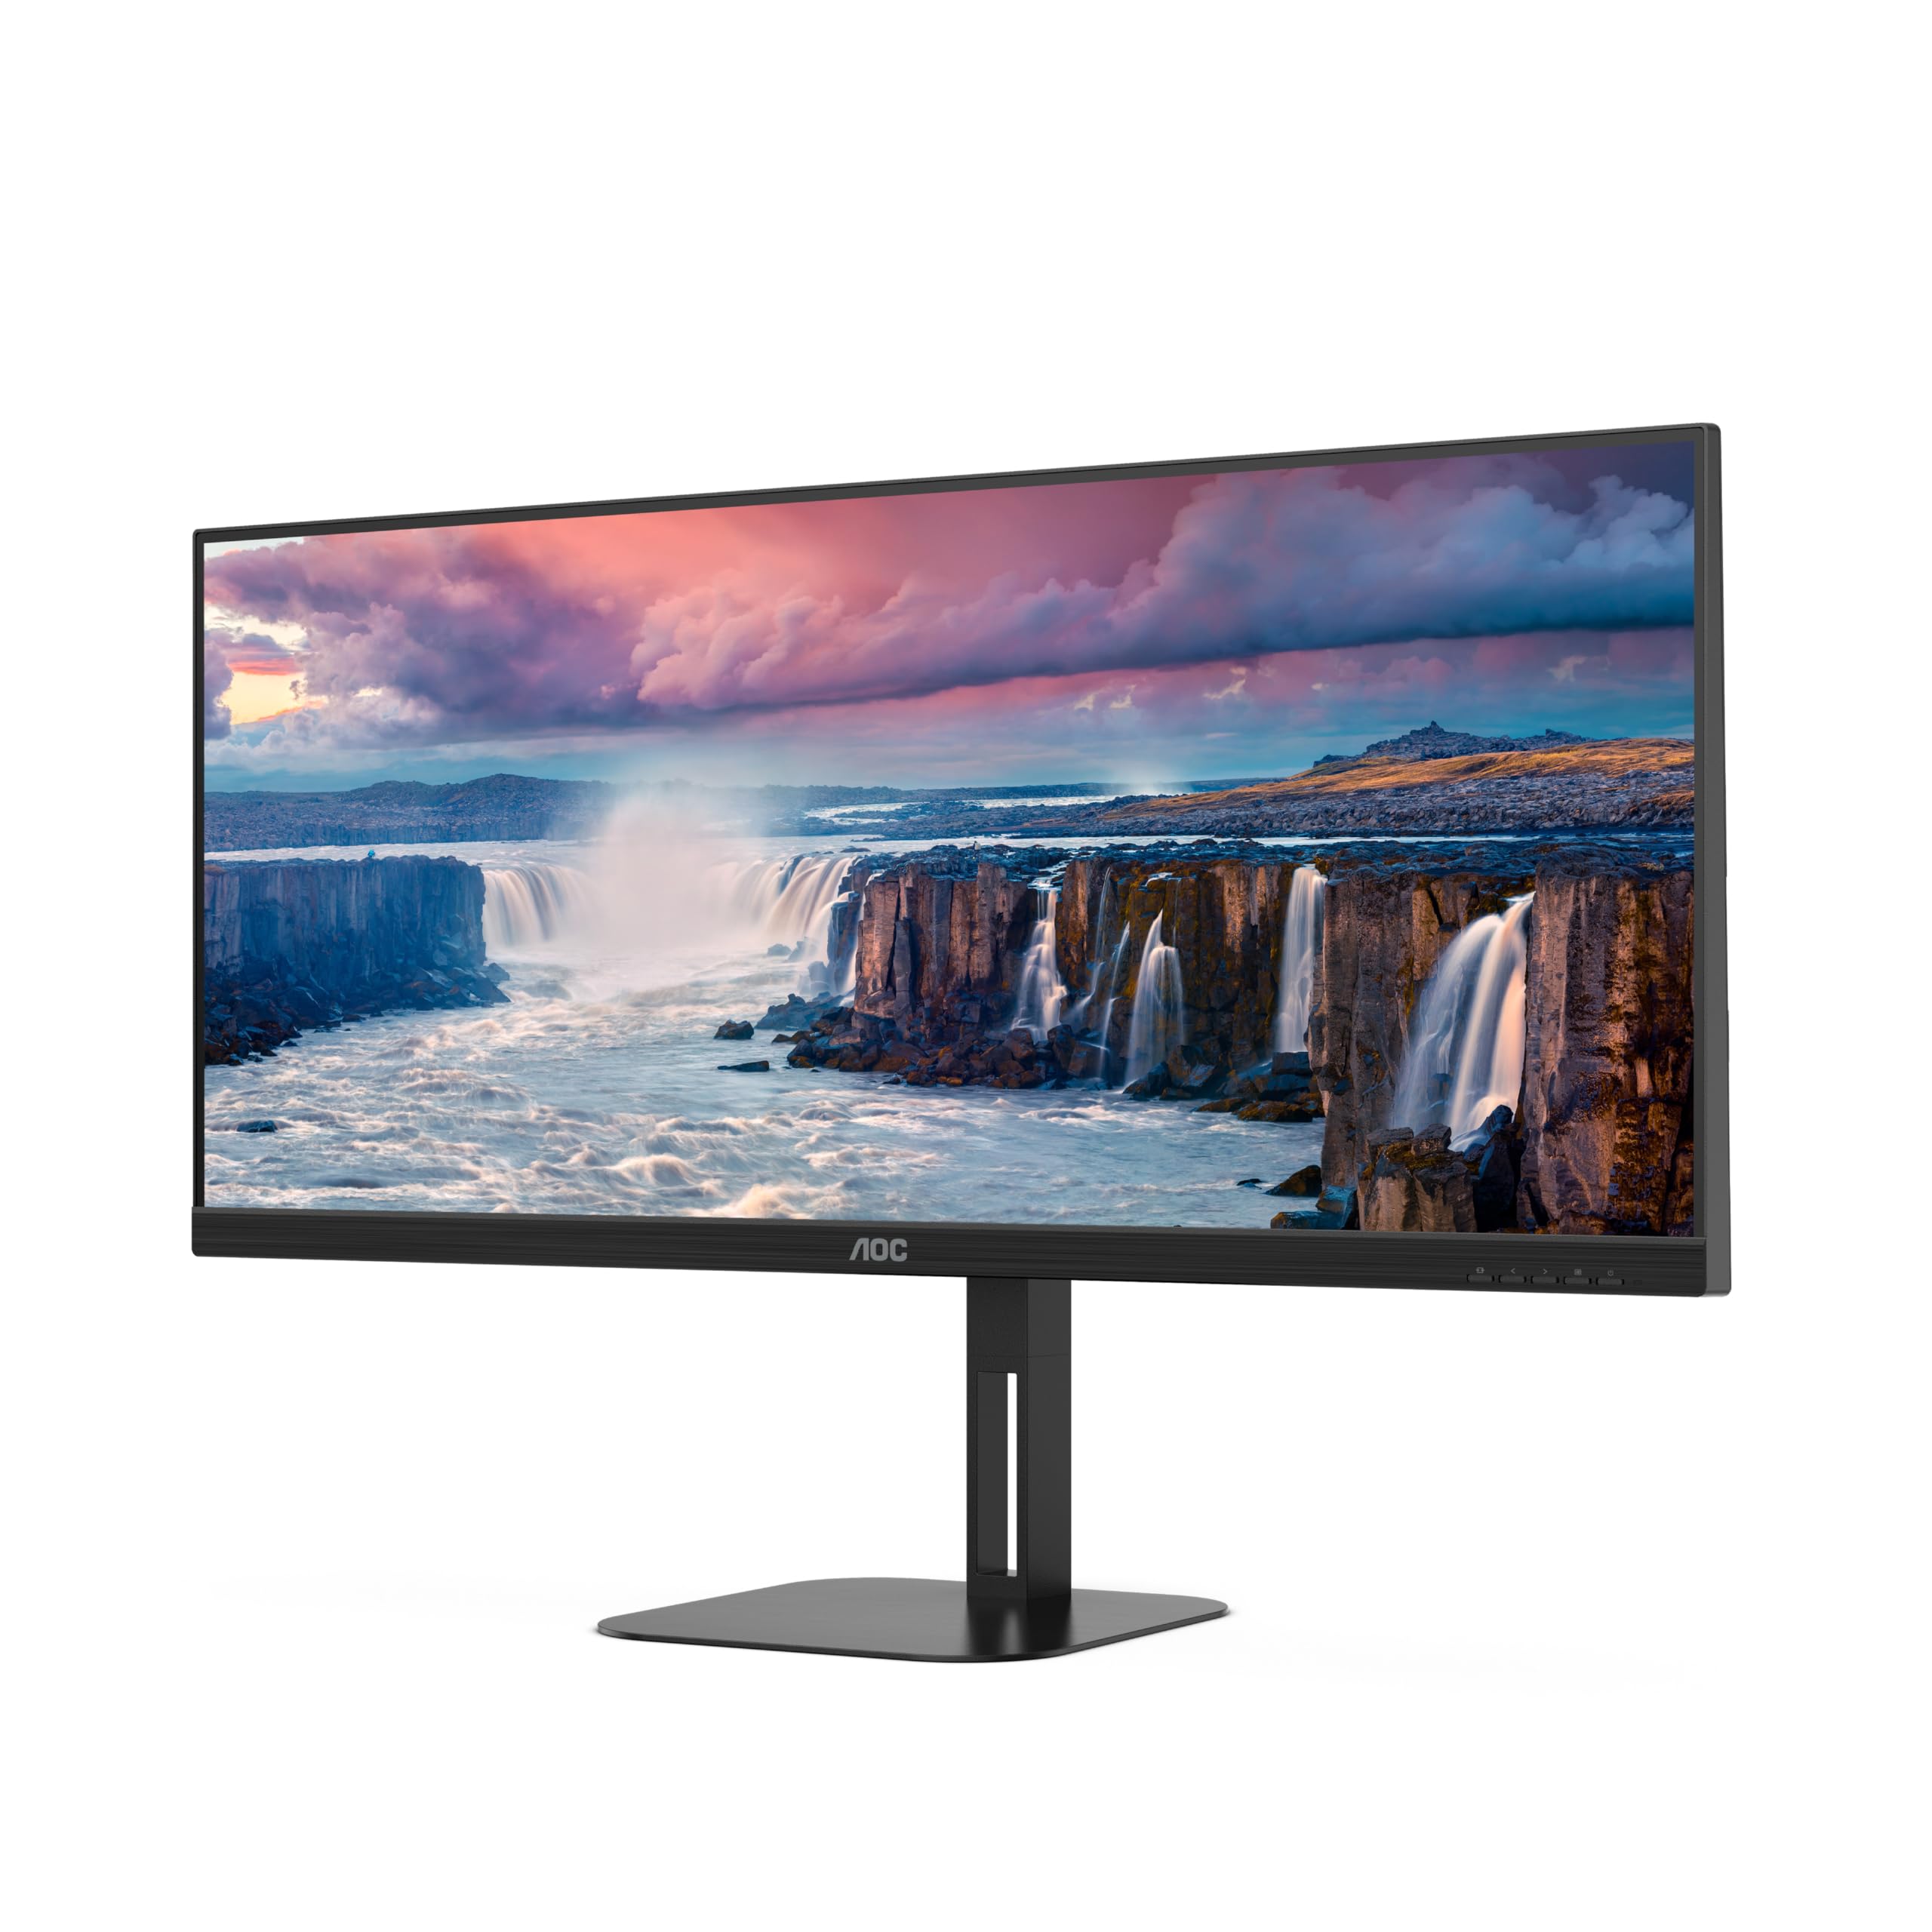
شکل 4.1: سامنے view of the AOC U34V5C/BK monitor highlighting its 34-inch VA panel, USB-C port with 65W Power Delivery, 100Hz refresh rate, and AMD FreeSync technology.
4.1 اجزاء کی نگرانی کریں۔
اپنے مانیٹر کے مختلف حصوں سے خود کو واقف کرو:
- فرنٹ پینل: Display screen, OSD control buttons (usually located on the bottom right bezel).
- ریئر پینل: Power input, video input ports (HDMI, DisplayPort, USB-C), USB hub ports, security lock slot.
- کھڑے ہو جاؤ: Provides stable support and allows for height, tilt, and swivel adjustments.

شکل 4.2: پیچھے view of the AOC U34V5C/BK monitor, showing the VESA mount compatibility and the stand attachment point.

شکل 4.3: نیچے view of the AOC U34V5C/BK monitor, detailing the power input, DisplayPort, HDMI, USB-C, and USB-A hub ports.
5. سیٹ اپ
5.1 اسٹینڈ کو جمع کرنا
- خروںچ کو روکنے کے لیے مانیٹر کے چہرے کو نرم، صاف کپڑے پر احتیاط سے رکھیں۔
- Attach the stand neck to the back of the monitor until it clicks into place or is secured with screws (if applicable).
- Attach the stand base to the stand neck and tighten the captive screw at the bottom of the base.
- Carefully lift the monitor and place it on a stable desk.
5.2 مانیٹر کو جوڑنا
اس بات کو یقینی بنائیں کہ آپ کا کمپیوٹر اور مانیٹر کوئی بھی کنکشن بنانے سے پہلے بند ہے۔
- پاور کنکشن: Connect the power cable to the monitor's power input and then to a grounded electrical outlet.
- ویڈیو کنکشن: درج ذیل اختیارات میں سے ایک کو منتخب کریں:
- HDMI: Connect one end of the HDMI cable to your computer's HDMI output and the other end to an HDMI input on the monitor.
- ڈسپلے پورٹ: Connect one end of the DisplayPort cable to your computer's DisplayPort output and the other end to the DisplayPort input on the monitor.
- USB-C: Connect one end of the USB-C cable to your computer's USB-C port (which supports video output) and the other end to the USB-C input on the monitor. This connection can also provide power delivery and USB data transfer.
- USB حب کنکشن (اختیاری): If using the monitor's USB hub, connect a USB upstream cable (USB-C to USB-A or USB-C to USB-C, depending on your computer) from your computer to the monitor's USB upstream port. This enables the monitor's USB-A ports for peripherals.
6. مانیٹر کو چلانا
6.1 پاور آن/آف
Press the power button, usually located on the bottom right bezel, to turn the monitor on or off. The power indicator light will illuminate when the monitor is on.
6.2 آن اسکرین ڈسپلے (OSD) مینو
The OSD menu allows you to adjust various monitor settings. Use the control buttons (joystick or individual buttons) on the monitor's bezel to navigate the menu.
- Press the Menu button (or push the joystick) to open the OSD menu.
- Use the navigation buttons (or joystick) to move through the menu options.
- Press the Select button (or push the joystick) to enter a sub-menu or confirm a selection.
- Use the Exit button (or move the joystick left) to go back to the previous menu or exit the OSD.
6.3 Common OSD Settings
- روشنی: چمک، کنٹراسٹ اور گاما کو ایڈجسٹ کریں۔
- تصویر کا سیٹ اپ: Fine-tune image quality, sharpness, and pixel clock.
- رنگ سیٹ اپ: Select color temperature, sRGB mode, or user-defined color settings.
- پکچر بوسٹ: اسکرین کے مخصوص علاقوں کو بہتر بنائیں۔
- او ایس ڈی سیٹ اپ: Adjust OSD language, position, and transparency.
- گیم کی ترتیب: Enable/disable FreeSync, adjust overdrive, and game modes.
- اضافی: Select input source, reset settings, view معلومات
7 دیکھ بھال
7.1 مانیٹر کی صفائی
- صفائی سے پہلے ہمیشہ مانیٹر کو ان پلگ کریں۔
- ہلکے سے نرم، لنٹ سے پاک کپڑا استعمال کریں۔ampپانی یا ہلکے، غیر کھرچنے والے اسکرین کلینر کے ساتھ ختم کیا گیا ہے۔
- Do not use alcohol, ammonia, or abrasive cleaners, as they may damage the screen or casing.
- Wipe the screen gently. Do not apply excessive pressure.
7.2 عمومی نگہداشت
- مانیٹر یا اس کی کیبلز پر بھاری اشیاء رکھنے سے گریز کریں۔
- مانیٹر کو براہ راست سورج کی روشنی، گرمی کے ذرائع اور انتہائی درجہ حرارت سے دور رکھیں۔
- Do not expose the monitor to strong vibrations or impacts.
8 خرابیوں کا سراغ لگانا
اگر آپ کو اپنے مانیٹر کے ساتھ مسائل کا سامنا کرنا پڑتا ہے، تو درج ذیل عام مسائل اور حل دیکھیں:
| مسئلہ | ممکنہ وجہ | حل |
|---|---|---|
| اسکرین پر کوئی تصویر نہیں ہے | Monitor not powered on; Incorrect input source; Loose video cable | Press power button; Select correct input via OSD; Reconnect video cable securely |
| تصویر بہت سیاہ/روشن ہے۔ | Brightness/Contrast settings incorrect | Adjust Brightness and Contrast in OSD menu |
| جھلملاتی تصویر | Incorrect refresh rate; Faulty cable | Set refresh rate to 100Hz in display settings; Try a different video cable |
| USB پورٹس کام نہیں کر رہے ہیں۔ | USB upstream cable not connected | Connect the USB-C upstream cable from the monitor to your computer |
If the problem persists after trying these solutions, contact AOC customer support.
9. وضاحتیں
Below are the technical specifications for the AOC U34V5C/BK monitor:

Figure 9.1: Product Information Sheet for AOC U34V5C/BK, detailing energy efficiency and technical parameters.
| پیرامیٹر | قدر |
|---|---|
| برانڈ | اے او سی |
| ماڈل | U34V5C/BK |
| اسکرین کا سائز | 34 انچ (86.4 سینٹی میٹر) |
| قرارداد | 3440 x 1440 WQHD |
| پہلو کا تناسب | 21:9 |
| رسپانس ٹائم | 4 ملی سیکنڈز |
| ریفریش ریٹ | 100 Hz (default 60 Hz) |
| پینل ٹیکنالوجی | VA Panel, LED LCD |
| Viewآئی اینگل | 178 ڈگری (افقی/عمودی) |
| ہارڈ ویئر انٹرفیس | DisplayPort, HDMI, USB-C |
| کل USB پورٹس | 4 (USB Hub) |
| پاور ڈیلیوری (USB-C) | 65W |
| والیومtage | 5 Volts (Internal Power Supply) |
| مصنوعات کے طول و عرض | 50 x 25 x 40 سینٹی میٹر؛ 7 کلوگرام |
| توانائی کی کارکردگی کی کلاس (SDR) | G |
| بجلی کی کھپت (SDR) | 34.0 ڈبلیو |
| توانائی کی کارکردگی کی کلاس (HDR) | G |
| بجلی کی کھپت (HDR) | 35.0 ڈبلیو |
| اسٹینڈ بائی پاور | 0.5 ڈبلیو |
| Minimum guaranteed software/firmware updates | 8 سال |
| Minimum guaranteed spare parts availability | 7 سال |
| کم از کم گارنٹی شدہ پروڈکٹ سپورٹ | 8 سال |
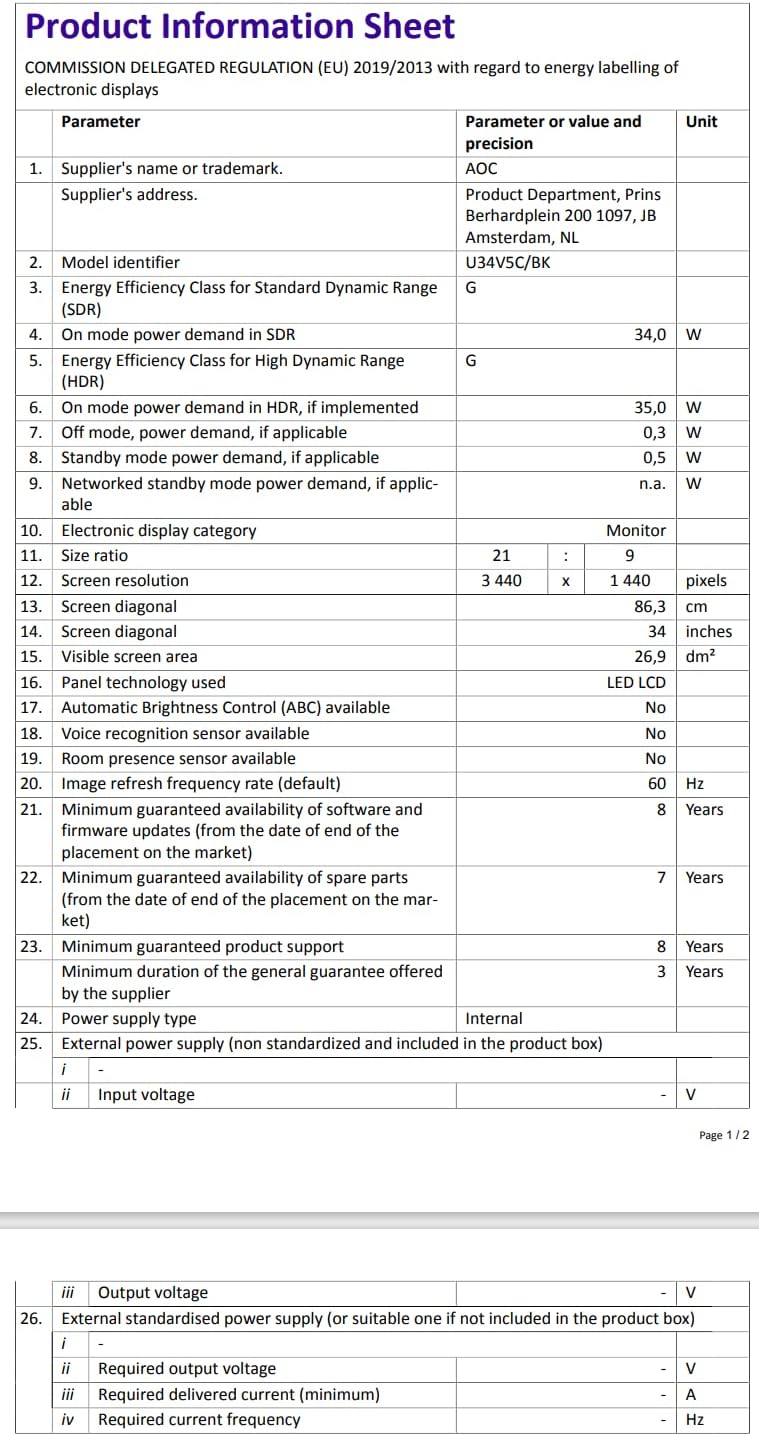
Figure 9.2: Energy Label for AOC U34V5C/BK. For more details, visit the EPREL ڈیٹا بیس.
10. وارنٹی اور سپورٹ
The AOC U34V5C/BK monitor comes with a minimum guaranteed general warranty of 3 سال فراہم کنندہ کے ذریعہ فراہم کردہ۔
For technical support, warranty claims, or service inquiries, please visit the official AOC website or contact your local AOC customer service center. Ensure you have your monitor's model number (U34V5C/BK) and serial number ready when contacting support.


