1. تعارف
This manual provides essential information for the safe installation, operation, and maintenance of your CREATE WIND CLEAR Ceiling Fan. Please read these instructions thoroughly before installation and retain them for future reference.
The CREATE WIND CLEAR Ceiling Fan is a quiet ceiling fan featuring a 40W DC brushless motor and a winter-summer reversal function. Its compact and versatile design includes retractable blades. It is suitable for small to medium-sized rooms and bedrooms, offering a built-in LED light with three adjustable color temperatures. The fan body is constructed from steel, and the blades are made of ABS. It provides 6 speed settings and a programmable timer up to 8 hours, all controllable via the included remote control and WiFi connectivity.
2. حفاظتی ہدایات
- تنصیب، دیکھ بھال، یا صفائی سے پہلے مین سرکٹ بریکر سے ہمیشہ بجلی منقطع کریں۔
- تنصیب کو تمام مقامی اور قومی برقی کوڈز کے مطابق ایک مستند الیکٹریشن کے ذریعے انجام دیا جانا چاہیے۔
- Ensure the mounting structure can support the weight of the fan (refer to specifications for weight).
- پنکھے کے بلیڈ کے راستے میں اشیاء نہ ڈالیں۔
- یقینی بنائیں کہ تمام کنکشن محفوظ اور مناسب طریقے سے موصل ہیں۔
- یہ آلات کم جسمانی، حسی یا دماغی صلاحیتوں، یا تجربے اور علم کی کمی والے افراد (بشمول بچوں) کے استعمال کے لیے نہیں ہے، جب تک کہ ان کی حفاظت کے لیے ذمہ دار کسی فرد کی جانب سے آلات کے استعمال سے متعلق نگرانی یا ہدایات نہ دی گئی ہوں۔
3. شامل اجزاء
تنصیب شروع کرنے سے پہلے تصدیق کریں کہ تمام اجزاء موجود ہیں:
- CREATE WIND CLEAR Ceiling Fan Unit
- ریموٹ کنٹرول
- ریموٹ کنٹرول کے لیے بیٹری
- Mounting Hardware (screws, brackets, etc. - specific items may vary)
- ہدایت نامہ
For a visual reference of the product and its components, please see the image below:

4. سیٹ اپ اور انسٹالیشن
Professional installation is highly recommended for this ceiling fan. Ensure the power supply is disconnected before starting any installation work.
4.1 جسمانی تنصیب
- بڑھتے ہوئے بریکٹ: Securely attach the mounting bracket to a ceiling joist or a suitable electrical junction box rated for fan support.
- وائرنگ: Connect the fan's electrical wires to the household wiring according to the wiring diagram provided in the full installation guide (not included in this summary). Ensure proper grounding.
- پرستار اسمبلی: Carefully lift and attach the fan motor assembly to the mounting bracket.
- بلیڈ کی تنصیب: The fan features retractable blades that deploy automatically when the fan operates. No manual blade installation is typically required after the main unit is mounted.
- لائٹ کٹ کی تنصیب: Attach the LED light kit to the fan housing as per the detailed instructions.
Refer to the following images for visual guidance on the fan's appearance and dimensions:


4.2 WiFi Setup
The fan supports WiFi connectivity for control via a smartphone application. Refer to the specific instructions provided with the fan for pairing the device with your home WiFi network and the CREATE smart home app.
5. آپریٹنگ ہدایات
Your CREATE WIND CLEAR Ceiling Fan can be operated using the included remote control or via the dedicated smartphone application.
5.1 ریموٹ کنٹرول کے افعال
- پاور آن/آف: پنکھا اور لائٹ آن یا آف کرنے کے لیے پاور بٹن دبائیں۔
- پنکھے کی رفتار: Adjust between 6 fan speeds using the designated speed buttons.
- روشنی کنٹرول: Turn the LED light on/off and cycle through three adjustable color temperatures (warm, neutral, cold).
- ٹائمر: پنکھے کو 1، 2، 4، یا 8 گھنٹے کے بعد خود بخود بند کرنے کے لیے سیٹ کریں۔
- موسم سرما/گرما موڈ: Switch between forward (summer) and reverse (winter) rotation modes.

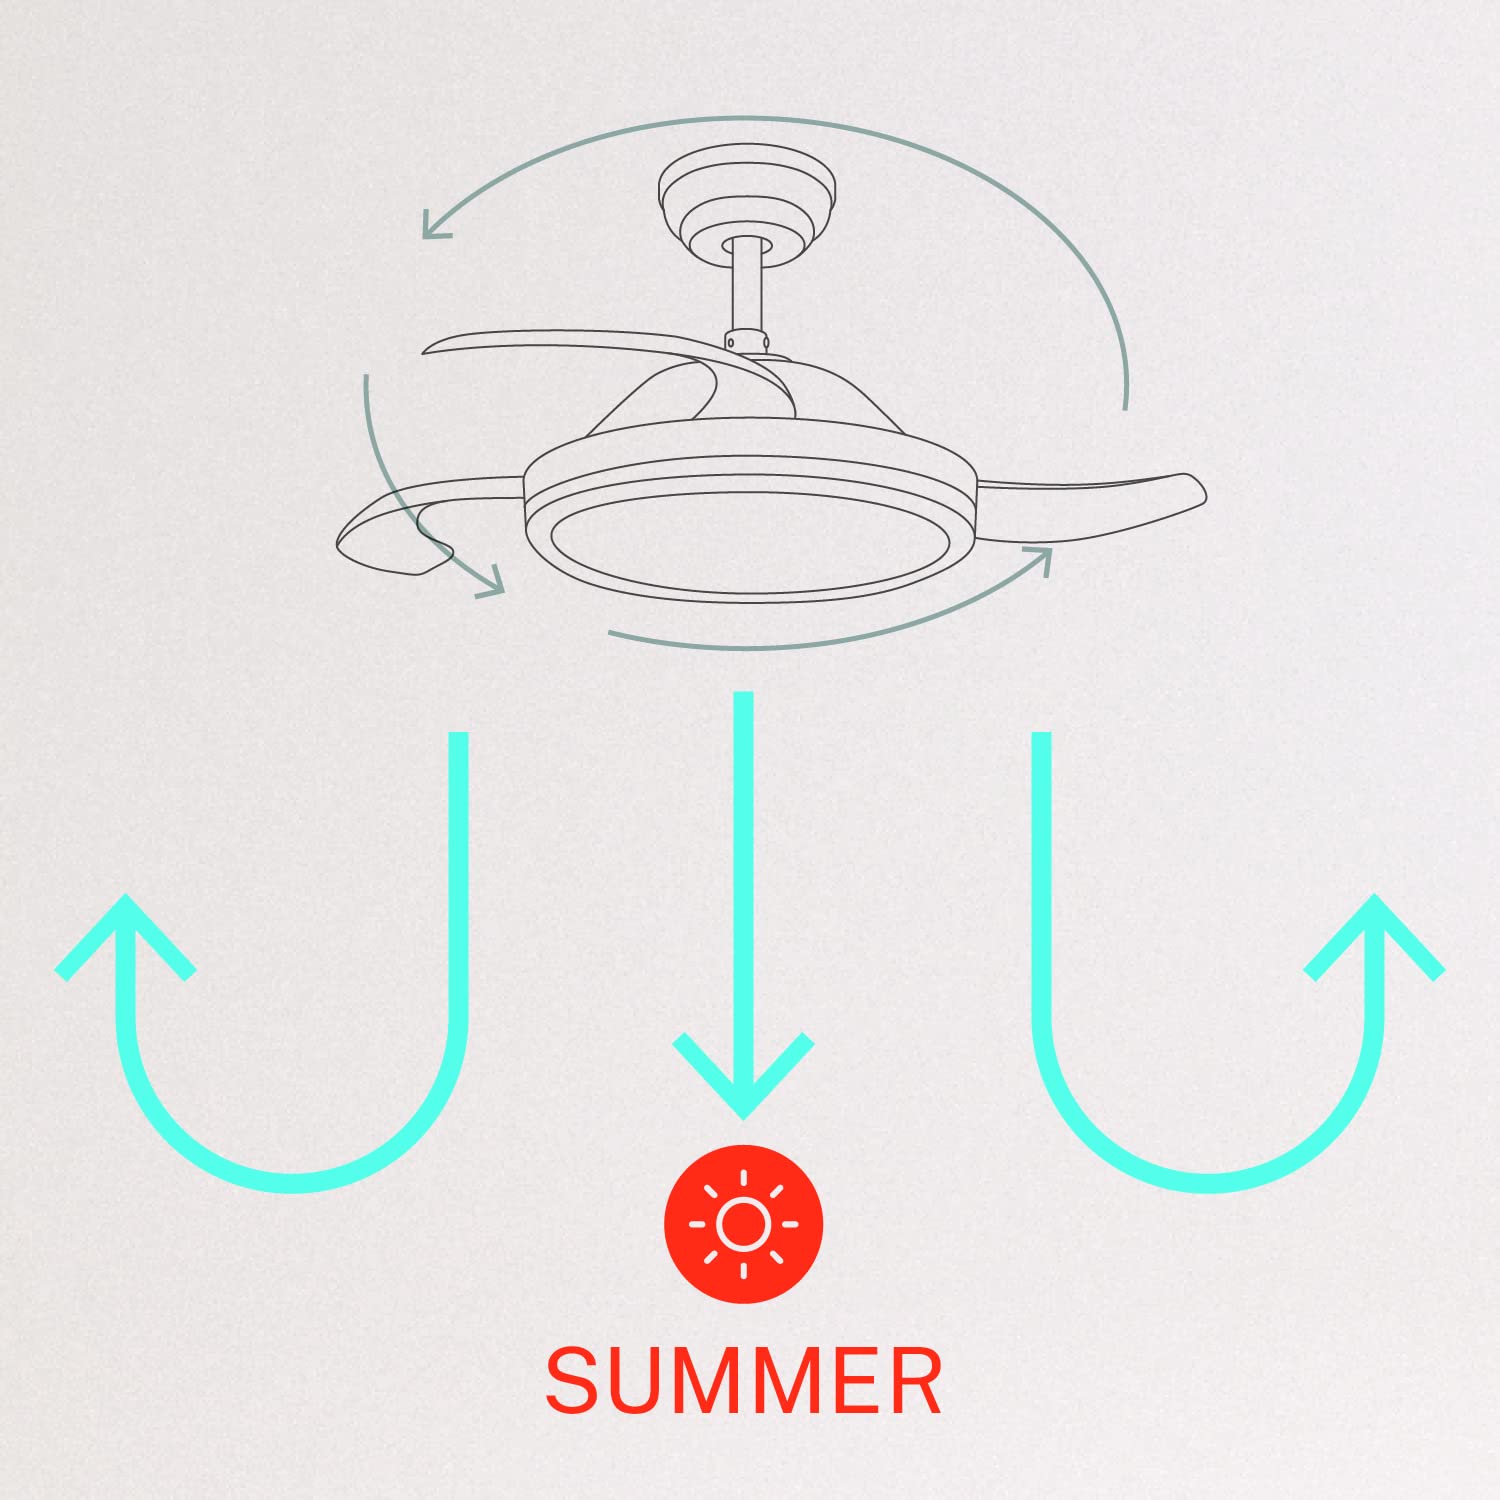
5.2 Winter and Summer Modes
The fan features a reversible motor to optimize air circulation for different seasons:
- سمر موڈ (گھڑی کی مخالف سمت میں گردش): The fan blades rotate counter-clockwise, pushing air downwards to create a cooling breeze.
- ونٹر موڈ (گھڑی کی سمت میں گردش): The fan blades rotate clockwise, drawing air upwards to circulate warm air trapped near the ceiling, helping to distribute heat more evenly.

6 دیکھ بھال
باقاعدگی سے دیکھ بھال آپ کے چھت کے پنکھے کی بہترین کارکردگی اور لمبی عمر کو یقینی بناتی ہے۔
- صفائی: وقتا فوقتا پنکھے کے بلیڈ اور موٹر ہاؤسنگ کو نرم سے صاف کریں، ڈیamp کپڑا کھرچنے والے کلینر یا سالوینٹس کا استعمال نہ کریں۔ صاف کرنے سے پہلے یقینی بنائیں کہ پنکھا بند ہے اور بجلی منقطع ہے۔
- پیچ کو سخت کرنا: Check all mounting screws and blade attachment screws annually to ensure they are properly tightened.
- روشنی کا ذریعہ: The LED light source is integrated. If it requires service, contact qualified personnel.
7 خرابیوں کا سراغ لگانا
اگر آپ کو اپنے پرستار کے ساتھ مسائل کا سامنا کرنا پڑتا ہے، تو درج ذیل عام مسائل اور حل دیکھیں:
| مسئلہ | ممکنہ وجہ | حل |
|---|---|---|
| پنکھا شروع نہیں ہوتا | No power supply; Loose wiring; Remote control battery depleted | Check circuit breaker; Verify all wiring connections; Replace remote control battery. |
| پنکھا ڈوبتا ہے۔ | Loose mounting screws; Unbalanced blades | Ensure mounting bracket and fan assembly screws are tight; Check for any obstructions to blade movement. |
| روشنی کام نہیں کرتی | Loose wiring; LED module fault | Check light kit wiring connections; Contact customer support if LED module is faulty. |
| ریموٹ کنٹرول کام نہیں کر رہا ہے۔ | Depleted battery; Remote not paired | Replace remote control battery; Refer to pairing instructions in the full manual. |
| WiFi control issues | Poor WiFi signal; Incorrect app setup | Ensure strong WiFi signal; Reconfigure WiFi connection in the app. |
8. وضاحتیں
| فیچر | تفصیل |
|---|---|
| برانڈ | تخلیق کریں۔ |
| ماڈل نمبر | 120760_254772 |
| رنگ | سفید |
| الیکٹرک فین ڈیزائن | پنکھا |
| طاقت کا منبع | کورڈڈ الیکٹرک |
| انداز | With WiFi |
| مصنوعات کے طول و عرض | 107D x 107W x 39H سینٹی میٹر |
| کمرے کی قسم | بیڈ روم |
| خصوصی خصوصیت | ٹائمر |
| تجویز کردہ استعمال | وینٹیلیٹنگ |
| واٹtage | 40 واٹ |
| شامل اجزاء | Remote, Battery |
For detailed product data and energy efficiency information, please refer to the following documents:

9. وارنٹی اور سپورٹ
For warranty information, technical support, or service inquiries, please contact CREATE customer service or refer to the official CREATE webسائٹ خریداری کے ثبوت کے طور پر اپنی خریداری کی رسید اپنے پاس رکھیں۔


