تعارف
This manual provides detailed instructions for the safe and efficient operation, maintenance, and troubleshooting of your Mr. Coffee 4-Shot Steam Espresso, Cappuccino, and Latte Maker, model BVMC-ECM271. Please read all instructions carefully before first use and retain this manual for future reference.

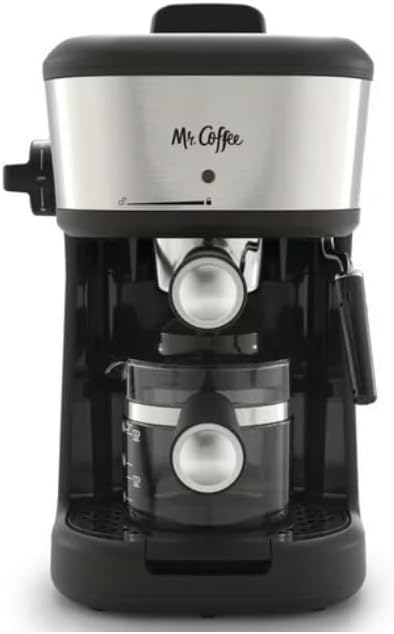
تصویر: سامنے view of the Mr. Coffee 4-Shot Steam Espresso, Cappuccino, and Latte Maker. The machine is black with a stainless steel front panel, featuring a portafilter, steam wand, and glass carafe.
اہم حفاظتی معلومات
آگ، برقی جھٹکا، اور/یا افراد کو چوٹ لگنے کے خطرے کو کم کرنے کے لیے برقی آلات استعمال کرتے وقت ہمیشہ بنیادی حفاظتی احتیاطی تدابیر پر عمل کریں۔
- تمام ہدایات پڑھیں۔
- گرم سطحوں کو مت چھونا۔ ہینڈل یا نوبس کا استعمال کریں۔
- بجلی کے جھٹکے سے بچانے کے لیے، ڈوری، پلگ، یا آلات کو پانی یا دیگر مائع میں نہ ڈبویں۔
- جب کوئی بھی آلات بچوں کے ذریعہ یا اس کے قریب استعمال ہوتا ہے تو قریبی نگرانی ضروری ہے۔
- استعمال میں نہ ہونے پر اور صفائی سے پہلے آؤٹ لیٹ سے ان پلگ کریں۔ پرزے لگانے یا اتارنے سے پہلے، اور آلات کو صاف کرنے سے پہلے ٹھنڈا ہونے دیں۔
- کسی بھی آلے کو خراب شدہ ڈوری یا پلگ سے یا آلات کی خرابی کے بعد، یا کسی بھی طرح سے نقصان پہنچانے کے بعد نہ چلائیں۔
- آلات کے مینوفیکچرر کی طرف سے تجویز کردہ آلات کے اٹیچمنٹ کے استعمال کے نتیجے میں آگ لگ سکتی ہے، بجلی کا جھٹکا لگ سکتا ہے یا لوگوں کو چوٹ لگ سکتی ہے۔
- باہر استعمال نہ کریں۔
- ڈوری کو میز یا کاؤنٹر کے کنارے پر لٹکنے نہ دیں، یا گرم سطحوں کو چھونے نہ دیں۔
- گرم گیس یا الیکٹرک برنر پر یا اس کے قریب یا گرم تندور میں نہ رکھیں۔
- ہمیشہ پلگ کو پہلے آلات سے جوڑیں، پھر دیوار کے آؤٹ لیٹ میں کورڈ لگائیں۔ منقطع کرنے کے لیے، کسی بھی کنٹرول کو "آف" کریں، پھر وال آؤٹ لیٹ سے پلگ ہٹا دیں۔
- مطلوبہ استعمال کے علاوہ آلات کا استعمال نہ کریں۔
- Scalding may occur if the reservoir cap is removed during the brewing cycle.
- یہ آلہ صرف گھریلو استعمال کے لیے ہے۔
اجزاء اور خصوصیات
Familiarize yourself with the parts of your Mr. Coffee Espresso Maker.
- پانی کے ذخائر کی ٹوپی
- بھاپ کنٹرول نوب۔
- پاور آن/آف سوئچ
- اشارے کی روشنی
- پورٹافلٹر ہینڈل
- پورٹافلٹر
- Glass Carafe with Stay-Cool Handle and Measuring System
- ڈرپ ٹرے
- Steam Wand / Frothing Wand
- ماپنے کا سکوپ
تصویر: سامنے view of the espresso maker highlighting various components such as the portafilter, steam wand, and control knob.
سیٹ اپ اور پہلا استعمال
پیک کھولنا
- تمام پیکیجنگ مواد کو احتیاط سے ہٹا دیں۔
- Wash the portafilter, glass carafe, and measuring scoop in warm, soapy water. Rinse thoroughly and dry.
- Wipe the exterior of the espresso maker with a damp کپڑا
Priming the Unit (Before First Use)
Before brewing coffee or frothing milk for the first time, it is essential to prime the unit to remove any manufacturing residues and ensure proper operation.
- Fill the glass carafe with cold water up to the 4-shot mark.
- Pour the water from the carafe into the water reservoir, located at the top of the machine. Securely close the water reservoir cap.
- خالی شیشے کی کیفے کو ڈرپ ٹرے پر رکھیں۔
- Ensure the portafilter is securely locked into place (without coffee).
- Turn the Steam Control Knob to the "Brew" position.
- Plug the espresso maker into a standard electrical outlet.
- Press the Power On/Off switch to the "On" position. The indicator light will illuminate.
- Allow the water to heat and brew through the portafilter into the carafe.
- Once all water has brewed, turn the Power On/Off switch to "Off" and unplug the unit.
- Discard the water and rinse the carafe. The unit is now primed and ready for use.
آپریٹنگ ہدایات
ایسپریسو پینا
- پورٹ فلٹر تیار کریں: Using the measuring scoop, add desired amount of finely ground espresso coffee into the portafilter. For a single shot, use one scoop; for a double shot, use two scoops. Gently tamp the coffee grounds evenly.
- پورٹ فلٹر منسلک کریں: Align the portafilter with the group head and twist firmly to the right until it is securely locked in place.
- پانی کے ذخائر کو بھریں: Fill the glass carafe with cold water to the desired level (2-shot or 4-shot mark). Pour this water into the water reservoir and close the cap.
- پوزیشن کیفے: Place the empty glass carafe on the drip tray directly under the portafilter.
- شراب بنانا شروع کریں:
- Ensure the Steam Control Knob is in the "Brew" position.
- Plug in the unit and press the Power On/Off switch to "On". The indicator light will illuminate.
- Allow the machine to heat up for approximately 2-3 minutes until the indicator light turns off, signaling it's ready to brew.
- Once the light is off, turn the Steam Control Knob to the "Brew" position. Hot water will begin to flow through the coffee grounds into the carafe.
- When the desired amount of espresso has been brewed, turn the Power On/Off switch to "Off".
- سرو کریں: Carefully remove the carafe and serve your fresh espresso.
Frothing Milk for Cappuccinos and Lattes
The integrated frothing wand allows you to create rich, frothy milk for your favorite specialty drinks.
- دودھ تیار کریں: Fill a stainless steel frothing pitcher (not included, but recommended) with cold milk (dairy or non-dairy) up to one-third full.
- بھاپ کی چھڑی کی پوزیشن: دودھ کی سطح کے بالکل نیچے بھاپ کی چھڑی کی نوک کو ڈوبیں۔
- Generate Steam:
- Ensure the Power On/Off switch is "On" and the indicator light is off (meaning it's heated).
- Slowly turn the Steam Control Knob to the "Steam" position. Steam will begin to release from the wand.
- Hold the pitcher at a slight angle, moving it up and down gently to incorporate air and create foam.
- Continue until the milk reaches the desired temperature and froth consistency. Be careful not to overheat the milk.
- بھاپ لینا بند کریں: Turn the Steam Control Knob back to the "Off" position.
- صاف چھڑی: اشتہار کے ساتھ بھاپ کی چھڑی کو فوری طور پر صاف کریں۔amp cloth to prevent milk residue from drying. Briefly turn the steam knob to "Steam" again to clear any milk from inside the wand, then turn it off.
- یکجا کریں: Pour the frothed milk over your freshly brewed espresso to create a cappuccino or latte.
دیکھ بھال اور دیکھ بھال
روزانہ صفائی
- ہر استعمال کے بعد:
- یونٹ کو ان پلگ کریں اور اسے مکمل طور پر ٹھنڈا ہونے دیں۔
- Remove the portafilter, discard used coffee grounds, and rinse the portafilter and filter basket under warm water.
- Wash the glass carafe and measuring scoop in warm, soapy water.
- اشتہار کے ساتھ مشین کے بیرونی حصے کو صاف کریں۔amp کپڑا
- Clean the drip tray and grid.
- Wipe the steam wand immediately after frothing.
کم کرنا (ہر 2-3 ماہ بعد یا ضرورت کے مطابق)
Mineral deposits from water can affect the performance of your espresso maker. Descaling helps maintain optimal function.
- Prepare a descaling solution by mixing equal parts white vinegar and water. Fill the water reservoir with this solution.
- Place the empty carafe on the drip tray.
- Turn the Steam Control Knob to "Brew".
- Plug in the unit and turn the Power On/Off switch to "On".
- Allow half of the solution to brew through the portafilter into the carafe.
- Turn the Power On/Off switch to "Off" and let the unit sit for 15-20 minutes.
- Turn the Power On/Off switch to "On" and brew the remaining solution.
- Once complete, turn the Power On/Off switch to "Off", discard the solution, and rinse the carafe.
- Run two full cycles of fresh, cold water through the machine to rinse thoroughly.
خرابی کا سراغ لگانا
| مسئلہ | ممکنہ وجہ | حل |
|---|---|---|
| کوئی کافی brews نہیں. |
|
|
| ایسپریسو بہت آہستہ سے پکتا ہے یا بالکل نہیں۔ |
|
|
| Espresso is weak. |
|
|
| Steam wand not producing steam or producing weak steam. |
|
|
وضاحتیں
| برانڈ: | مسٹر کافی |
| ماڈل کا نام: | BVMC-ECM271 |
| مصنوعات کے طول و عرض: | 10"D x 10"W x 12"H |
| آئٹم کا وزن: | 6.44 پاؤنڈ |
| رنگ: | سیاہ |
| بیرونی ختم: | سٹینلیس سٹیل |
| آپریشن موڈ: | مکمل طور پر خودکار |
| مخصوص استعمال: | کیپوچینو، ایسپریسو، لیٹے۔ |
| UPC: | 053891150118 |

Image: Diagram showing the dimensions of the Mr. Coffee 4-Shot Steam Espresso, Cappuccino, and Latte Maker, measuring 10 inches deep, 10 inches wide, and 12 inches high.
وارنٹی اور سپورٹ
وارنٹی کی معلومات، پروڈکٹ رجسٹریشن، یا کسٹمر سپورٹ کے لیے، براہ کرم آفیشل مسٹر کافی پر جائیں۔ webسائٹ یا ان کے کسٹمر سروس ڈیپارٹمنٹ سے رابطہ کریں۔
Official Mr. Coffee Webسائٹ: www.mrcoffee.com
Please have your model number (BVMC-ECM271) and proof of purchase available when contacting support.


