1. تعارف
This manual provides detailed instructions for the safe and effective operation, setup, and maintenance of your Ortur Laser Master 2 S2 LU2-10A Laser Engraver and Cutter, along with the Ortur Laser Rotary Roller. Please read this manual thoroughly before using the device to ensure proper functionality and safety.
2. حفاظتی معلومات
WARNING: This product uses a high-power laser. Improper use can cause serious injury, including eye damage and burns. Always wear appropriate laser safety goggles when operating the device. Never look directly at the laser beam.
درج ذیل حفاظتی تدابیر پر عمل کریں:
- آنکھوں کی حفاظت: Always wear certified laser safety goggles.
- وینٹیلیشن: Operate in a well-ventilated area to dissipate fumes and smoke generated during engraving/cutting.
- آگ کا خطرہ: Keep a fire extinguisher nearby. Do not leave the machine unattended during operation.
- مواد کی مطابقت: Only engrave or cut materials suitable for laser processing. Avoid reflective, flammable, or PVC materials.
- بچے اور پالتو جانور: بچوں اور پالتو جانوروں کو آپریٹنگ ایریا سے دور رکھیں۔
- ایمرجنسی اسٹاپ: Familiarize yourself with the emergency stop button location.
The Ortur Laser Master 2 S2 LU2-10A includes the following safety protections:
- Exposure Duration Detection
- Laser Beam Safety Guard
- پاور کنٹرول سسٹم
- Position Movement Protection
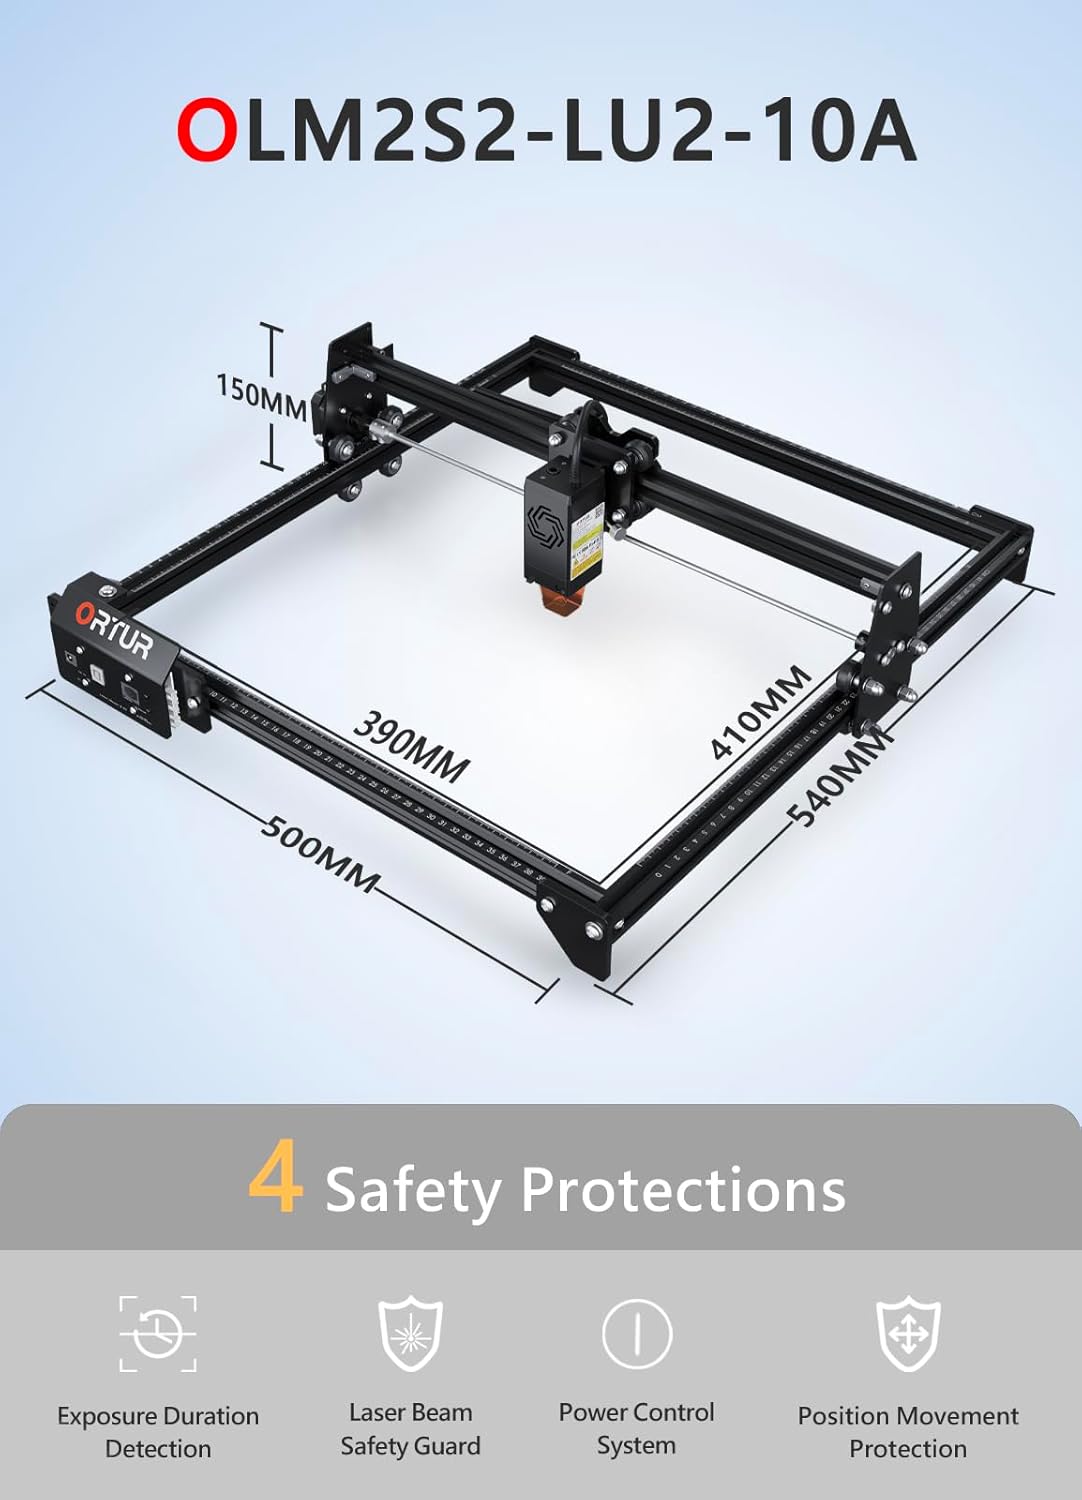
تصویر: ختمview of the Ortur Laser Master 2 S2 LU2-10A, showing its dimensions and highlighting its four safety protection features: Exposure Duration Detection, Laser Beam Safety Guard, Power Control System, and Position Movement Protection.
3. پیکیج کے مشمولات
Upon unpacking, verify that all components are present. The package typically includes:
- Ortur Laser Master 2 S2 Engraver Frame
- LU2-10A Laser Module (10W Output Power)
- Ortur Laser Rotary Roller (YRR2.0)
- پاور اڈاپٹر اور کیبلز
- USB کیبل
- حفاظتی چشمے۔
- اسمبلی کے اوزار اور پیچ
- Sampجانچ کے لیے مواد
- صارف دستی (یہ دستاویز)

Image: The complete Ortur Laser Master 2 S2 LU2-10A laser engraver with the 10W laser module, shown alongside the Ortur Laser Rotary Roller and various engraved sample items.
4. پروڈکٹ ختمview
4.1 Ortur Laser Master 2 S2 LU2-10A Engraver
The Ortur Laser Master 2 S2 LU2-10A is a high-performance laser engraver and cutter featuring a powerful 10W optical output laser module. It is designed for precision engraving and efficient cutting of various materials.
- لیزر ماڈیول: LU2-10A, 10W optical power.
- Compressed Spot: 0.05mm x 0.1mm for fine detail.
- کاٹنے کی صلاحیت: Can cut up to 30mm acrylic and 20mm wood.
- کندہ کاری کا علاقہ: 390 ملی میٹر x 410 ملی میٹر۔
- Air-Assist Interface: Built-in for enhanced cutting performance.
- ساخت: Industrial-grade full metal design for reliability and accuracy.

Image: Close-up of the Ortur LU2-10A laser module, illustrating its higher precision with a smaller compressed spot size (0.05x0.1mm) compared to other modules.

Image: Demonstrates the cutting capability of the Ortur LU2-10A laser module, showing clean cuts through 12mm thick black acrylic and 15mm thick plywood in a single pass.

تصویر: پھٹا view of the Ortur 10W laser module, detailing its internal components including air intake, dual fans, laser diodes, focus gauge, and protective cover.
4.2 Ortur Laser Rotary Roller (YRR2.0)
The Ortur Laser Rotary Roller is an accessory designed for engraving cylindrical or irregularly shaped objects that cannot be processed on a flat bed. It expands the versatility of your laser engraver.
- فنکشن: Enables 360° rotating engraving on cylindrical objects.
- Adjustable Diameters: Features 7 adjustable diameter settings, accommodating objects from 8mm to 110mm.
- مطابقت: Suitable for items such as cups, bottles, pipes, and small diameter cylinders.

Image: Close-up of the Ortur Rotary Roller, illustrating its gear mechanism and the 7 adjustable diameter settings for engraving objects of various sizes, from 8mm to 100mm.

Image: The Ortur Rotary Roller in operation, demonstrating 360° rotating engraving on a cylindrical object (a beverage can).

تصویر: ایک کولاج شوasing various items that can be engraved using the rotary roller, including wine glasses, bottles, tumblers, rolling pins, rings, and pens.
5. سیٹ اپ
5.1 Main Unit Assembly
The Ortur Laser Master 2 S2 LU2-10A features a modular design for easy assembly. Typically, assembly can be completed within 10-15 minutes by following the included quick start guide or video instructions.
- تمام اجزاء کو کھولیں اور پیکیج کے مواد کی فہرست کے خلاف تصدیق کریں۔
- Assemble the frame according to the provided diagrams, securing all screws.
- Install the LU2-10A laser module onto the gantry.
- Connect all necessary cables (power, USB, motor cables).
- Ensure the machine is placed on a stable, level surface in a well-ventilated area.
5.2 Rotary Roller Connection
To use the Ortur Laser Rotary Roller, connect it to the engraver's dedicated rotary axis port. Specific connection details can be found in the rotary roller's supplementary guide.
- Ensure the main engraver is powered off.
- Connect the rotary roller's motor cable to the designated port on the engraver's control board.
- Place the rotary roller on a stable surface within the engraver's working area.
- Adjust the height of the engraver's gantry or the rotary roller's support to ensure proper focus on the cylindrical object.
6. آپریٹنگ ہدایات
6.1 سافٹ ویئر کی مطابقت
The Ortur Laser Master 2 S2 LU2-10A is compatible with popular laser engraving software:
- لیزر جی آر بی ایل: Free software, compatible with Windows 7 / 8 / XP / 10 / 11.
- لائٹ برن: Paid software, compatible with Windows 7 / 8 / XP / 10 / 11 and macOS.
حمایت کی file formats include SVG, DXF, JPG, JPEG, PNG, BMP, TIF, CR2, etc.
6.2 Basic Engraving/Cutting Process
- ڈیزائن کی تیاری: Create or import your design in your chosen software.
- مواد کی جگہ کا تعین: Place the material securely on the engraving bed.
- فوکس ایڈجسٹمنٹ: Adjust the laser module's focus using the integrated focus gauge.
- سافٹ ویئر کی ترتیبات: Configure laser power, speed, and passes based on the material type and desired outcome.
- Frame Test: Use the software's framing function to ensure the design fits within the material.
- آپریشن شروع کریں: Initiate the engraving or cutting process. Monitor the machine closely.
6.3 روٹری رولر کا استعمال
When engraving cylindrical objects, the rotary roller replaces the standard flat bed operation.
- Install Rotary Roller: Connect the rotary roller as described in Section 5.2.
- جگہ آبجیکٹ: Secure the cylindrical object (e.g., cup, bottle) onto the rotary roller.
- Adjust Diameter: Set the rotary roller to the appropriate diameter using its adjustable gears (7 steps, 8mm to 110mm).
- Focus Laser: Adjust the laser module height to focus on the surface of the cylindrical object.
- سافٹ ویئر کی تشکیل: In your engraving software (e.g., LightBurn), enable the rotary axis and input the correct diameter and steps per rotation settings.
- کندہ کاری شروع کریں: Proceed with the engraving process, ensuring the object rotates smoothly.
7 دیکھ بھال
Regular maintenance ensures optimal performance and extends the lifespan of your laser engraver.
- صاف لیزر لینس: Periodically clean the laser module's lens with a lint-free cloth and lens cleaning solution.
- ریلوں اور پہیوں کو صاف کریں: Keep the guide rails and wheels free from dust and debris to ensure smooth movement.
- موونگ پارٹس کو چکنا کرنا: Apply a small amount of lubricant to the guide rails and lead screws as needed.
- فرم ویئر اپ ڈیٹس: Check the Ortur official webآپ کی مشین کے لیے کسی بھی دستیاب فرم ویئر اپ ڈیٹس کے لیے سائٹ۔
- کیبلز کا معائنہ کریں: پہننے یا نقصان کے لیے تمام کیبلز کو باقاعدگی سے چیک کریں۔
8 خرابیوں کا سراغ لگانا
اگر آپ کو مسائل درپیش ہیں تو درج ذیل عام مسائل اور حل کا حوالہ دیں:
- No Laser Output:
- Check power connection and laser module cable.
- Ensure safety features (e.g., tilt sensor) are not triggered.
- Verify software settings for laser power.
- Machine Not Connecting to Computer:
- USB کیبل کنکشن چیک کریں۔
- Install necessary drivers for the engraver.
- ایک مختلف USB پورٹ یا کیبل آزمائیں۔
- ناقص کندہ کاری/کاٹنے کا معیار:
- Verify laser focus is correctly set.
- Adjust laser power and speed settings for the material.
- لیزر لینس کو صاف کریں۔
- Ensure the material is flat and securely held.
- Rotary Roller Not Rotating:
- Check the rotary roller's motor cable connection.
- Ensure rotary axis is enabled and configured correctly in software.
- Verify the object is not too heavy or causing friction.
For further assistance, consult the Ortur support webسائٹ یا کسٹمر سروس سے رابطہ کریں۔
9. وضاحتیں
9.1 Ortur Laser Master 2 S2 LU2-10A Engraver
- ماڈل: Laser Master 2 S2 LU2-10A
- لیزر ماڈیول: LU2-10A (10W Optical Output Power)
- Compressed Spot Size: 0.05 ملی میٹر x 0.1 ملی میٹر
- کندہ کاری کا علاقہ: 390 ملی میٹر x 410 ملی میٹر
- Machine Dimensions (Approx.): 500mm (L) x 540mm (W) x 150mm (H)
- کاٹنے کی صلاحیت: Up to 30mm acrylic, 20mm wood
- مطابقت: Windows 7/8/XP/10/11, macOS (with LightBurn)
- حمایت کی File فارمیٹس: SVG, DXF, JPG, JPEG, PNG, BMP, TIF, CR2, etc.
9.2 Ortur Laser Rotary Roller (YRR2.0)
- ماڈل: YRR2.0
- Adjustable Engraving Diameter: 8mm to 110mm (7 steps)
- طول و عرض (تقریباً): 129mm (L) x 184mm (W) x 81mm (H)

Image: Technical specifications and dimensions of the Ortur Laser Rotary Roller, showing approximate measurements of 129mm in length, 184mm in width, and 81mm in height.
10. وارنٹی اور سپورٹ
Ortur products come with a standard manufacturer's warranty. Please refer to the warranty card included with your product or visit the official Ortur webتفصیلی وارنٹی شرائط و ضوابط کے لیے سائٹ۔
For technical support, troubleshooting assistance, or spare parts, please contact Ortur customer service through their official website or the retailer where you purchased the product. Provide your product model and serial number for faster service.


