1. تعارف
This manual provides instructions for the VETEK 4K 64MP Camcorder, model NPX108-2. This device is designed for high-quality video recording and photography, featuring 4K Ultra HD video resolution at 60 frames per second (FPS) and 64-megapixel image resolution. It includes an 18X digital zoom, a 4.0-inch 270-degree rotating touchscreen, and WiFi connectivity. The camcorder is equipped with an external microphone, a handheld stabilizer, and a 2.4G wireless remote control to enhance your recording experience.
پیکیج کا مواد:
- VETEK 4K 64MP Camcorder
- DV-108 Battery (4500mAh)
- 64 جی بی ایس ڈی کارڈ
- USB کیبل
- 2.4G وائرلیس ریموٹ کنٹرول
- ہینڈ ہیلڈ سٹیبلائزر۔
- لینس ہڈ
- بیرونی مائیکروفون
- ایل ای ڈی فل فل لائٹ
- صارف دستی
- کیمرے بیگ

2. جزو ختمview
Familiarize yourself with the various parts and controls of your camcorder.

بندرگاہیں اور انٹرفیس:

کنٹرولز:

3. ابتدائی سیٹ اپ
3.1 بیٹری چارج کرنا
Insert the provided DV-108 battery into the camcorder. Connect the camcorder to a power source using the USB cable. The battery takes approximately 4-5 hours to fully charge and provides about 3 hours of continuous use.

3.2 SD کارڈ داخل کرنا
Locate the SD card slot on the camcorder. Insert the provided 64GB SD card into the slot until it clicks into place. Ensure the card is inserted correctly to avoid damage.
3.3 لوازمات منسلک کرنا
- بیرونی مائکروفون: Attach the external microphone to the hot shoe mount on top of the camcorder and connect its cable to the MIC port.
- ہینڈ ہیلڈ سٹیبلائزر: Secure the handheld stabilizer to the bottom tripod mount of the camcorder for improved stability during recording.
- لینس ہڈ: Attach the lens hood to the front of the lens to protect it and reduce glare.
4. آپریٹنگ ہدایات
4.1 پاور آن/آف
Press and hold the Power button to turn the camcorder on or off.
4.2 ویڈیو ریکارڈ کرنا اور تصاویر لینا
Use the Mode button to switch between video recording and photo capture modes. Press the Quick Video button to start/stop video recording or the Quick Photo button to take a picture.


4.3 ڈیجیٹل زوم۔
The camcorder features an 18X digital zoom. Use the zoom controls (W/T buttons) on the camcorder or the handheld stabilizer to adjust the zoom level.

4.4 ٹچ اسکرین آپریشن
The 4.0-inch 270-degree rotating touchscreen allows for easy navigation of menus, settings, and playback of recordings.
4.5 وائی فائی کنیکٹیویٹی
Connect the camcorder to your smartphone via WiFi using the XDV PRO app. This allows you to view recordings, control the camera remotely, and transfer files.


4.6 Webکیمرے کی فعالیت
Connect the camcorder to a computer using the USB cable and select "PC CAM" mode to use it as a webcam for video calls and streaming.


4.7 2.4G Remote Control
The included 2.4G wireless remote control allows you to operate the camcorder from up to 65 feet away in any direction.

4.8 بیرونی مائیکروفون
The external microphone utilizes X-Y Stereo Pickup Technology to effectively reduce background noise and improve audio quality. Adjust the sound sensitivity from -10dB to +20dB for optimal audio capture.

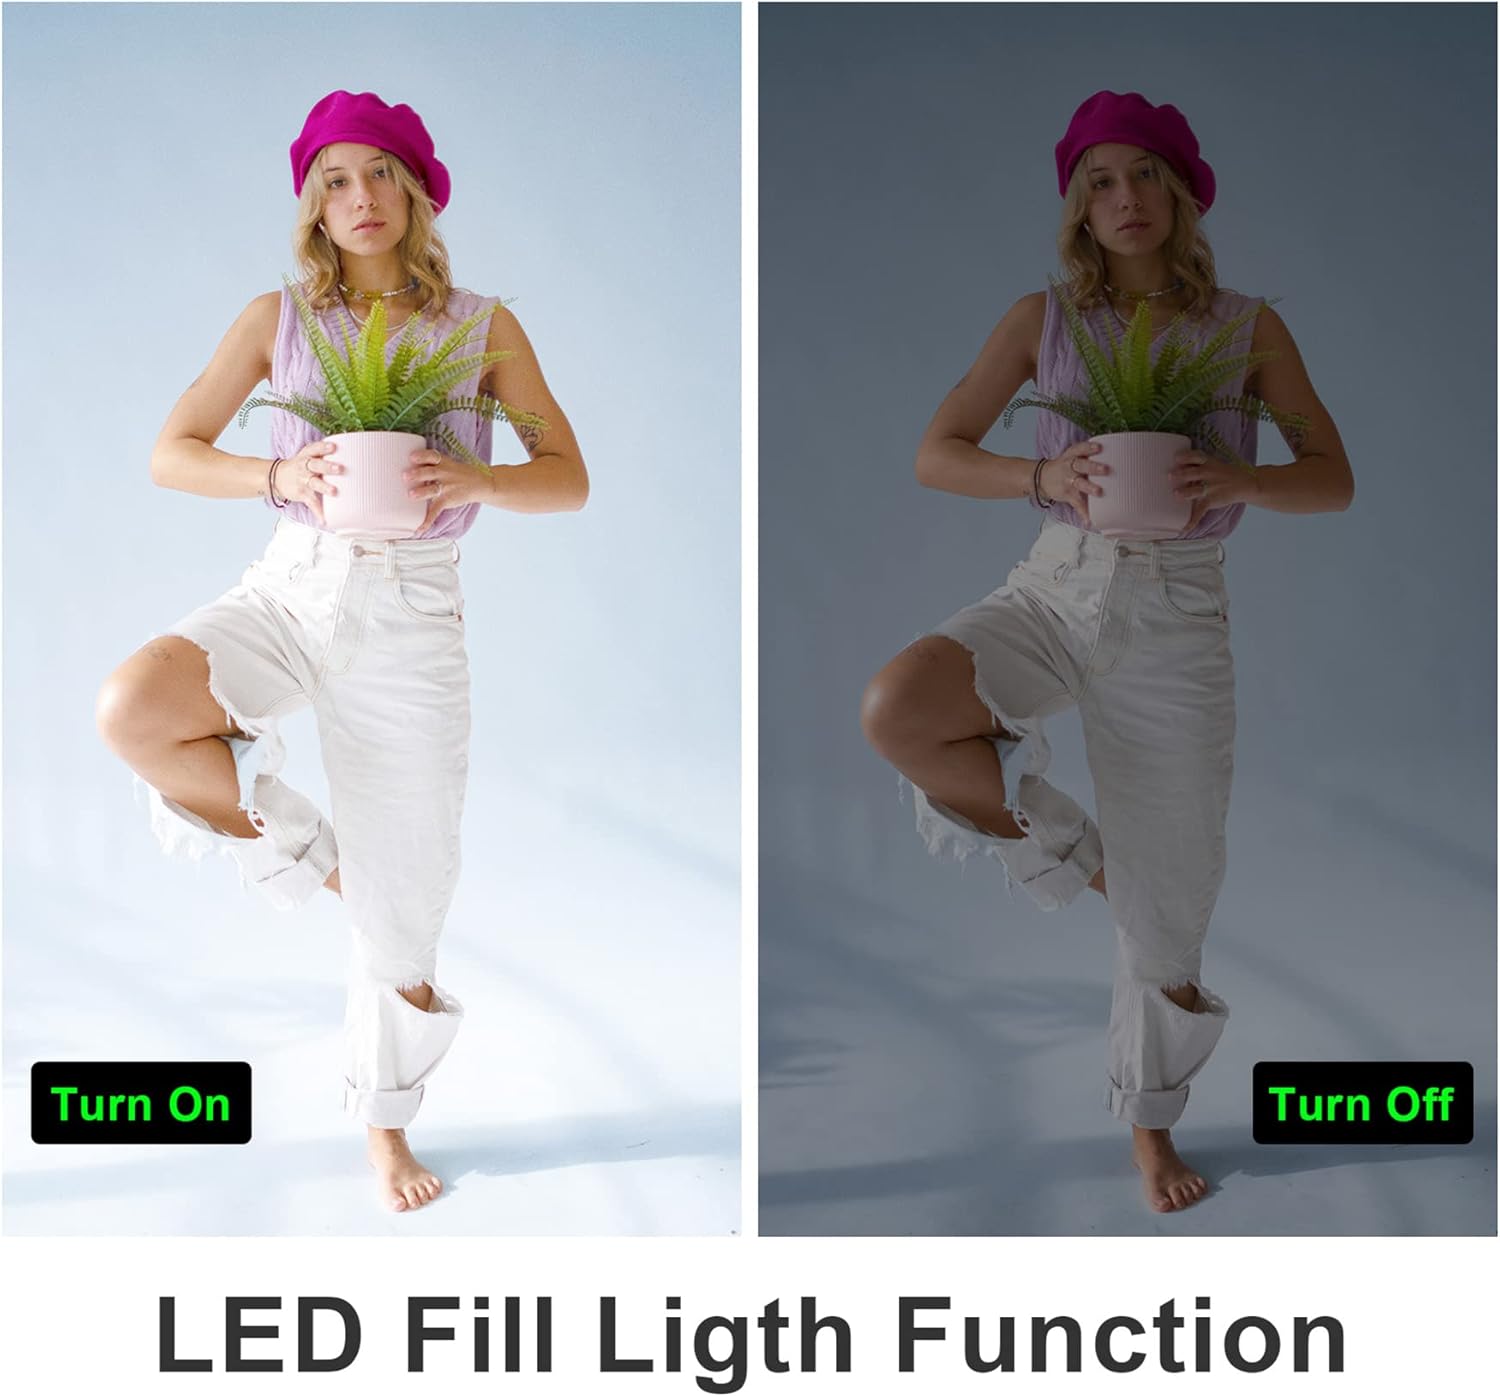
4.9 LED Fill Light
Activate the built-in LED fill light for improved illumination in low-light conditions.
4.10 Slow Motion and Time-Lapse
The camcorder supports slow-motion recording for capturing fast-moving objects and time-lapse recording for condensing long events into short videos.

4.11 HDMI آؤٹ پٹ
Connect the camcorder to a TV or monitor using an HDMI cable (not included) to view ایک بڑی اسکرین پر آپ کی ریکارڈنگ۔

5 دیکھ بھال
5.1 بیٹری کی دیکھ بھال
- پہلے استعمال سے پہلے بیٹری کو مکمل چارج کریں۔
- بیٹری کو انتہائی درجہ حرارت کے سامنے لانے سے گریز کریں۔
- If not using the camcorder for an extended period, remove the battery.
5.2 صفائی
- Use a soft, dry cloth to clean the camcorder body.
- For the lens and touchscreen, use a specialized lens cleaning cloth and solution.
- کھرچنے والے کلینر یا سالوینٹس کا استعمال نہ کریں۔
5.3 اسٹوریج
Store the camcorder in a cool, dry place away from direct sunlight and dust. Use the provided camera bag for protection during transport.
6 خرابیوں کا سراغ لگانا
Refer to the following tips for common issues:
- Fixed Focal Length: This camera has a fixed focal length and does not support optical zoom. Zooming is digital.
- Autofocus Delay: Autofocus may require a 2-3 second delay buffer time to adjust.
- ویڈیو کا معیار: The quality of recorded video may not be as high as still photos, especially in challenging lighting conditions.
- Microphone Range: The built-in microphone has a pickup distance of approximately 6.5 feet. The external microphone can extend this range to about 16.4 feet.
- کیمرا آن نہیں ہو رہا ہے: یقینی بنائیں کہ بیٹری پوری طرح سے چارج ہے اور صحیح طریقے سے ڈالی گئی ہے۔
- SD کارڈ کی خرابی: Ensure the SD card is inserted correctly and is not full or corrupted. Try reformatting the card (this will erase all data).
- وائی فائی کنکشن کے مسائل: Ensure the XDV PRO app is installed and the camcorder's WiFi is enabled. Check your smartphone's WiFi settings.

7. وضاحتیں
| فیچر | تفصیلات |
|---|---|
| ماڈل نمبر | NPX108-2 |
| ویڈیو ریزولوشن | 4K Ultra HD (3840x2160) @ 60FPS |
| تصویری ریزولوشن | 64 میگا پکسلز |
| ڈیجیٹل زوم۔ | 18X |
| اسکرین کا سائز | 4.0-inch Touch Screen (270-degree rotation) |
| کنیکٹوٹی | WiFi, USB, HDMI |
| بیٹری کی صلاحیت | 4500mAh لتیم پولیمر |
| بیٹری کی زندگی | Approx. 3 hours recording |
| ذخیرہ | SD Card (up to 64GB included) |
| خصوصی خصوصیات | Anti-shake, Face Detection, Night Vision, Webcam Mode, Slow Motion, Time-Lapse, External MIC Support, LED Fill Light |
| طول و عرض | 6.8 x 3.2 x 3.8 انچ |
| وزن | 3.61 پاؤنڈ |
8. وارنٹی کی معلومات
VETEK products typically come with a standard manufacturer's warranty. Please refer to the warranty card included in your package or contact customer support for specific details regarding warranty coverage and duration.
9. کسٹمر سپورٹ
For further assistance, technical support, or inquiries regarding your VETEK 4K 64MP Camcorder, please visit the official VETEK website or contact their customer service department. Contact information can usually be found on the product packaging or the brand's online store.


