1. تعارف
Thank you for choosing the TERUNSOUl D016 4K+4K Dual Dash Cam. This device is designed to provide comprehensive video surveillance for your vehicle, recording both front and rear views in high definition. It features advanced functionalities such as built-in GPS, 5.8GHz WiFi for app control, G-Sensor for incident detection, enhanced night vision, and 24-hour parking monitoring. Please read this manual thoroughly before use to ensure proper installation and operation.
2. پروڈکٹ ختمview

Image: The TERUNSOUl D016 dash cam system, showing the main front camera unit, the smaller rear camera, the suction cup mount, and an included 128GB microSD card.
The TERUNSOUl D016 is a high-performance dual dash camera system. Key features include:
- Dual 4K Recording: Simultaneous front and rear recording at 3840x2160P resolution.
- 170° چوڑا زاویہ: Front camera provides a wide field of view.
- بلٹ ان GPS: Records driving routes, locations, and speed data.
- 5.8GHz WiFi & App Control: Connects to the TERUNSOUl App for live viewing, video management, and firmware updates.
- جی سینسر: ویڈیو foo کو خود بخود لاک کر دیتا ہے۔tage during collisions or sudden impacts.
- Super Starlight Night Vision: Enhanced clarity in low-light conditions with F1.5 (front) and F1.8 (rear) apertures.
- 24 گھنٹے پارکنگ کی نگرانی: Time-lapse recording and G-sensor detection for vehicle protection when parked (requires hardwire kit, sold separately).
- لوپ ریکارڈنگ: Ensures continuous recording by overwriting the oldest unlocked files.
- 128GB مائیکرو ایس ڈی کارڈ شامل: فوری استعمال کے لیے تیار، 512GB تک سپورٹ کرتا ہے۔
3. پیکیج کے مشمولات
براہ کرم تصدیق کریں کہ تمام اشیاء آپ کے پیکیج میں موجود ہیں:
- 4K Dash Cam (Front Unit)
- 4K پیچھے والا کیمرہ
- GPS Suction Cup Mount
- TERUNSOUl 128GB microSD Card (pre-installed)
- 21ft Rear Cam Extension Cable
- 11ft USB-C Fast Car Charger
- صارف دستی
- کوئیک اسٹارٹ گائیڈ
- 5x کیبل کلپس
- وائر ٹرم ٹول
- Electrostatic Films
- پیڈ کی صفائی
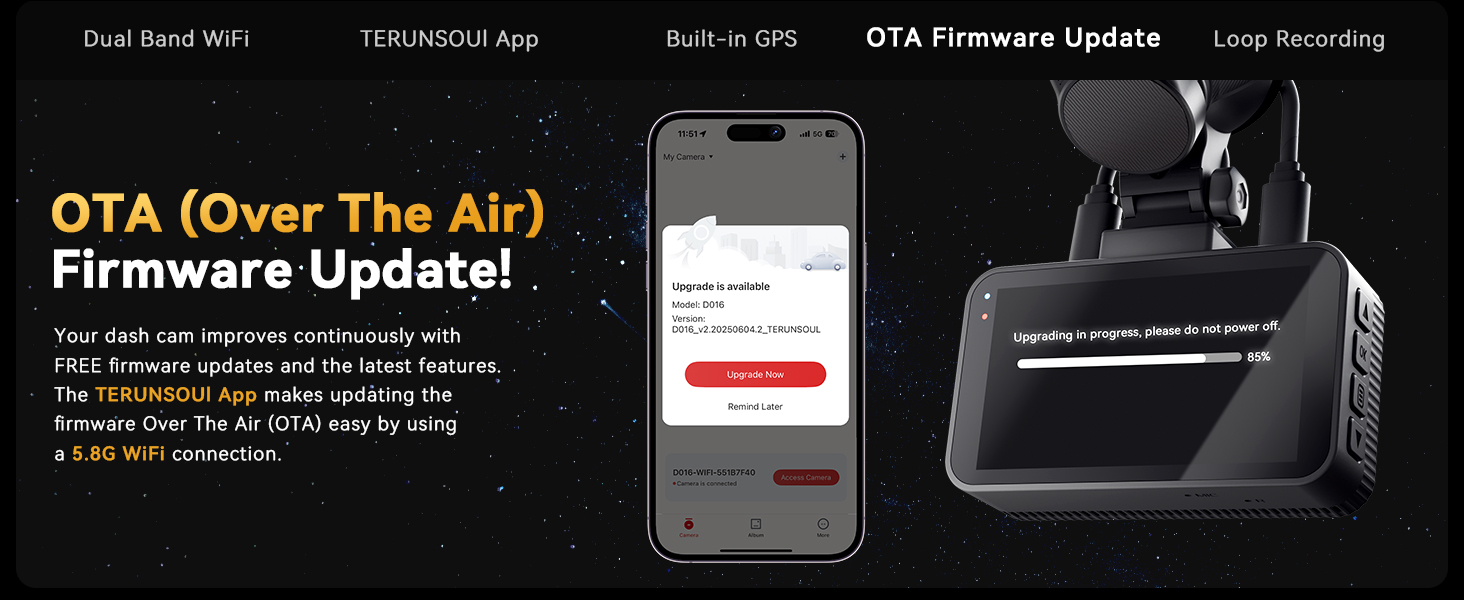
Image: An illustration detailing all components included in the TERUNSOUl D016 dash cam package.
4. سیٹ اپ اور انسٹالیشن
4.1 Memory Card Installation and Formatting
The 128GB microSD card is pre-installed. Before first use, or if you replace the card, it is recommended to format it within the dash cam's settings to ensure optimal performance. The dash cam supports up to 512GB microSD cards.
- Insert the microSD card into the designated slot (if not already inserted).
- ڈیش کیم پر پاور۔
- Navigate to the system settings menu.
- Select "Format SD Card" and confirm.
4.2 ڈیش کیم کو لگانا
- Clean the windshield area where you intend to mount the front camera. Ensure it does not obstruct your view.
- Attach the electrostatic film to the chosen area on the windshield.
- Attach the GPS suction cup mount to the electrostatic film.
- Slide the main dash cam unit onto the GPS suction cup mount until it clicks into place.
- صاف کو یقینی بنانے کے لیے کیمرے کے زاویے کو ایڈجسٹ کریں۔ view آگے سڑک کے.
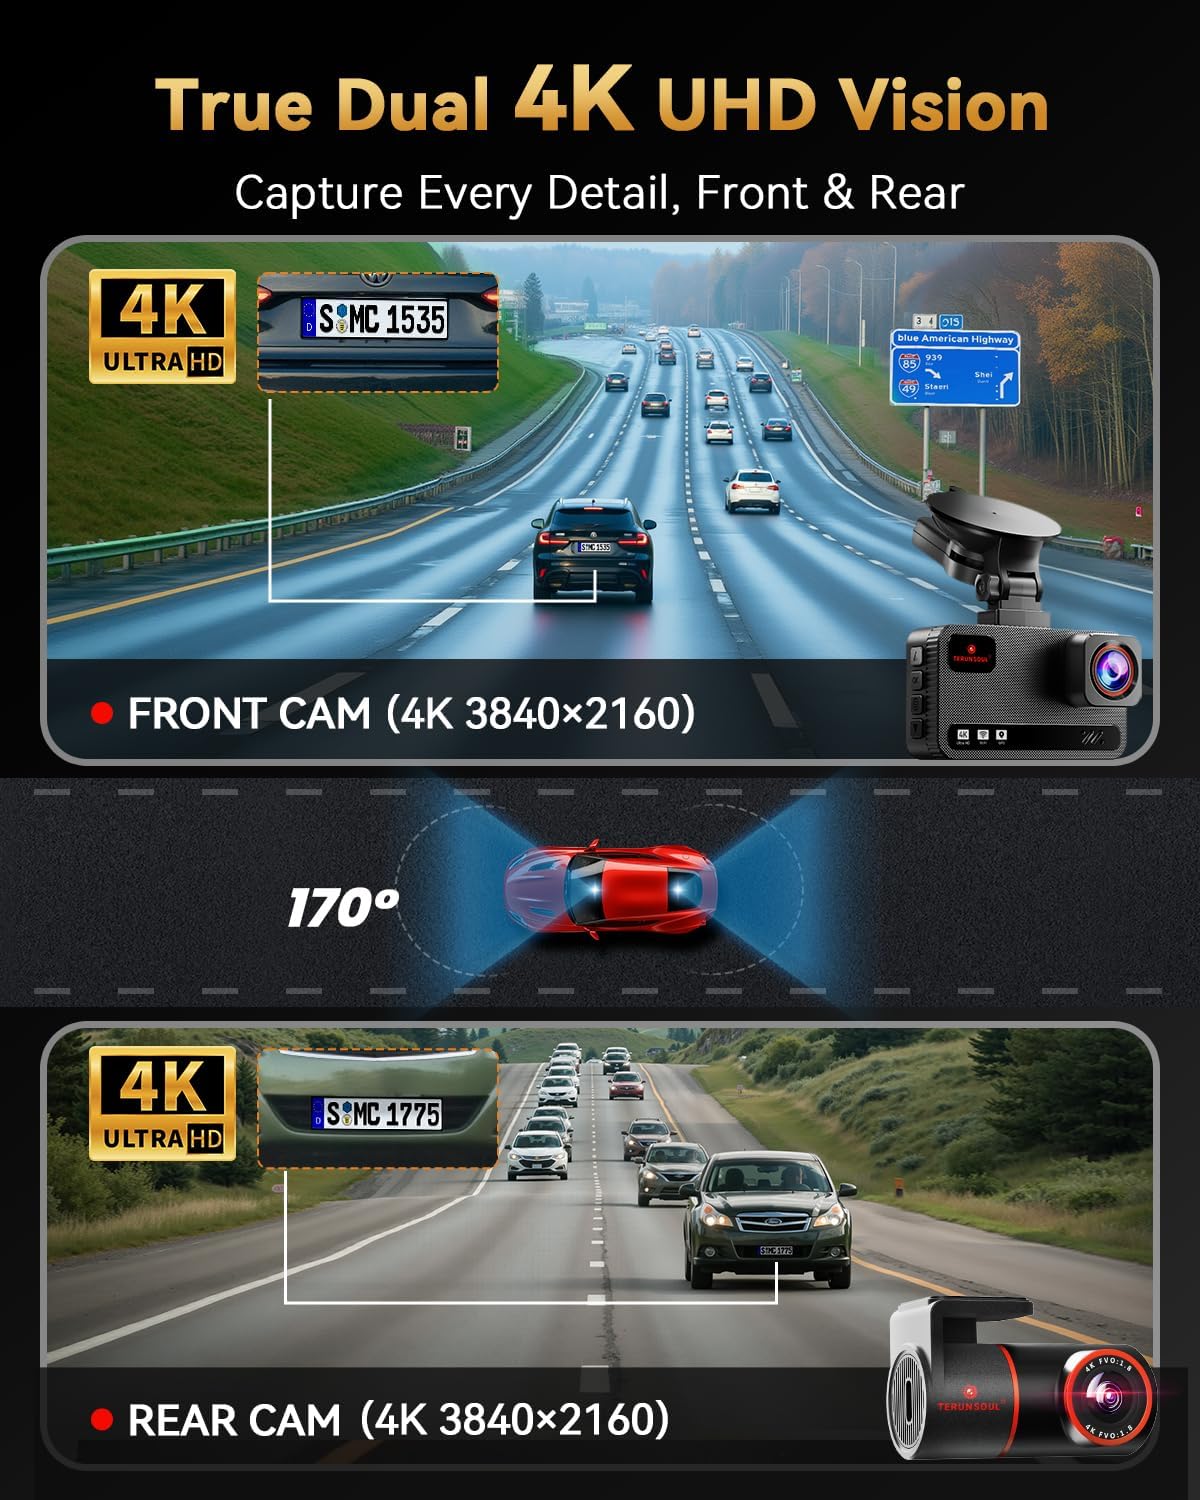
Image: The front dash cam unit mounted on a vehicle's windshield using the suction cup mount.
4.3 پیچھے کیمرہ انسٹال کرنا
- پچھلا کیمرہ عقبی ونڈشیلڈ پر لگائیں، صاف صاف کو یقینی بناتے ہوئے view.
- Connect the rear camera to the main front unit using the provided 21ft extension cable.
- Route the cable neatly along the vehicle's headliner and pillars using the cable clips and wire trim tool.

Image: A visual guide for connecting and routing the front and rear camera cables within a vehicle.
4.4 پاور کنکشن
- Connect the 11ft USB-C car charger to the main dash cam unit.
- Plug the other end of the charger into your vehicle's 12V power outlet (cigarette lighter socket).
- The dash cam will automatically power on and begin recording when the vehicle's ignition is turned on.
5. آپریٹنگ ہدایات
5.1 بنیادی کنٹرولز

Image: A detailed illustration of the dash cam's buttons and their corresponding functions.
- Menu Button (M): Press once to enter/exit menus. Press to go back to the previous screen in menu mode.
- اوپر کا بٹن (▲): Press once to move up in menus or play previous video in playback. Hold for 2 seconds to turn Wi-Fi on/off in recording mode.
- Emergency Lock Button (🔒): Press once to lock/unlock video (indicator turns yellow when locked). Hold for 1 second to take a photo.
- OK Button (OK): Press once to turn On/Off recording. Press to confirm/select in menu mode.
- پاور بٹن (⏻): Press once to turn screen off (while device is on). Hold for 2 seconds to power on/off the device.
- ڈاؤن بٹن (▼): Press once to switch front/rear camera view, split screen mode, etc. Press once to move down one line in menu. Press once to play next video in playback. Press and hold for 2 seconds to enable/disable audio recording (Recording Interface).
- File Button (☰): داخل ہونے کے لیے ایک بار دبائیں۔ file انتظام
Note: Once the dash cam is connected to the app, the physical buttons may be disabled. Configure the dash cam through the app or disconnect Wi-Fi first.
5.2 لوپ ریکارڈنگ
The dash cam records continuously in 1, 3, or 5-minute segments. When the memory card is full, the oldest unlocked video files will be automatically overwritten to make space for new recordings. Locked videos (triggered by G-Sensor or manual lock) will not be overwritten.

Image: A visual explanation of how loop recording works, ensuring continuous footage.
5.3 G-Sensor (Emergency Accident Lock)
The built-in G-Sensor detects sudden impacts or collisions. When an event is detected, the current video segment is automatically locked and saved to prevent it from being overwritten by loop recording. This ensures critical evidence is preserved.

Image: The G-Sensor feature automatically locking footage ایک تصادم کے دوران۔
5.4 24-Hour Parking Monitoring
To protect your vehicle when parked, the dash cam offers 24-hour parking monitoring with time-lapse recording and G-sensor detection. In time-lapse mode, the camera records at a low frame rate, saving storage space. If a collision is detected while parked, the G-sensor will trigger normal recording and lock the video.
Note: A separate hardwire kit (TERUNSOUl Ultimate USB Type C Hardwire Kit, ASIN: B0FNB4BPK2) is required for the 24-hour parking mode to function. This kit is not included in the standard package and must be purchased separately.
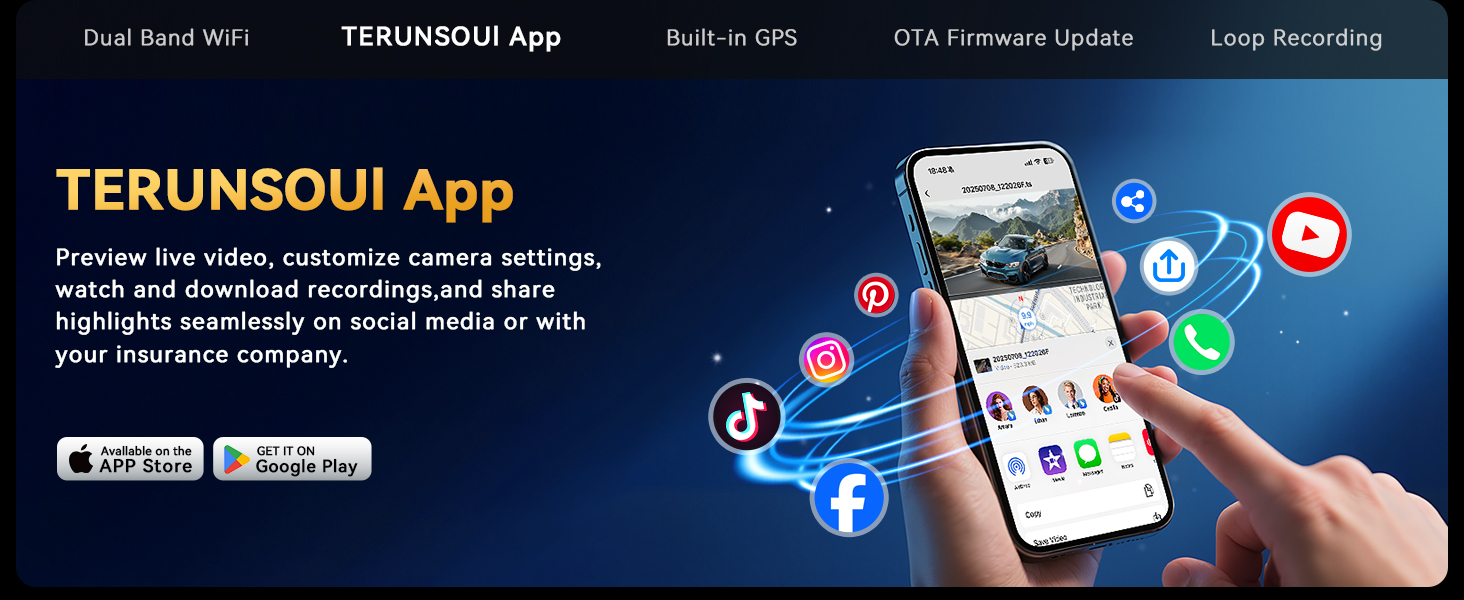
Image: The 24-hour parking monitor feature, highlighting the need for a hardwire kit.
5.5 Built-in GPS Tracking
The integrated GPS module records precise driving routes, locations, and speed data directly onto your video footage یہ معلومات ہو سکتی ہیں۔ viewed in real-time on the 3-inch IPS screen or later via the TERUNSOUl App or a dedicated GPS Player software on Windows/Mac.

Image: GPS tracking in action, displaying route and speed data on the dash cam screen and a computer application.
5.6 Super Starlight Night Vision
Equipped with enhanced WDR (Wide Dynamic Range) and Starlight CMOS Sensor technology, the dash cam delivers clear and vibrant video quality even in challenging low-light conditions. The large F1.5 (front) and F1.8 (rear) apertures allow more light to reach the sensors, improving night recording performance.

Image: The dash cam's display showing clear night vision footage of a vehicle.
5.7 TERUNSOUl App Control (5.8GHz WiFi)
The dash cam features dual-band 5.8GHz and 2.4GHz WiFi for fast and stable connection to the TERUNSOUl App (available on iOS and Android). The app allows you to:
- View live video feed from both cameras.
- Replay recorded videos and photos.
- ڈاؤن لوڈ کریں۔ files to your smartphone at high speed.
- Share recordings directly to social media or with insurance companies.
- Remotely manage camera settings.
- Perform Over-The-Air (OTA) firmware updates.

Image: The TERUNSOUl mobile application interface for managing dash cam recordings and settings.
6 دیکھ بھال
- باقاعدہ فارمیٹنگ: To maintain optimal performance and prevent data corruption, it is recommended to format the microSD card monthly. Back up any important fileفارمیٹنگ سے پہلے s۔
- صفائی: Use a soft, dry cloth to clean the camera lenses and the dash cam screen. Avoid abrasive cleaners.
- فرم ویئر اپ ڈیٹس: Regularly check for and install firmware updates via the TERUNSOUl App to ensure your dash cam has the latest features and improvements.
- درجہ حرارت: The dash cam is designed to withstand temperatures from -4°F to 158°F. Avoid prolonged exposure to extreme temperatures outside this range.
7 خرابیوں کا سراغ لگانا
| مسئلہ | ممکنہ حل |
|---|---|
| ڈیش کیم آن نہیں ہوتا ہے۔ |
|
| Recording stops or files خراب ہو گئے ہیں۔ |
|
| WiFi connection issues with the app. |
|
| GPS not tracking location/speed. |
|
| پارکنگ موڈ کام نہیں کر رہا ہے۔ |
|
8. وضاحتیں
- ماڈل: ڈی016
- ویڈیو ریزولوشن: Front 4K (3840x2160P), Rear 4K (3840x2160P)
- Front Camera Angle: 170° چوڑا زاویہ
- ڈسپلے: 3 انچ آئی پی ایس اسکرین
- وائی فائی: ڈوئل بینڈ 5.8GHz اور 2.4GHz
- GPS: Built-in for route, location, and speed tracking
- جی سینسر: خودکار واقعہ کا پتہ لگانا
- نائٹ ویژن: Super Starlight Night Vision with F1.5 (Front) / F1.8 (Rear) Aperture, WDR
- پارکنگ موڈ: 24-Hour Time-Lapse + G-Sensor (requires optional hardwire kit)
- ذخیرہ: Supports up to 512GB microSD card (128GB included)
- لوپ ریکارڈنگ: Yes (1/3/5 min segments)
- آپریٹنگ درجہ حرارت: -4 ° F سے 158 ° F (-20 ° C سے 70 ° C)
- طول و عرض: 1.46 x 3.4 x 1.97 inches (main unit)
- وزن: 1.79 پاؤنڈ
9. وارنٹی اور سپورٹ
TERUNSOUl provides an 18 ماہ کی وارنٹی for the D016 Dash Cam. If you encounter any issues or have questions regarding your product, please contact our 24/7 کسٹمر سپورٹ team. Our dedicated after-sales team is ready to assist you.
For support, please refer to the contact information provided in your Quick Start Guide or visit the official TERUNSOUl webسائٹ


